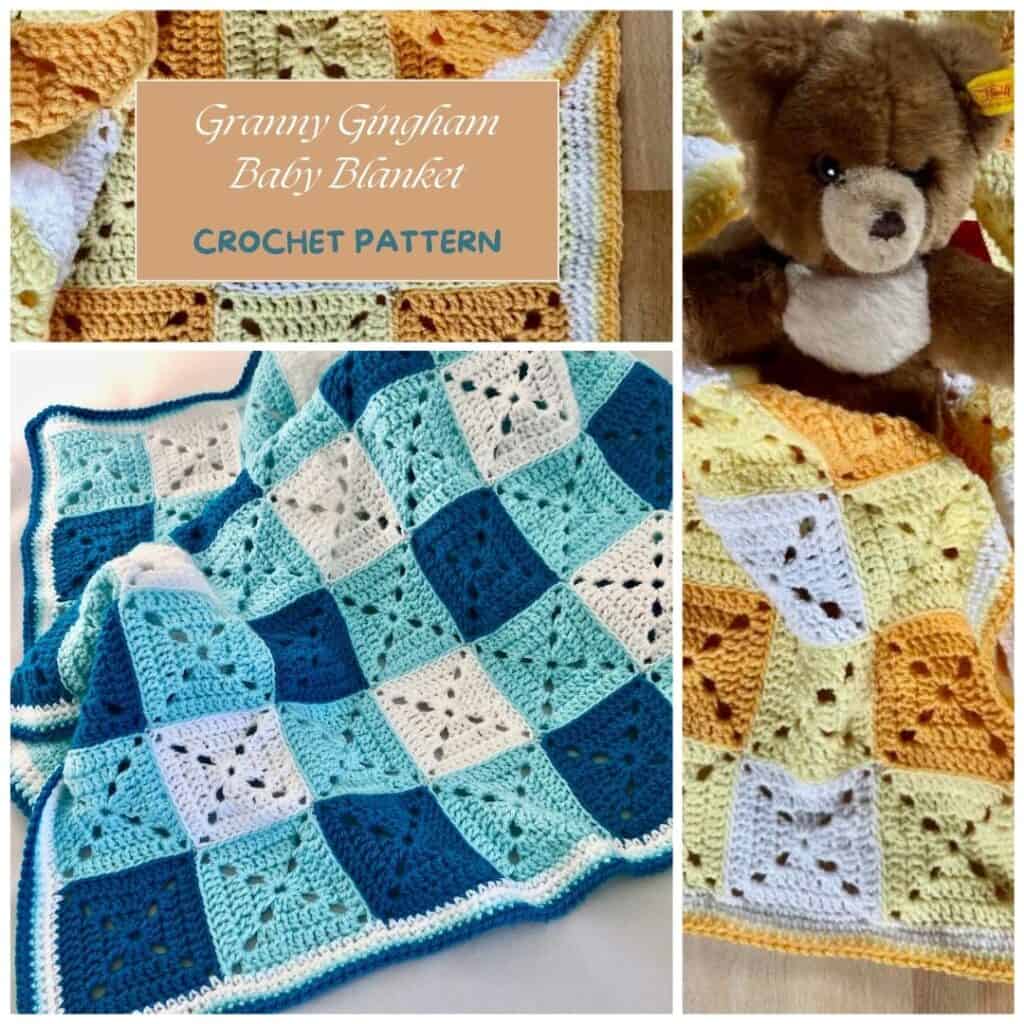
A granny gingham baby blanket brings vintage vibes to the nursery
Add a vintage look to baby’s nursery with the Granny Gingham Baby Blanket. It blends the classic look of gingham with a solid granny square for cozy character.
The Granny Gingham Baby Blanket
Whether you know it or not, you’ve surely seen checked gingham somewhere. Think Dorothy’s dress in The Wizard of Oz or that iconic red and white tablecloth you use for a picnic in the park.
Checked gingham takes me all the way back to my childhood. I’m sure my mom dressed me in gingham at some point! Every little girl was decked out in a gingham dress.
I designed this gingham baby blanket for a special friend when she had her first child. I was thrilled to give it to her before she moved away (insert sobbing sounds) – the look on her face was priceless. There is almost nothing better than a handmade gift when you’re having a baby.
Bring back the tradition of handmade to your next baby shower with this gingham baby blanket. It’s a special gift that’s as much fun to make as it is to gift.
Design + Construction
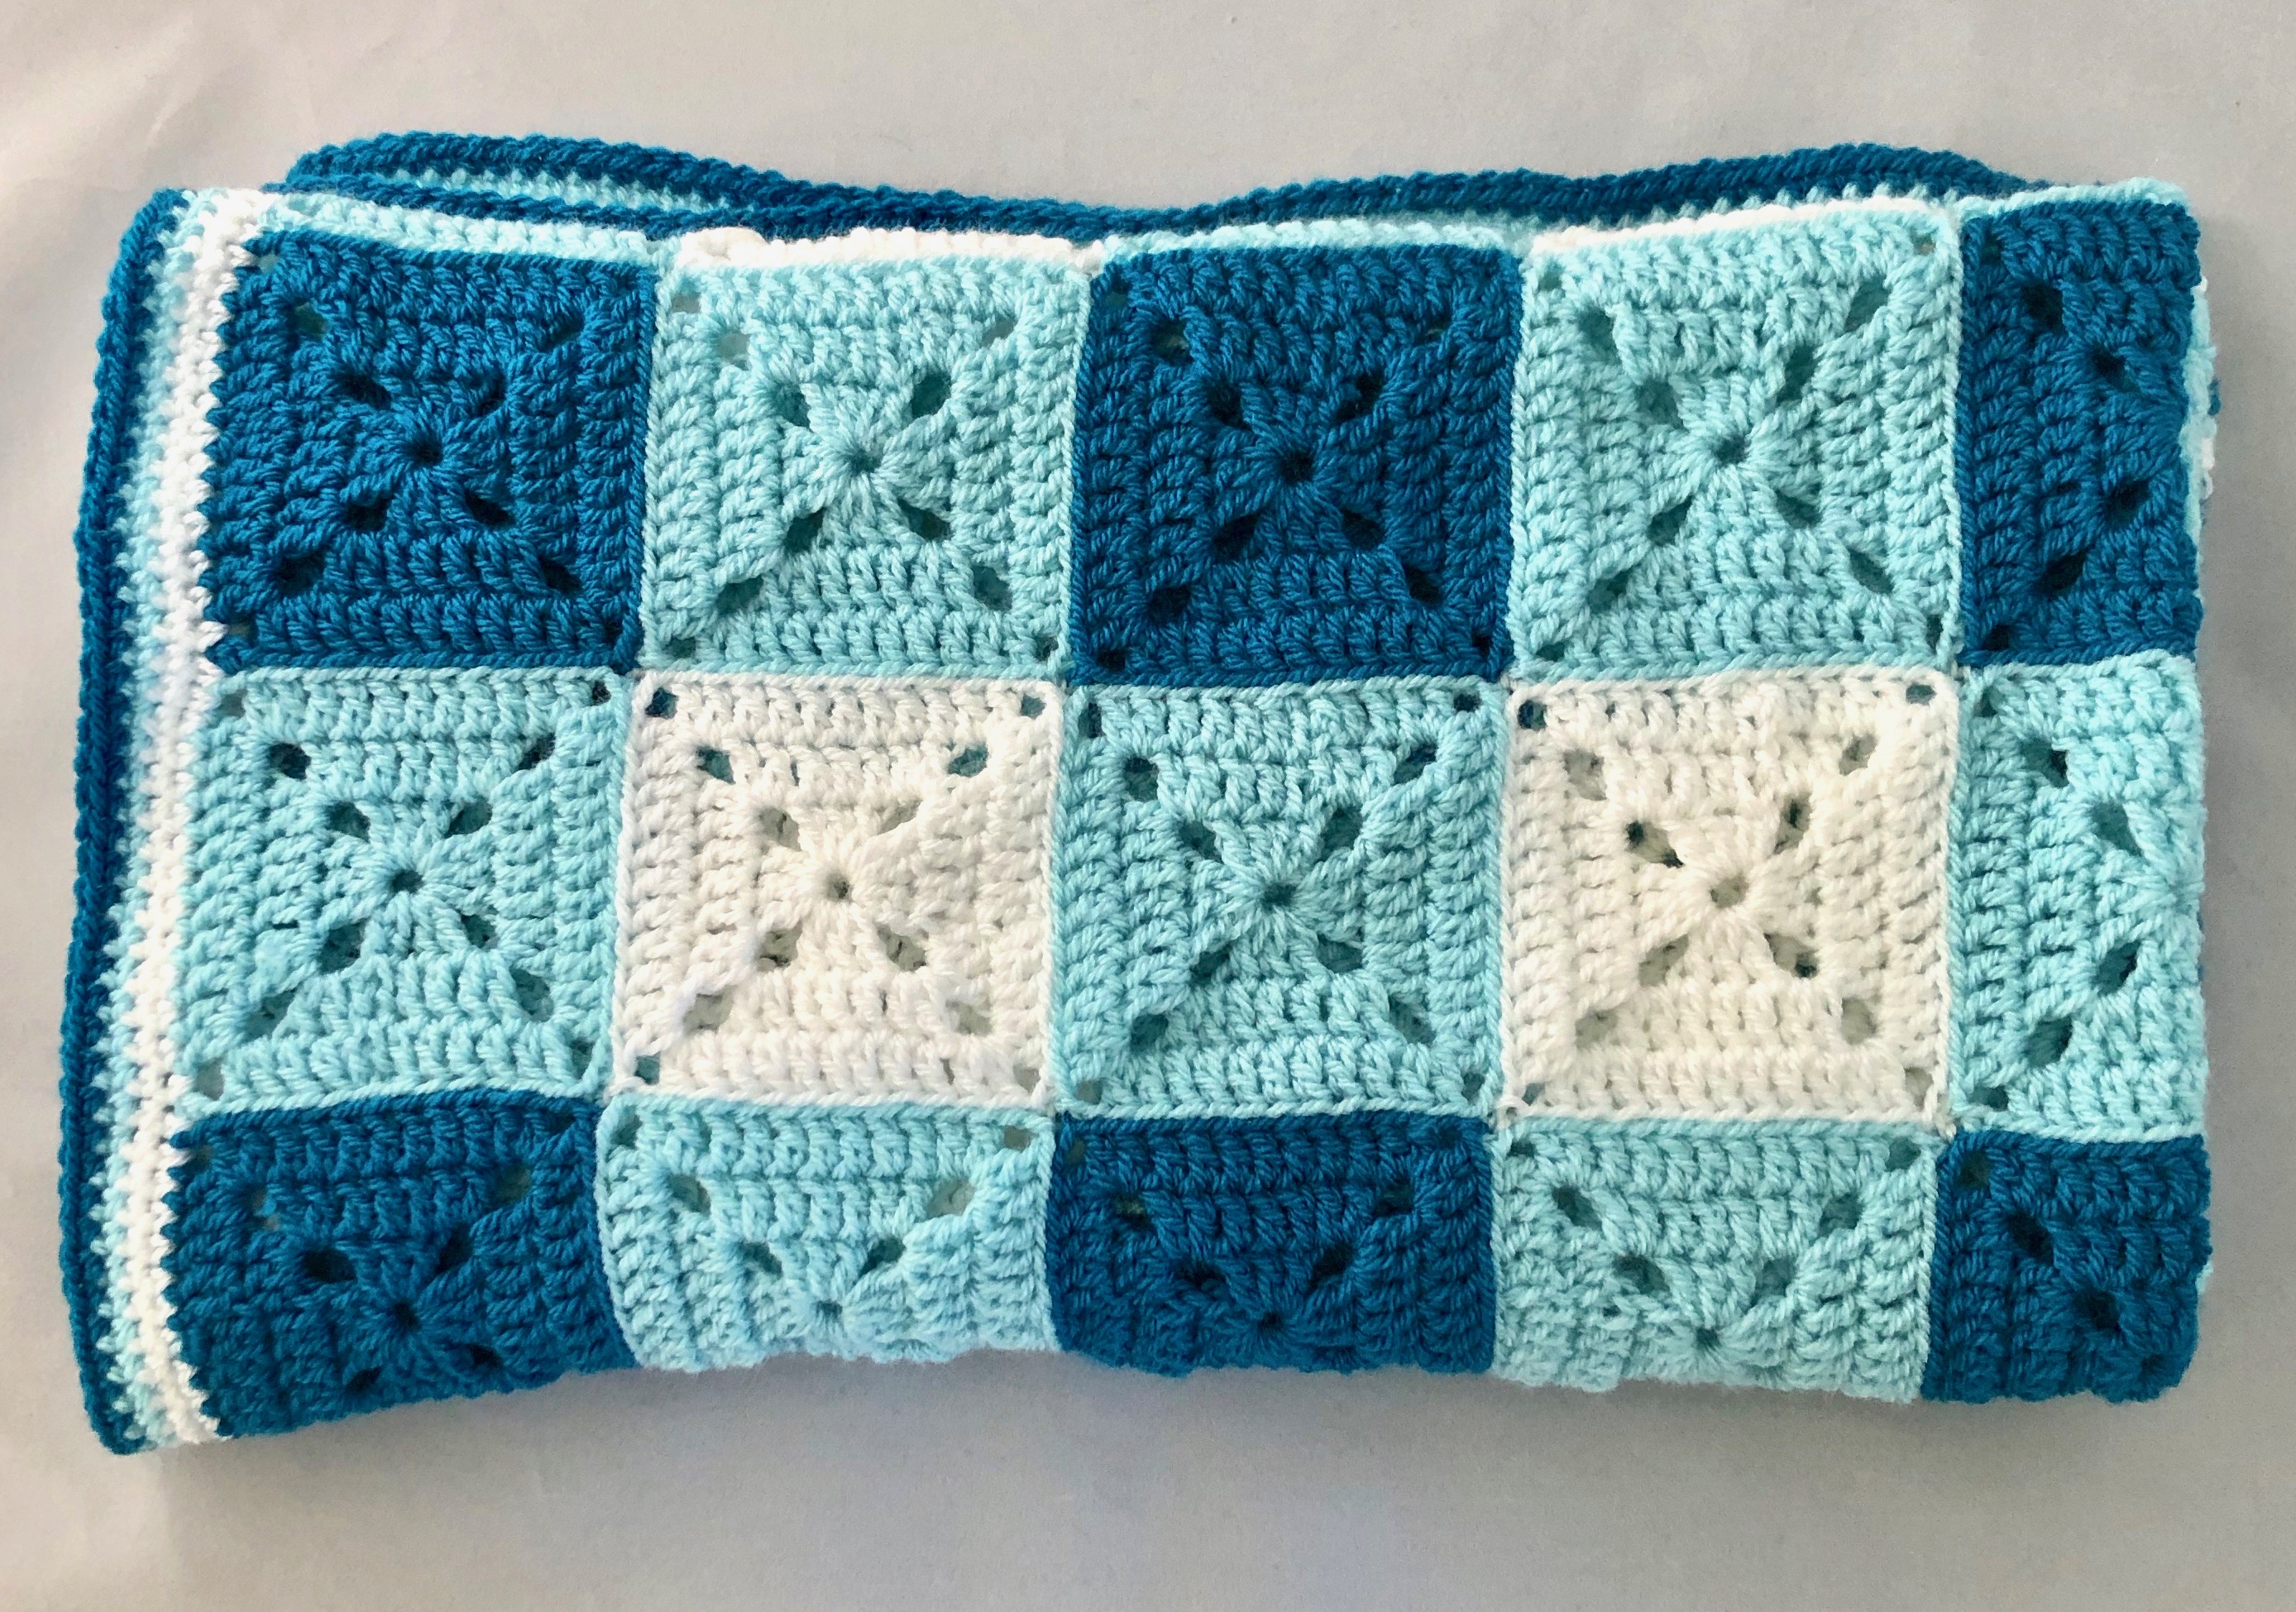
The main feature of this gingham baby blanket is the 3-round solid granny square crocheted in 3 related colors (dark and medium of the same color plus white). The 3-color combination, along with the way the grannies are laid out and joined, mimics a classic gingham pattern.
The 3-round grannies are quick and easy, making them the perfect portable project any time of year. Don’t be anxious about the number of grannies – 90 in total. I promise they make up quickly. You’ll have all of them done before you know it!
I used an invisible mattress seam for the gingham baby blanket because I wanted a seamless look for the gingham pattern. You can choose another method of seaming for this gingham baby blanket, but I encourage you to choose one that completely hides the seam on the right side of the blanket.
A simple single crochet border, in keeping with the simple, classic style of the gingham, finishes the gingham baby blanket. You can choose any colors you like for the border or add more rounds if you want something a little bigger.
The Yarn
For the Granny Gingham baby blanket, I used Stylecraft “Special DK” . There is so much to love about this acrylic yarn:
- It gives the blanket a cozy warmth, beautiful drape and high snuggle factor.
- The yarn is easy to care for (a must for baby’s nursery) and durable through heavy use.
- You won’t have any trouble finding the perfect colors. With over 100 colors, you can easily personalize your gingham baby blanket to match the nursery décor where the blanket will find its home.
The original gingham baby blanket is worked in Empire, Sherbet and White. The updated version is worked in Saffron, Lemon and White.
The price point is perfect for the budget conscious among us and the generous yardage means your skein goes a long way.
I purchase mine from The Wool Warehouse based in the UK. The yarn is always in stock and shipping is fast and affordable.
Yarn Substitute
While Stylecraft “Special DK” is my favorite choice, there are a few other DK weight yarns I really love.
Paintbox Yarns “Baby DK” 55% acrylic, 45% nylon (1.75oz/183yd; 50g/167m)
Paintbox Yarns “Simply DK” 100% acrylic (3.53oz/302yd; 100g/276m)
WeCrochet “Brava Sport” 100% premium acrylic (340yd/100g)


Where to get the PDF for the Granny Gingham Baby Blanket
The Granny Gingham Baby Blanket is a free crochet granny square pattern in this blog post for blog subscribers. Scroll down to view the free version.
Upgrade to the premium PDF and you’ll get a printer friendly, downloadable version available from one of my shops.
The premium PDF can be uploaded to your favorite mobile device so you can take your gingham baby blanket project with you to work on whenever you’re out and about.
The PDF is easy to read and beautifully formatted without ads for a great experience. It includes a handy crochet chart of the granny square.
Get your copy today!


This pattern was originally written and published in 2019. It has been given a complete refresh in 2025 with new photos, updated written instructions and charts.
The Granny Gingham Baby Blanket Free Pattern
General Information
Yarn
Stylecraft “Special DK” 100% acrylic (322 yds/3.5 oz; 295m/100g)
Version 1:
- Color A: #1829 Empire – 2 skeins
- Color B: #1034 Sherbet – 3 skeins
- Color C: #1001 White – 2 skeins
Version 2:
- Color A: (1081) Saffron – 2 skeins
- Color B: (1020) Lemon – 3 skeins
- Color C: #1001 White – 2 skeins
Hook
US size H-8 (5mm)
Finished Size
Approx. 33” x 30” (without edging)
Gauge
Each square measures 3.25″ across
Skill Level: Advanced beginner/Intermediate
Abbreviations – US crochet terminology
- beg – beginning
- ch – chain
- dc – double crochet
- rep – repeat
- rnd – round
- sc – single crochet
- sp – space
- st(s) – stitch(es)
- YO – yarn over
Repeats
- (…) – Work everything within the parentheses in the same st or sp.
- […] – Repeat everything within the brackets the indicated number of times.
Special Stitches
Granny stitch (GS) – 3 dc in the same st or sp
Stacked single crochet (STsc) – (This stitch is used at the beginning of a round to replace the traditional turning ch-3. It has the appearance of a dc.) – Insert hook in the same st as the loop, YO, pull up a loop, YO, pull through 2 loops (bottom sc made), insert hook through the left vertical bar of the bottom sc, YO, pull up a loop, YO, pull through 2 loops (top sc made).
Video Tutorial
Pattern Notes
- A ch-1 at the beg of a rnd does not count as a st.
- A ch-2 or ch-3 may be substituted for the STsc at any time without altering the construction.
- Do not turn after any rnd.
Unlock Exclusive Subscriber Content
To unlock Exclusive Subscriber Content, click on the button in the box below. The Grow.me app window will pop up where you can either create an account or sign in if you already have one.
To create an account, sign in with your existing Google or Facebook account. You can also create an account with an email address and new password.
If you forget your password, simply click the “Forgot my Password”button. I have no access to your Grow account so I’m unable to retrieve or reset your password.
Remember, once you’ve created a Grow account, you never have to do it again. Your Grow account unlocks all the exclusive content created by Grow
Thank you for being a loyal blog subscriber. I hope you enjoy the exclusive content!
Pattern Instructions
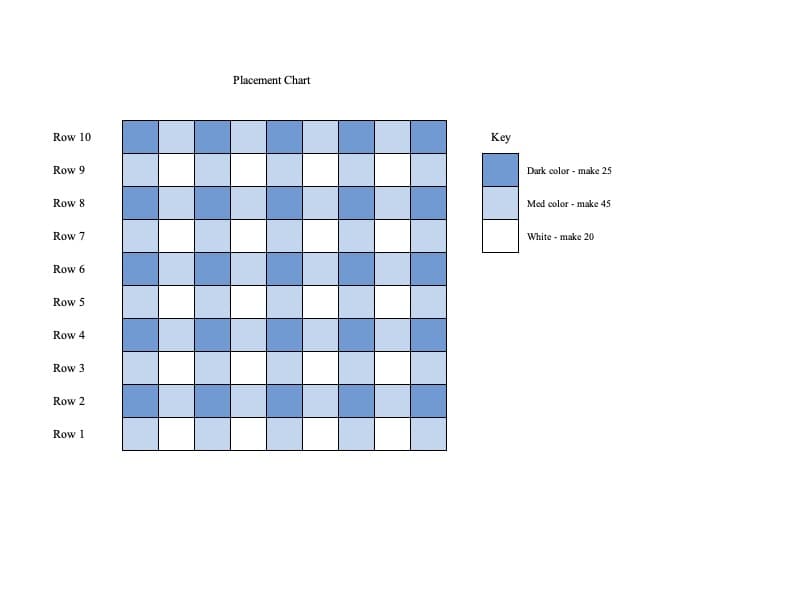
Granny square – Make 25 of Color A (Dark color), 45 of Color B (Medium color) and 20 of Color C (White) = 90 total.
Ch 4, join with slip st to form ring.
Rnd 1: (STsc, 2 dc) in the ring (counts as the 1st GS), ch 3, [GS in the ring, ch 3] 3 times, join with slip st to beg st. < 4 GS, 4 ch-3 corner sp >
Rnd 2: STsc, dc in the next 2 sts, (2 dc, ch 3, 2 dc) in the ch-3 corner sp, [dc in the next 3 sts, (2 dc, ch 3, 2 dc) in the next ch-3 corner sp] 3 times, join with slip st to top of beg st. < 28 dc, 4 ch-3 corner sp >
Rnd 3: STsc, dc in the next 4 sts, (2 dc, ch 3, 2 dc) in the ch-3 corner sp, [dc in the next 7 sts, (2 dc, ch 3, 2 dc) in the next ch-3 corner sp] 3 times, dc in next 2 sts, join with slip st to beg st. < 44 dc, 4 ch-3 corner sp >
Fasten off and weave in ends.
Assembly
Sew squares together using a mattress seam, following the placement chart below. Visit the tutorial at timestamp 8’20” where I show you how to sew a mattress seam.
Note: You may use any seaming method you prefer. If you do, choose one that hides the seam on the right side of the blanket in order to preserve the look of a traditional gingham pattern.
Border
Note: Place a marker in the middle sc of each corner. That’s where you’ll work the 3 sc in each subsequent rnd. Move the marker up to the middle sc of the next rnd.
Rnd 1: Attach Color C along any edge, ch 1, sc in the same st and in each st, ch-1 sp (on either side of each seam) and in each seam across to the ch-3 corner sp, [3 sc in the ch-3 corner sp, sc in the next st and in each st, ch-1 sp (on either side of each seam) and in each seam across to the next ch-3 corner sp] 3 times, 3 sc in the ch-3 corner sp, sc in the next st and in each st, ch-1 sp (on either side of each seam) and in each seam across to the beg st, join with slip st to beg sc.
Rnd 2: Ch 1, sc in the same st and in each st across to middle sc of the corner, [3 sc in the middle sc (this becomes the corner), sc in the next st and in each st across to the middle sc of the next corner] 3 times, 3 sc in the middle sc, sc in the next st and in each st across to the beg st, join with slip st to beg st.
Rnd 3: With Color B, rep Rnd 2.
Rnd 4: With Color A, rep Rnd 2.
To make the Border wider, rep Rnd 4 to desired width.
Fasten off and weave in ends.
You may want to block your finished blanket to even out the seams and give the squares a polished look.
I have a grow account that I have open, but I still cannot unlock the pattern.
I’m not sure what I did, but I got the pattern unlocked!
Excellent!