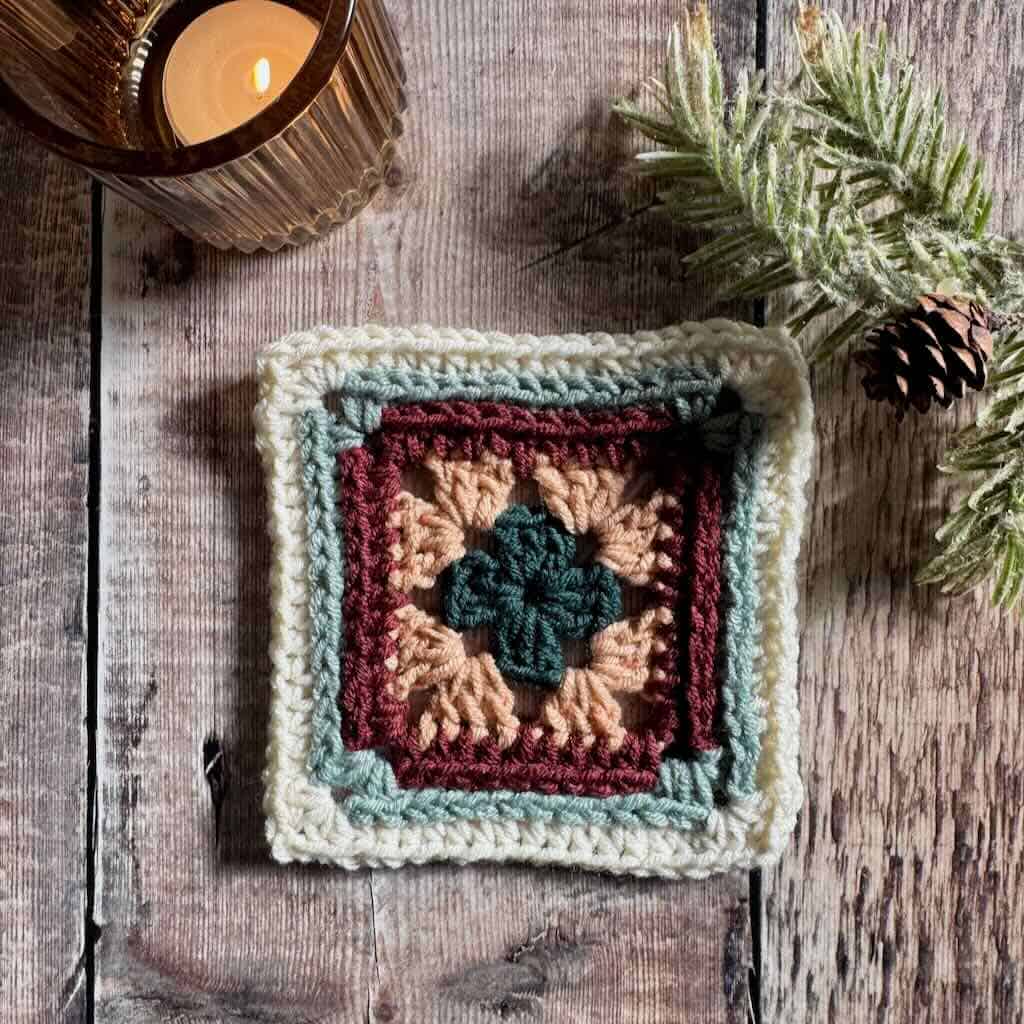
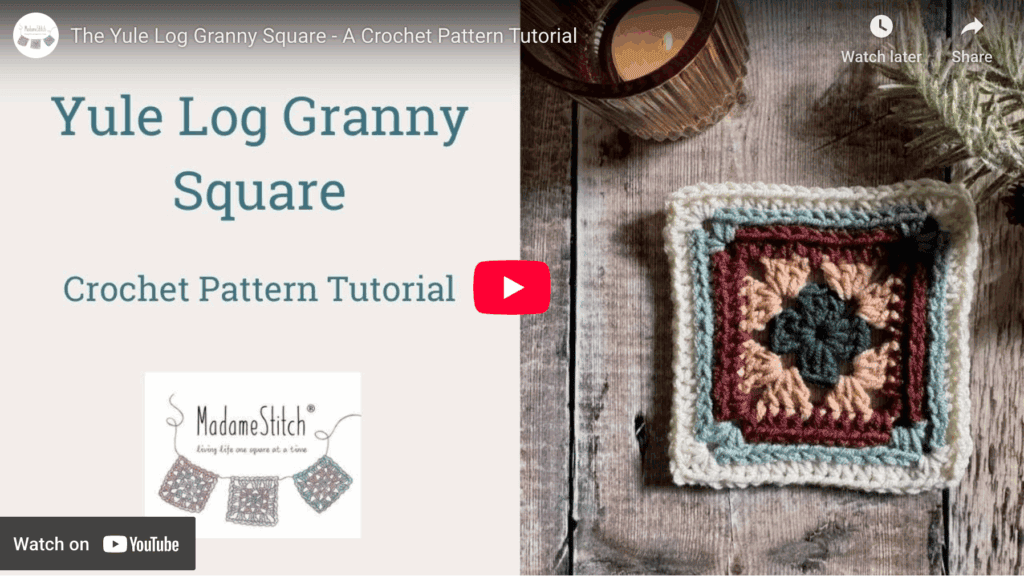
A festive granny square reminiscent of a Christmas Yule log
Cozy and calming, the Yule Log Granny Square adds wood-inspired texture and warm, old-world charm to your handmade holiday projects.
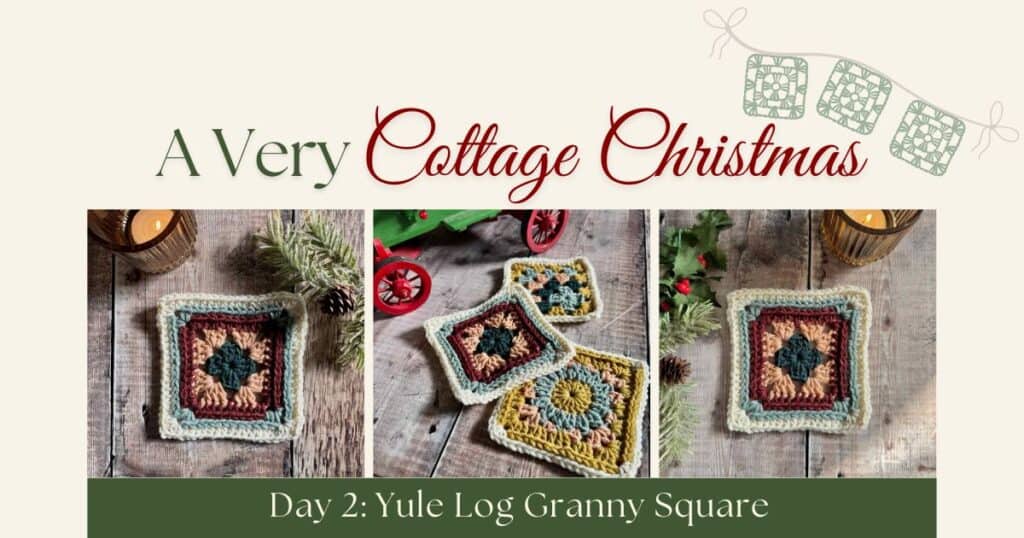
The Yule Log Granny Square
The Yule Log Granny Square is inspired by the slow, glowing burn of a traditional holiday yule log—steady, comforting, and quietly full of warmth.
Designed to be simple and soothing, this granny square invites you to settle in and enjoy the rhythm of your stitches. It’s an elegant addition to any seasonal project, adding a hint of old-world charm and the peaceful spirit of winter nights.
Worked in subtle textures and comforting seasonal colors, this square brings a touch of handmade holiday magic to any project, especially A Very Cottage Christmas garland for which it was designed.
Design + Construction
The Yule Log Granny Square begins with a classic granny square center, then gently expands into textured stitches worked in the 3rd loop that echo the warm, wood-grained charm of a festive yule log.
Besides the granny stitch center, this granny square includes one of my favorite techniques – working in the 3rd loop. The single and half double crochets of the later rounds create a subtle texture without the effort of added surface stitching.
Each round invites you to imagine the soft glow of holiday lights, the scent of evergreens, and the quiet crackle of a cozy winter hearth.
You’ll find the Yule Log Granny Square to be a beginner-friendly project, one that works up quickly, perfect for that quiet mindful crochet moment.
Whether you join several for a blanket or feature one as a special accent, the Yule Log Granny Square offers a warm, nostalgic nod to cherished traditions.
The Yarn
Any worsted weight yarn will work (see what I used in the pattern below 👇. You’ll need small amounts of 5 different colors. The granny square can be worked in one color, but a big part of its charm comes from the combination of colors.
For a budget-friendly option, shop your yarn collection and use up some of those valuable leftovers.
Create your own color scheme with what you already have or splurge on new yarn in a specially curated color scheme.
A Very Cottage Christmas Crochet Along
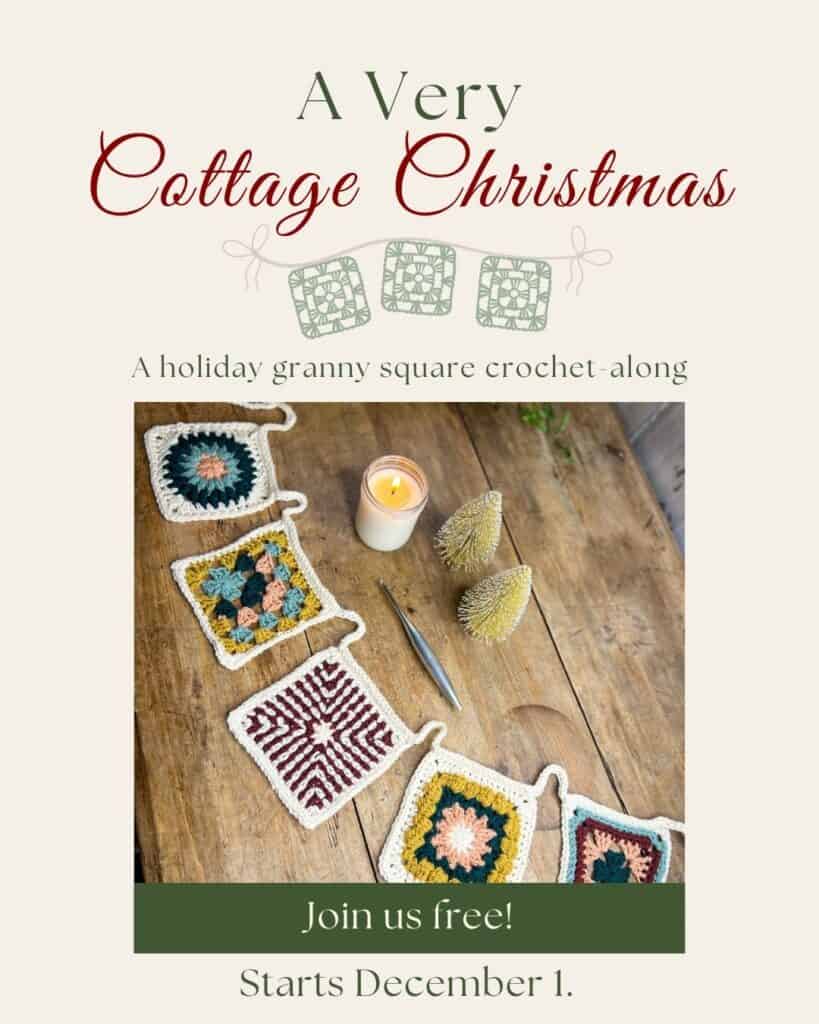
A Very Cottage Christmas was created as a gentle pause—an invitation to breathe deeply and find a moment of calm in the midst of holiday chaos. When the season feels overwhelming, you can slip into the mindfulness of stitching beautiful granny squares, giving yourself space to regroup, recharge, and reconnect with the joy of making.
We wanted something simple, festive, and heartwarming to celebrate the season—something that would bring handmade charm into your home without adding stress, pressure, or extra expense. From that desire for ease and comfort, A Very Cottage Christmas was born.
An eBook Loaded With Extras
The Yule Log Granny Square is one of 6 patterns featured in the blog-style crochet along. To find out more about the event and make your garland at no cost, visit the event post HERE.

The pattern for the Yule Log Granny Square is included in the jam-packed A Very Cottage Christmas eBook. It’s a must-have for your crochet library with so many features for a festive holiday season.
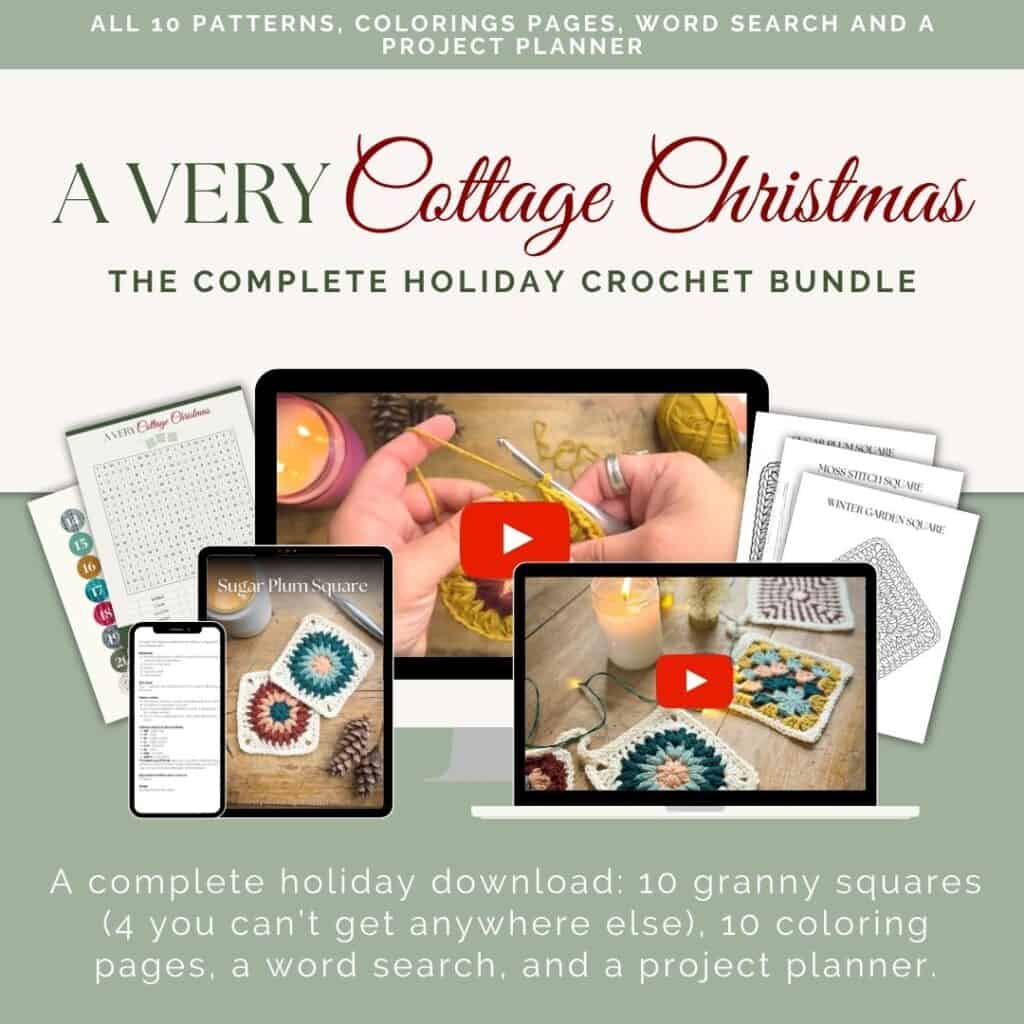
You won’t want to miss getting your very own copy. It includes 4 bonus squares (not available anywhere else), a project planner (make notes about your journey), coloring pages (plan your colors) and a fun Word Search puzzle (Why not?!).
The crochet along price of $14.99 is good until Dec. 15th so don’t delay!

Where to get the PDF for the Yule Log Granny Square
The Yule Log Granny Square is a free crochet granny square pattern in this blog post. Scroll down to view the free version.
Upgrade to a printer friendly, downloadable version and you’ll be able to take your project with you to work on whenever you’re out and about.
The PDF is easy to read and beautifully formatted without ads for a great experience.
Get your copy today! Available only in my Ravelry shop.

The Yule Log Granny Square Free Pattern
General Information
Yarn
Lion Brand “Color Theory” 100% acrylic worsted weight (3.5oz/246yd; 100g/225m)
Small amounts of 5 colors:
- 1st color – Peacock
- 2nd color – Himalayan Salt
- 3rd color – Beaujolais
- 4th color – Tourmaline
- 5th color – Ivory
Any worsted weight yarn will work – shop your collection!
Hook
US size H-8 (5mm)
Finished Size
Approx. 5″ across
Gauge
Not important for this square
Skill Level: Advanced Beginner
Abbreviations – US crochet terminology
- beg – beginning
- ch – chain
- dc – double crochet
- hdc – half double crochet
- MR – magic ring
- rep – repeat
- rnd – round
- sc – single crochet
- sk – skip
- sp – space
- st – stitch
- YO – yarn over
Repeats
- (…) – Work everything within the parentheses in the same st or sp
- […] – Repeat everything within the brackets the indicated number of times
Special Stitches
Chain-1 space (ch-1 sp) – The number denotes the number of chains made
Granny stitch (GS) – 3 dc in the same st or sp
Half double crochet in the 3rd loop (hdc 3lp) – when working on the front side of the stitches from the rnd before – YO, insert hook through the 3rd loop that sits just under and behind the top loop of the stitch, YO, pull through the 3rd loop, YO, pull through all 3 loops on the hook to complete the hdc.
Single crochet in the 3rd loop (sc 3lp) – Insert hook through the 3rd loop that sits just under and behind the top loop of the stitch, YO, pull through the 3rd loop, YO, pull through the 2 loops on the hook to complete the sc.
Note: A standing stitch replaces attaching the yarn and working a series of chains to begin a round. All standing sts begin with a slip knot held firmly against the hook to avoid slipping, then the st is worked as it normally would be.
Standing double crochet (Standing dc) – Make a slip knot, hold the slip knot firmly against the hook with the forefinger of the same hand, YO, insert hook in the indicated st, YO, pull up a loop, [YO, pull through 2 loops] twice.
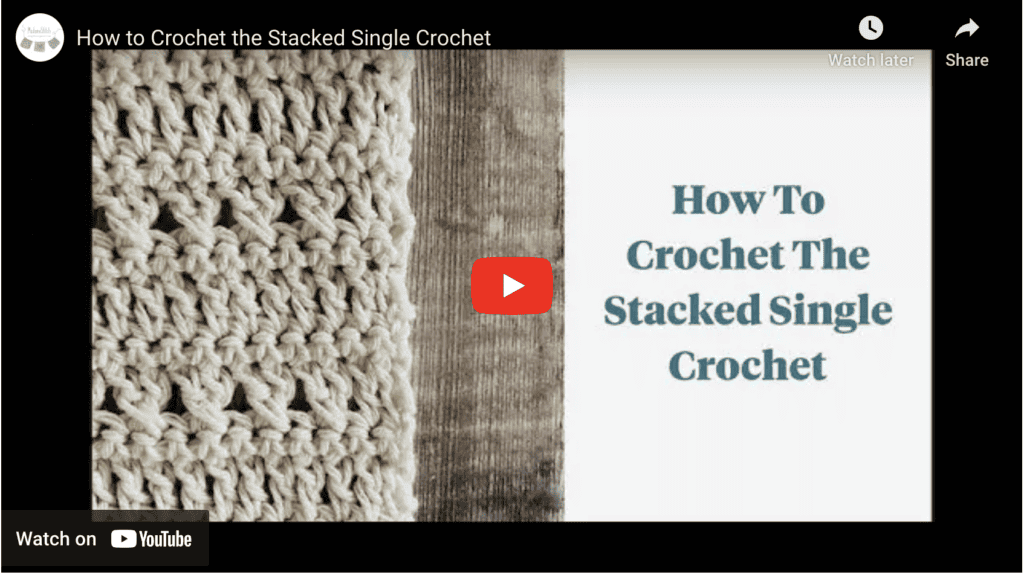
Stacked single crochet (STsc) – (This stitch is used at the beginning of a round to replace the traditional turning ch-3. It has the appearance of a dc.) – Insert hook in the same st as the loop, YO, pull up a loop, YO, pull through 2 loops (bottom sc made), insert hook through the left vertical bar of the bottom sc, YO, pull up a loop, YO, pull through 2 loops (top sc made).
Pattern Notes
- Do not turn after any rnd. The right side is always facing you.
- A “ch 1” at the beg of a rnd does not count as a st.
- A “ch 3” may be substituted for the STsc and Standing dc at any time.
Video Tutorial
In this video on YouTube, I show you all the steps to crochet your very own Yule Log Granny Square.
Pattern Instructions
With the 1st color, ch 4, join with slip st to form ring OR use a MR, closing the ring after Rnd 1.
Rnd 1: (STsc, 2 dc) in the ring (counts as the 1st GS), ch 3, [GS in the ring, ch 3] 3 times, join with slip st to beg st, fasten off. < 4 GS, 4 ch-3 corner sp >
Rnd 2: With the 2nd color, (Standing dc, 2 dc, ch 3, GS) in any ch-3 corner sp, ch 1, [(GS, ch 3, GS) in the next ch-3 corner sp, ch 1] 3 times, join with slip st to beg st, fasten off. < 8 GS, 4 ch-1 sp, 4 ch-3 corner sp >
Rnd 3: Attach the 3rd color to any ch-3 corner sp, ch 1, (2 hdc, ch 2, 2 hdc) in the same ch-3 corner sp, hdc in the nest st and in each st and ch-1 sp across to next ch-3 corner sp, [(2 hdc, ch 2, 2 hdc) in the ch-3 corner sp, hdc in the next st and in each st and ch-1 sp across to the next ch-3 corner sp] 3 times, join with slip st to beg st, fasten off. < 44 hdc, 4 ch-2 corner sp >
Note: The stitch immediately following a corner space is often hidden under the stitches just worked. Be sure to work the 1st stitch after the corner in this hidden stitch.
Rnd 4: Attach the 4th color to any ch-2 corner sp, ch 1, (2 hdc, ch 2, 2 hdc) in the same ch-2 corner sp, hdc 3lp in the next st and in each st across to the next ch-2 corner sp, [(2 hdc, ch 2, 2 hdc) in the ch-2 corner sp, hdc 3lp in the next st and in each st across to next ch-2 corner sp] 3 times, join with slip st to beg st, fasten off. < 16 hdc, 44 hdc 3lp, 4 ch-2 corner sp >
Rnd 5: Attach 5th color to any ch-2 corner sp, ch 1, (2 sc, ch 2, 2 sc) in the same ch-2 corner sp, sc 3lp in the next st and in each st across to the next ch-2 corner sp, [(2 sc, ch 2, 2 sc) in the ch-2 corner sp, sc 3lp in the next st and in each st across to next ch-2 corner sp] 3 times, join with slip st to beg st. < 16 sc, 60 sc 3lp, 4 ch-2 corner sp >
Weave in ends and block if necessary.