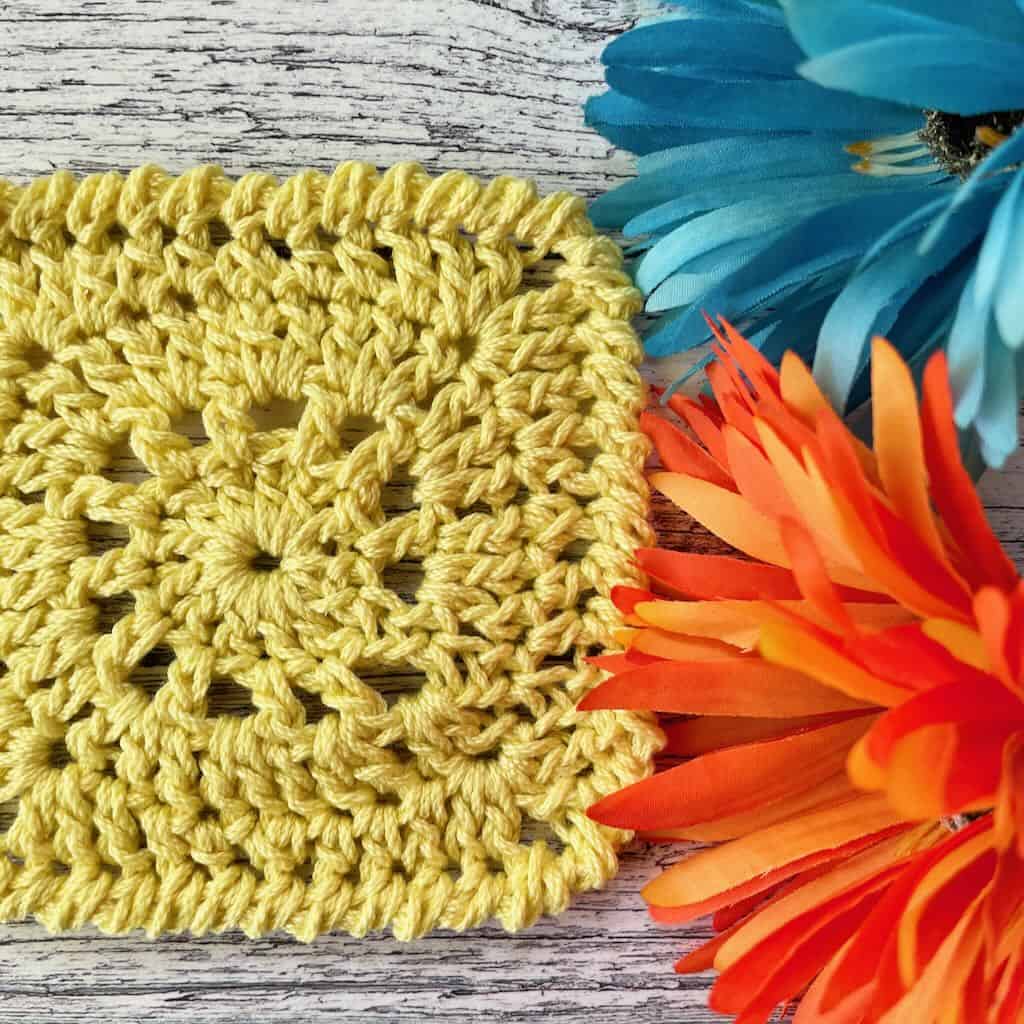
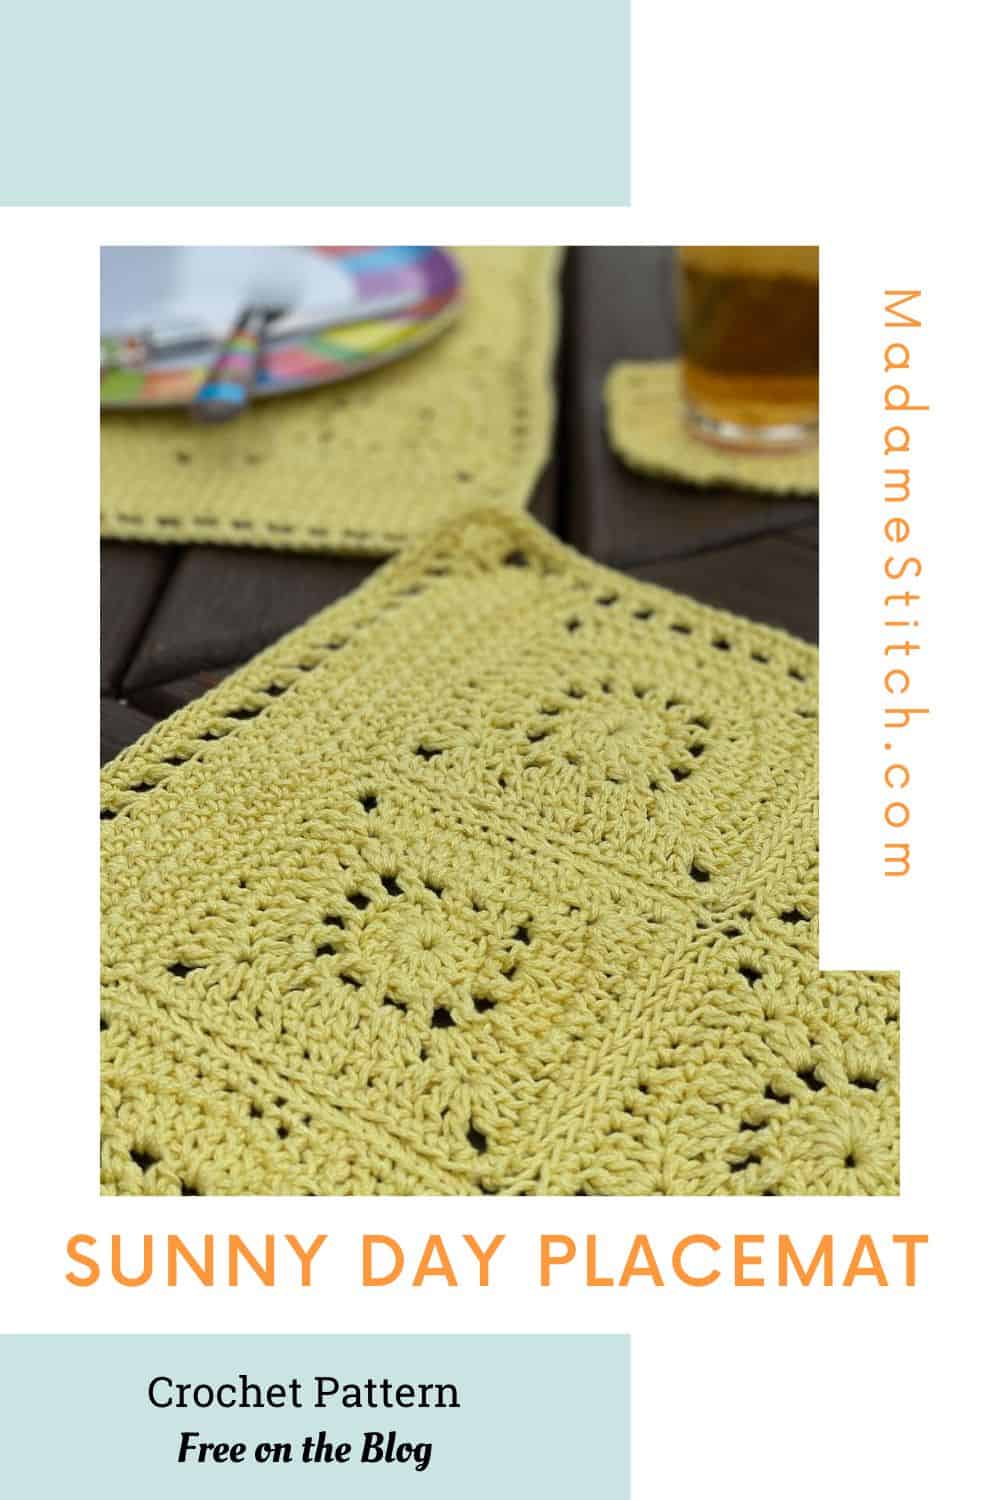
A sunny crochet placemat to brighten your outdoor table
Make the perfect crochet placemat for your outdoor dining! Protect your table from spills and add a touch of style at the same time with the bright Sunny Day Crochet Placemat. It’s a free pattern on the blog.

The Sunny Day Crochet Placemat
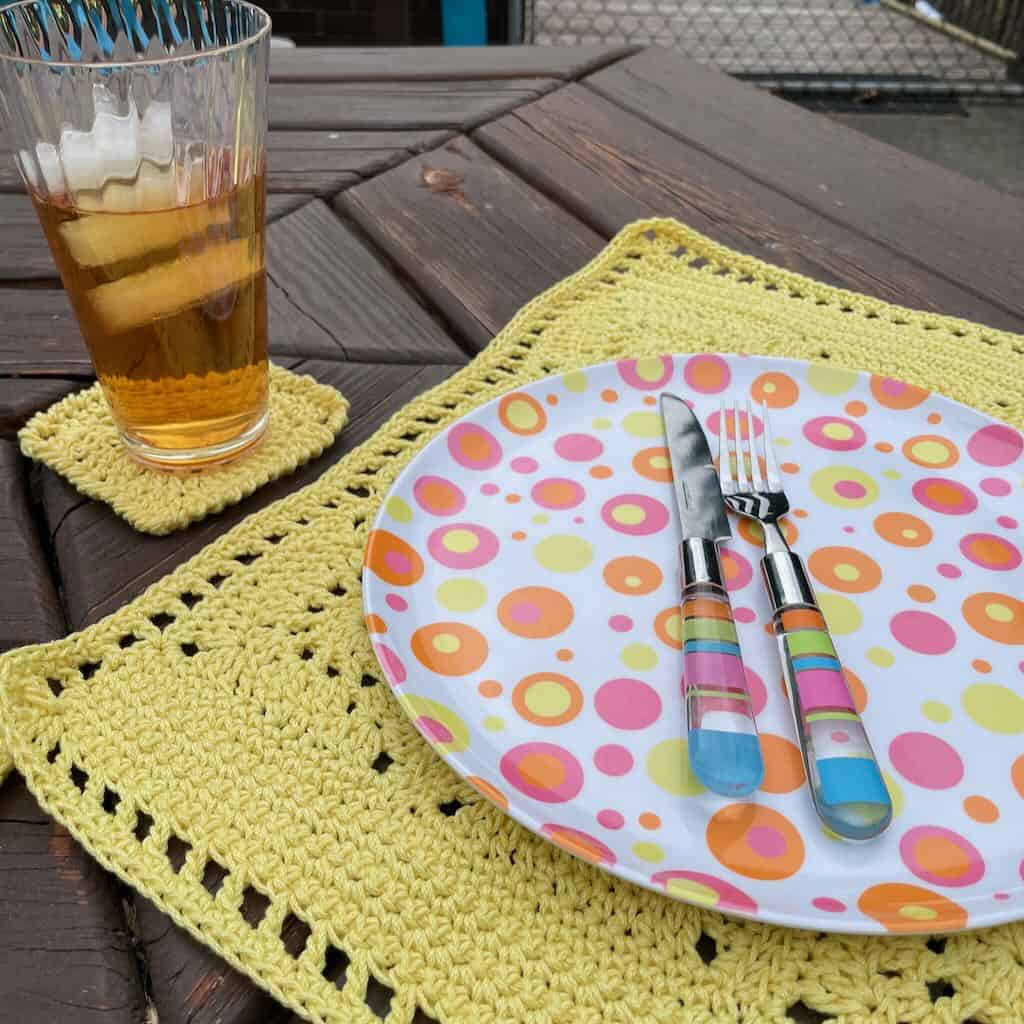
Just like lots of people we know, we use the picnic table on our deck for some of our warm weather meals. Once we added an umbrella to the middle of our table, we could no longer use a tablecloth. So, placemats have replaced our outdoor tablecloth. In fact, a set of crochet placemats, combined with my colorful melamine plates, has brought so much fun style to our picnic table.
A crochet placemat just seems to dress up that outdoor patio space and makes a meal on the back porch a little more special. This rectangular crochet placemat is wide enough for a dinner plate with room for the flatware. You can create a picture perfect table setting for an informal meal or a more formal night of entertaining outdoors.
What’s so great about a crochet placemat?
A crochet placemat is a versatile alternative to a tablecloth. While a tablecloth has to be the correct size to cover the tabletop, placemats can be arranged in any configuration you like.
A crochet placemat is also an eco-friendly option. It can be reused countless times, reducing the need for disposable alternatives and contributing to sustainability, reducing waste. When made with cotton yarn, a crochet placemat is durable through repeated use and laundering.
Design
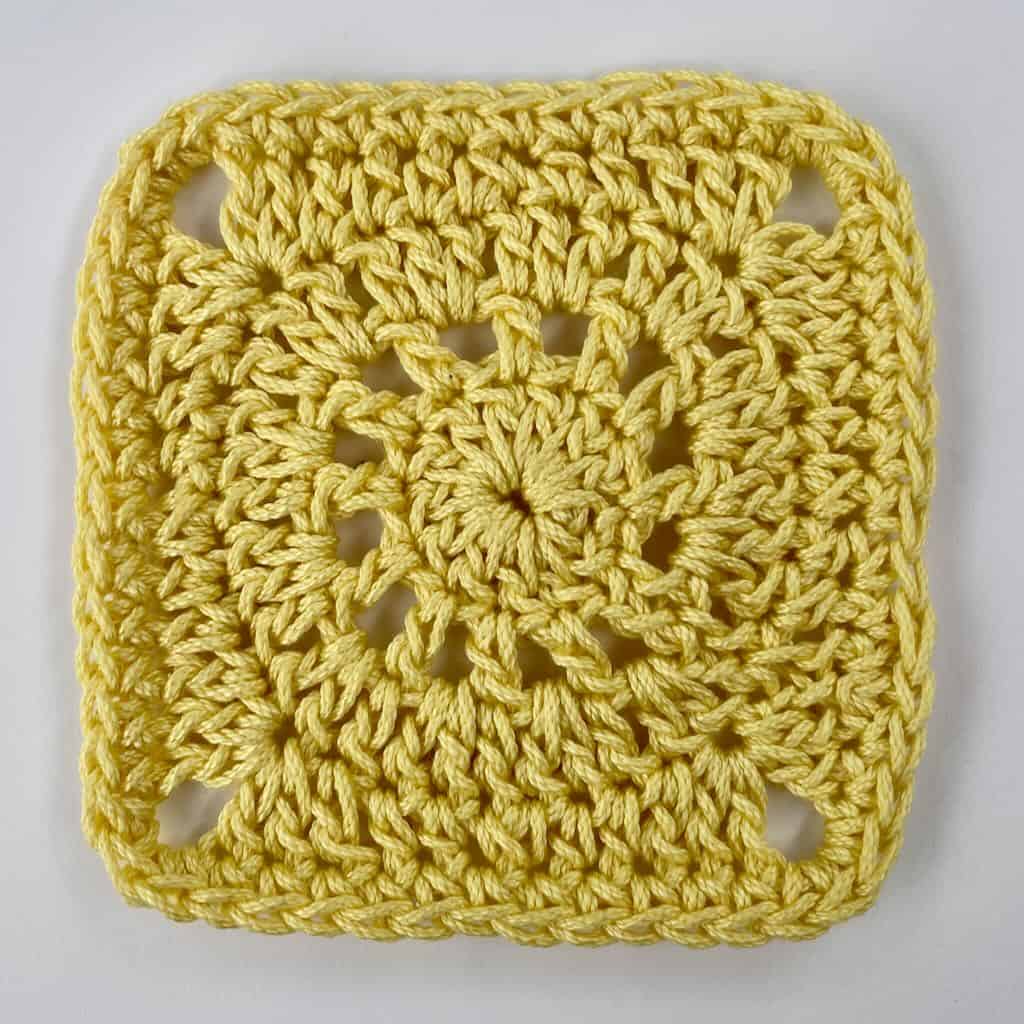
The Sunny Day collection started when I designed the Sunny Day Market Bag. Once I perfected the design of the square, the centerpiece of every design in the collection, it became clear that it could be used for a number of designs.
I just love the look of the Sunny Day Collection – the bright cotton yarn, the square that’s a perfect summer design, and the coordinated look that all the pieces will eventually have.
The first piece in the home décor section of the Sunny Day collection is the Sunny Day Coaster, a beginner friendly project that takes the square and adds a fun twisted border. It’s a great stash buster and can be worked up in an evening. Check out the free pattern here.
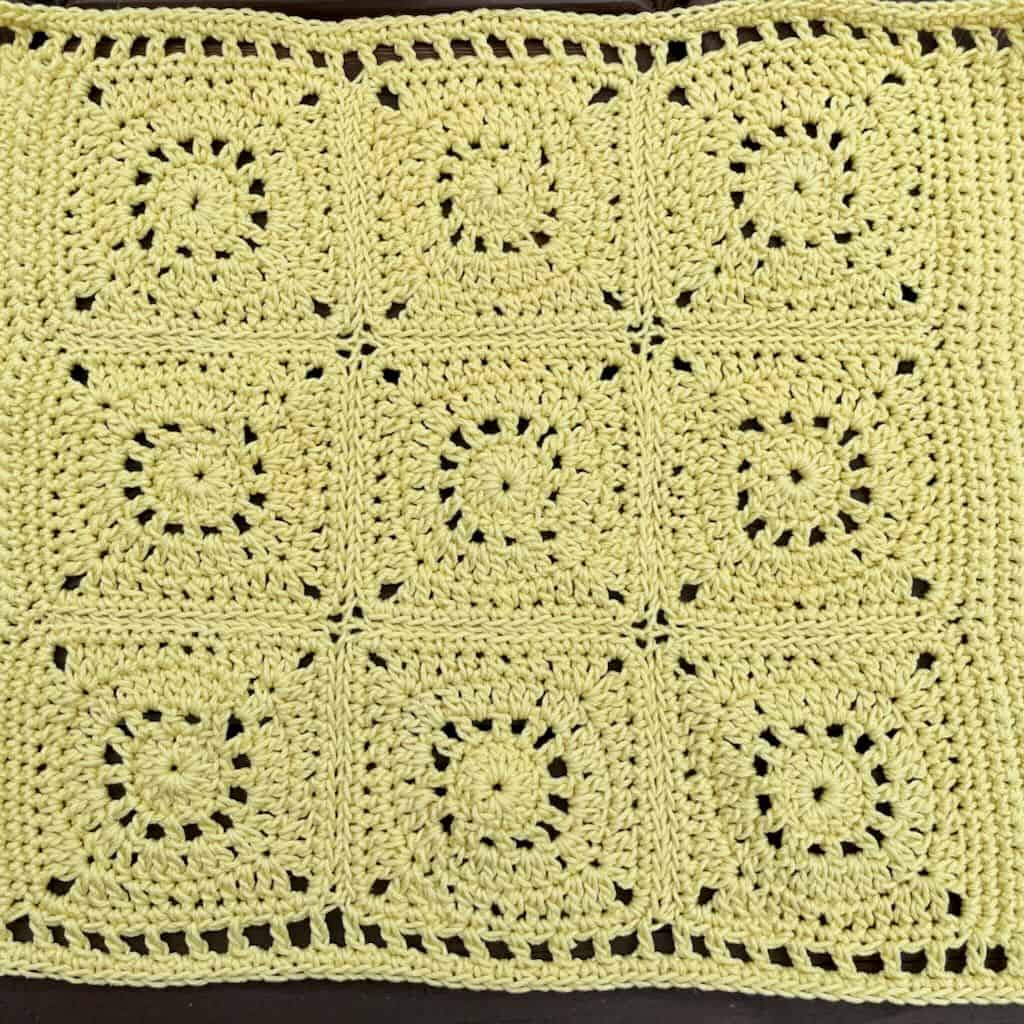
The second piece in the Sunny Day home décor collection is this crochet placemat. Each crochet placemat is made up of 9 of the Sunny Day squares.
Construction
Let’s talk about the square for a moment. It starts as a flat circle that’s reminiscent of the brilliant sun. It becomes a square when a round of varied height stitches is worked around the 3-round circle.
I finished off the squares for this crochet placemat with a round of single crochet because it stabilizes the edge of the square and makes it easier to join the squares with a whip stitch seam.
Now, back to the crochet placemat. The 9 squares are whip stitched together in a square, then rows of single crochet are worked along 2 opposing sides of the square to extend it into a rectangle.
Finished off with a decorative border, the Sunny Day crochet placemat is truly a beautiful addition to any outdoor dining experience. For a touch of the sun indoors, use your Sunny Day crochet placemat for a bright and cheery dining experience.
The Yarn
This post contains affiliate links. That means, if you purchase something using the link, I receive a small commission. You don’t pay any extra and your information is safe. Thanks for supporting my small business.
Because a crochet placemat gets so much use and needs to be laundered, I chose a 100% mercerized cotton. It stands up to continued use and frequent washing (because who doesn’t spill while they eat).
Not only is it an excellent choice for this type of project, the mercerization process gives the yarn a beautiful sheen and vibrant color saturation. Because it doesn’t stretch, the crochet placemat will retain its shape and won’t stretch out of shape.
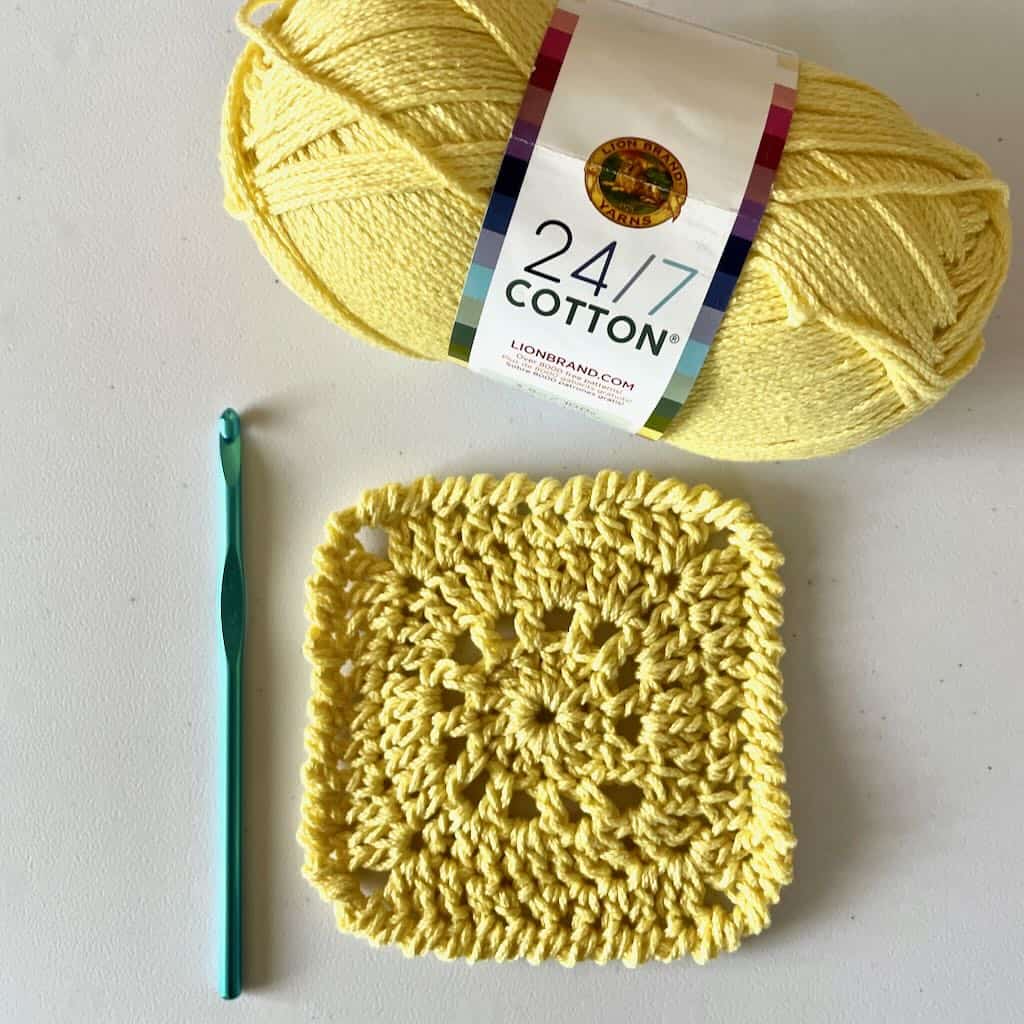
For the sample, I chose Lion Brand’s “24/7 Cotton” worsted weight yarn. It comes in a wide range of colors if you want to coordinate with your favorite dishes. You can certainly choose any cotton yarn you like but I would stick to mercerized if possible.
Why should I purchase the PDF for this crochet placemat when the pattern is free here on the blog?
If you love to make notes on the pattern as you work or you want a digital copy to upload to your favorite mobile device, I would recommend purchasing the PDF from one of my shops. The PDF includes:
- Detailed written instructions with photos of key construction points
- Crochet charts for stitch placement
- You won’t have to scroll through ads or bookmark this page (although you should).


All the info you need to make the Sunny Day Crochet Placemat
Thank you for staying on this post and reading my patterns right here on the blog, without copy/pasting. When you stay here to follow the free version of my pattern, I am compensated for my time and energy. This is a great, free way to support a designer. If you would like to save this for later, bookmark the page to save it in your mobile browser.
Yarn
Lion Brand “24/7 cotton” 100% mercerized cotton (3.5oz/186yd; 100g/170m)
Approx. 4.8oz/260yd for each placemat; Sample in Color #157D Lemon
Hook
US H-8 (5mm)
Tools
- Blocking mat + T-pins
- Tapestry needle for weaving in ends
Finished Size: Approx. 18″ x 14.5″
Gauge: Each square measures approx. 4.5″ across
Skill level: Advanced beginner/Intermediate
Abbreviations – US crochet terminology
- beg – beginning
- ch – chain
- dc – double crochet
- hdc – half double crochet
- rep – repeat
- rnd(s) – round(s)
- sc – single crochet
- sc2tog – single crochet 2 together (Insert hook in indicated st, YO, draw up a loop, insert hook in next st, YO, draw up a loop, YO, pull through all 3 loops)
- sk – skip
- sp – space
- st(s) – stitch(es)
- RS – right side
- WS – wrong side YO – yarn over
Pattern Instructions for the Sunny Day Crochet Placemat
Thank you for staying on this post and reading my patterns right here on the blog, without copy/pasting. When you stay here to follow the free version of my pattern, I am compensated for my time and energy. This is a great, free way to support a designer. If you would like to save this for later, bookmark the page to save it in your mobile browser.
Pattern Notes
- A ch 1 at the beg of a rnd or row does not count as a st.
- A ch 3 at the beg of a rnd or row counts as a dc.
- A ch 4 at the beg of a rnd counts as a dc + ch.
- Do not turn after any rnd.
- The stitch count is included only where it changes.
Written Instructions
Square – Make 9 for each placemat.
Ch 4, join with slip st to form ring.
Rnd 1: Ch 3, 11 dc in the ring, join with slip st to beg ch-3. (12 dc)
Rnd 2: Ch 4, [dc in the next st, ch 1] around, join with slip st to 3rd ch of beg ch-4. (12 dc, 12 ch-1 sp)
Rnd 3: Ch 3, 2 dc in the ch-1 sp, [dc in the next st, 2 dc in the ch-1 sp] around, join with slip st to beg ch-3. (36 dc)
Rnd 4: Ch 3, hdc in the next 2 sts, sc2tog, hdc in the next 2 sts, dc in the next st, (2 dc, ch 3, 2 dc) in the next st (corner made), [dc in the next st, hdc in the next 2 sts, sc2tog, hdc in the next 2 sts, dc in the next st, (2 dc, ch 3, 2 dc) in the next st] 3 times, join with slip st to beg ch-3. (4 sc2tog, 16 hdc, 24 dc, 4 ch-3 sp)
Rnd 5: Ch 1, sc in the same st and each st around, working 3 sc in each ch-3 sp, join with slip st to beg st. (56 sc)
Fasten off and weave in ends.
Joining the squares
Using a whip stitch through back loops only, sew the squares together in a 3 x 3 grid (3 rows of 3 squares each).
- When stitching the squares together, hold the squares right sides facing each other and whip stitch the squares together on the wrong sides of the squares.
- Be sure to join from the center corner st to center corner st to prevent a gap at the junction of the squares.
- Once the seaming is complete, weave in all ends and proceed to the Extensions.
Extensions
An extension on opposite edges of the square turns the square into a rectangle. It doesn’t matter which edge you begin with. However, be sure the 2nd extension is worked on the opposite edge from the one you started with.
With RS facing, attach yarn to center sc at any corner of the 9 square grid.
Row 1: Ch 1, sc in same st and in each st across, turn. (45 sc)Note: To ensure the st count is correct, work a sc in the unworked corner sts at each seam plus the center corner st included in the seam.
Rows 2-6: Ch 1, sc in the same st and in each st across, turn.
At the end of Row 6, fasten off.
Rep Rows 1-6 on the opposite side of the 9 square grid. At the end of Row 6, DO NOT FASTEN OFF. Proceed to Border.
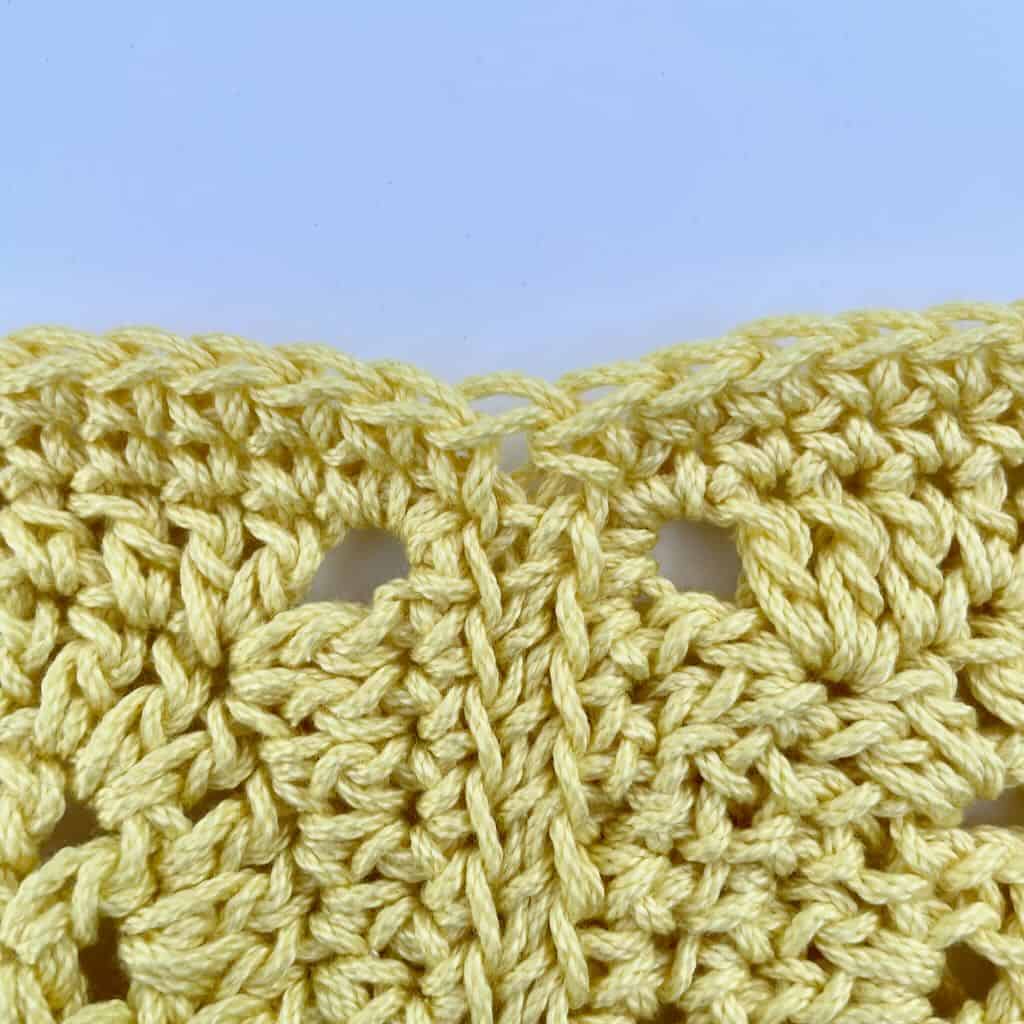
Border
Note: Be sure you have turned at the end of Row 6 on the 2nd side edge of the placemat. You are now working on the RS of the placemat.
Rnd 1 (RS)
Side edge 1: Ch 3, dc in the same st (See Figure 1), ch 1, sk 1 st, [dc in the next st, ch 1, sk 1 st] across to last st, (2 dc, ch 2, 2 dc) in the last st.
Bottom edge: Rotate the placemat 90 degrees, [ch 1, sk 1 row, dc in the end of the next row] twice (See Figure 2), ch 1, sk 1 row, dc in the middle corner st of the 1st square, ch 1, sk 1 st, dc in the next st] across to and including middle corner st of the last square, [ch 1, sk 1 row, dc in the end of the next row] twice, ch 1, sk 1 row.
Side edge 2: Rotate the placemat 90 degrees, (2 dc, ch 2, 2 dc) in the 1st st, ch 1, sk 1 st, [dc in the next st, ch 1, sk 1 st] across to last st, (2 dc, ch 2, 2 dc) in the last st.
Top edge: Rotate the placemat 90 degrees, [ch 1, sk 1 row, dc in the end of the next row] twice, ch 1, sk 1 row, dc in the middle corner st of the 1st square, ch 1, sk 1 st, dc in the next st] across to and including last middle corner st of the last square, [ch 1, sk 1 row, dc in the end of the next row] twice, ch 1, sk 1 row, {2 dc, ch 2) in the 1st st of Side edge 1 to complete the 1st corner, join with slip st to beg ch-3.
Rnd 2: Ch 1, sc in the same st and in each st and ch-1 sp around, working 2 sc in each corner ch-2 sp, join with slip st to beg st.
Fasten off and weave in all ends.
Blocking
I highly recommend blocking the finished placemat. It will eliminate the pucker of the squares and even out the stitches. You’ll also be able to slightly adjust the size of the placemat.
I used light steam blocking, my preferred method when working with cotton yarn. However, you may use the method of your choice.
How to care for your new placemat
While cotton yarn is very durable and easy to care for, the placemat is still a handmade item. If you choose to machine wash the placemat, place it in a zippered laundry bag and wash on a cool water setting. Do not put it in the dryer; instead, dry flat and reshape if necessary.
[mailerlite_form form_id=3]


One Comment