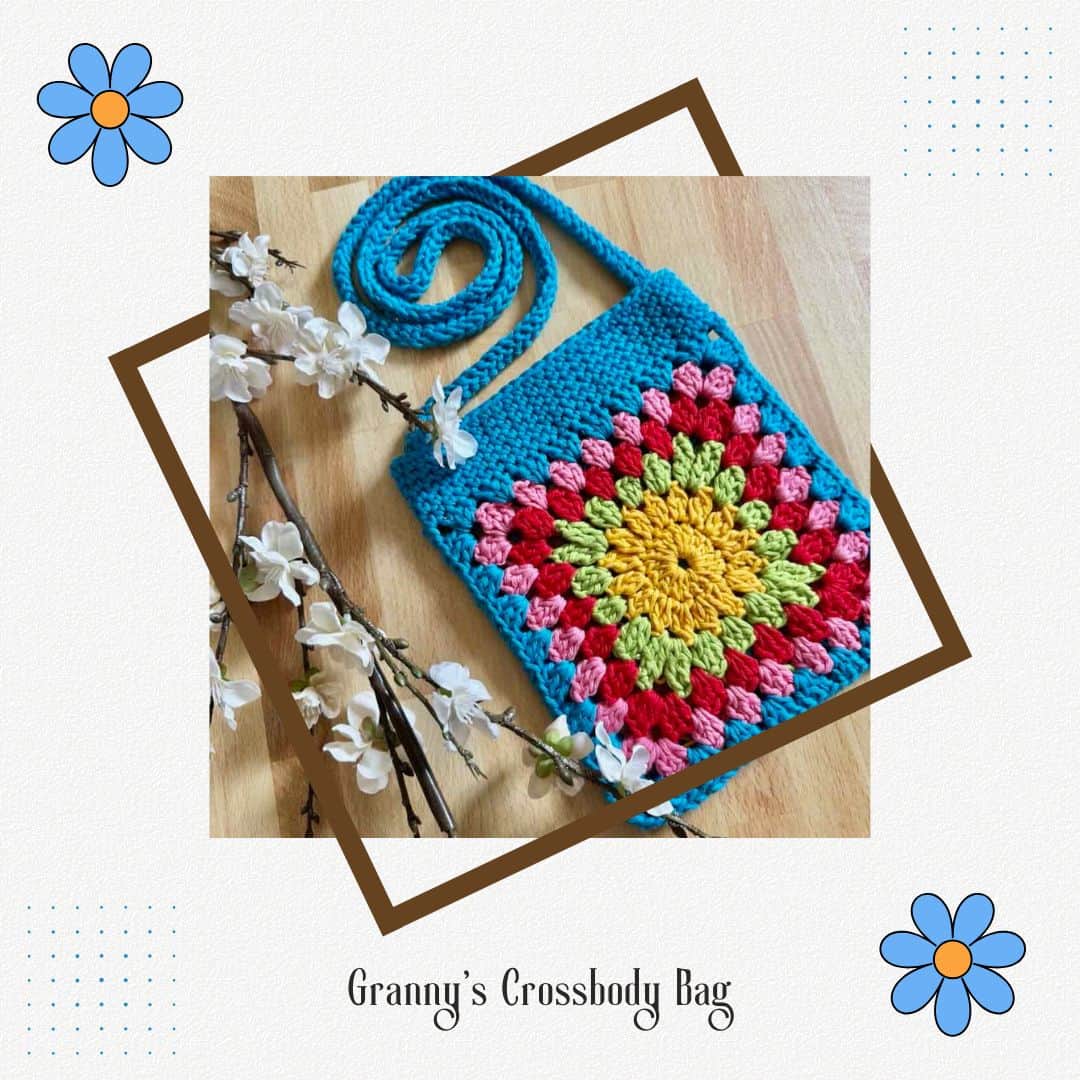
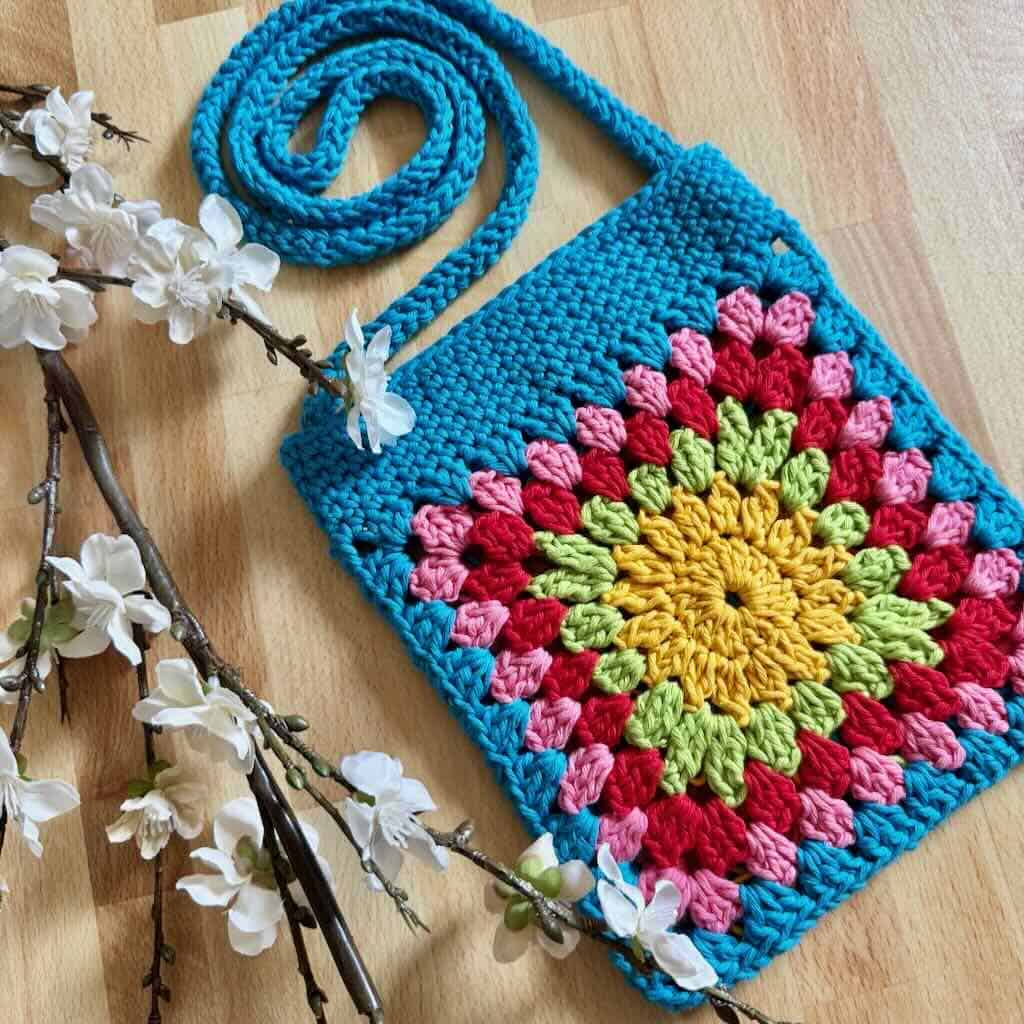
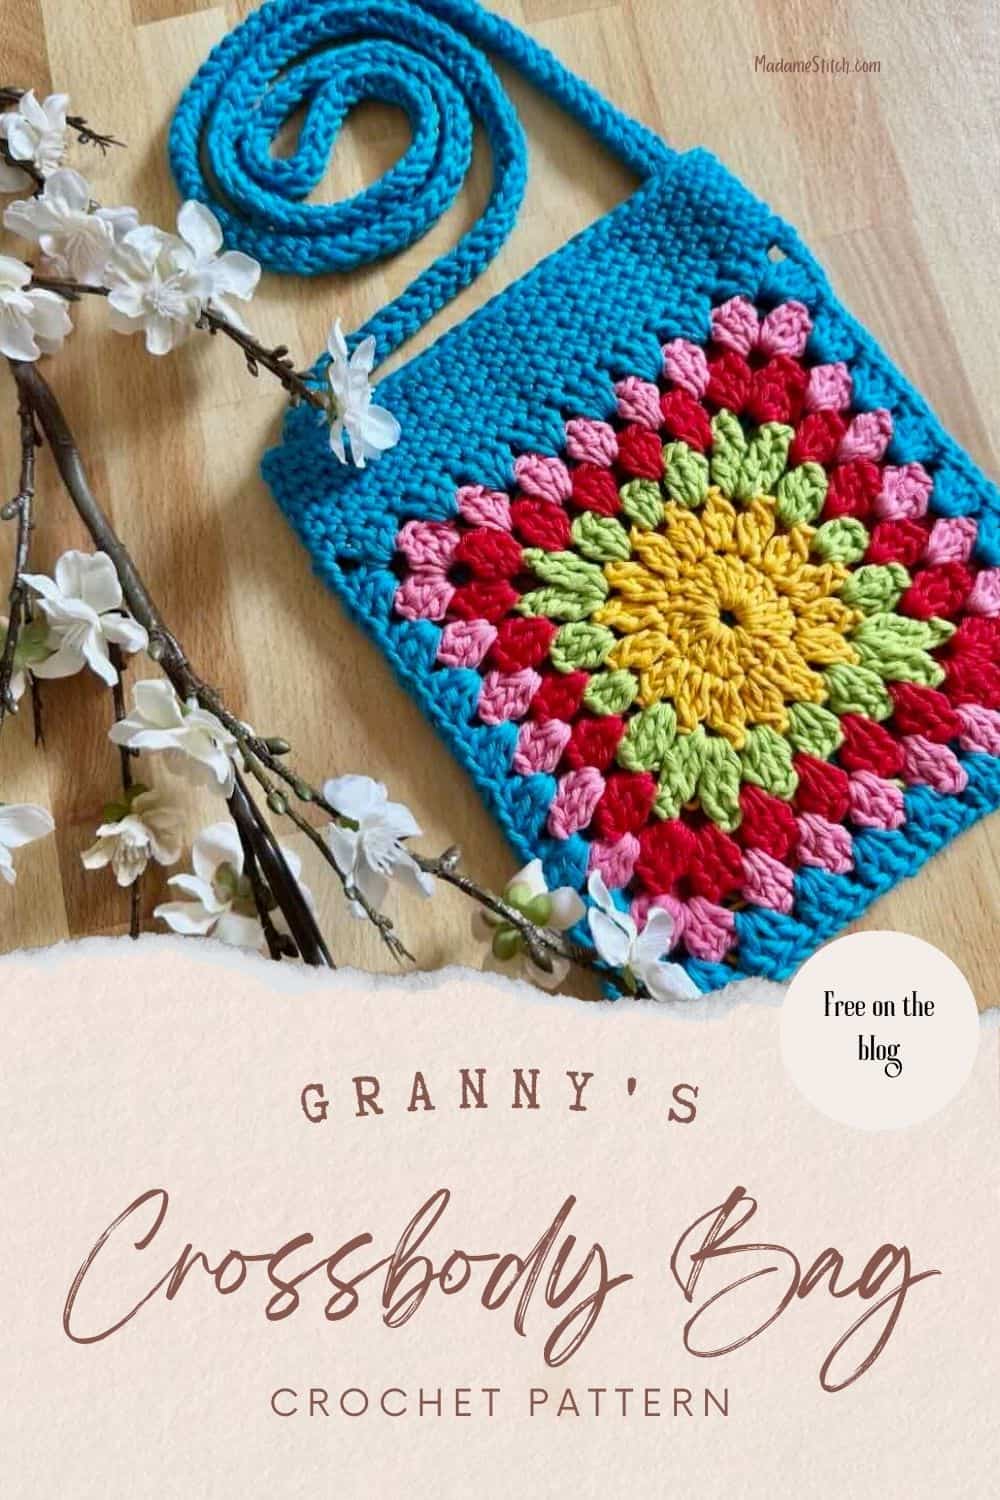
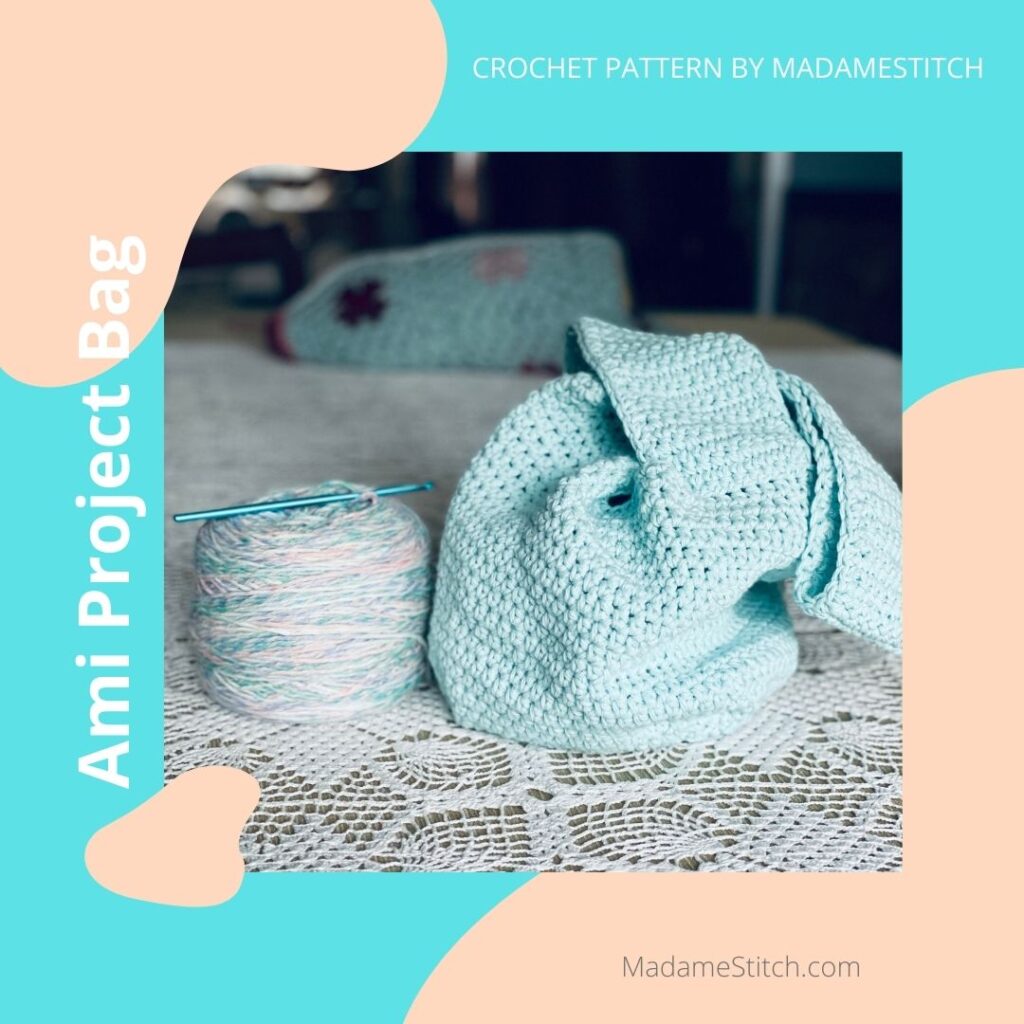
5 Reasons Granny’s Crossbody Bag is the Perfect Bag You’ll Love
A retro-inspired granny square crossbody bag will make you the envy of all! Make one for yourself with this beginner-friendly, stash-busting pattern.
I remember the 70s when granny squares were all the rage. Anything you could imagine was made out of granny squares – scarves, skirts, blankets, even men’s shorts!
The colors of the day were warm, earthy tones like mustard yellow, burnt orange, deep browns, and olive or avocado green. Even my Tupperware was made in these colors. Remember those?
One of the most popular items of the 70s was a small granny square bag with a long strap. Fringe and beads were added to complete the look. Everywhere you looked you could find a fringed granny square bag.
I’ve taken that classic crossbody bag design and given it a 21st century refresh with bright colors and a sunshiny center to the classic granny square. You’ll love making one for yourself.
Granny’s Crossbody Bag
Why you’ll love making Granny’s Crossbody Bag
There’s so much to love about this crossbody bag!
- Its vintage-inspired style – With its granny square design and retro vibes, this bag brings timeless charm to any outfit.
- The bag is fun and functional – It’s the perfect size for carrying your essentials while keeping your hands free.
- Its design is beginner-friendly – Made with just two modified granny squares and simple finishing, it’s quick and easy to crochet.
- Customize the crossbody bag with your favorites – Add fringe, tassels, charms, or even a colorful button closure to make it uniquely yours.
- It’s an instant gratification project – Fast to stitch up, this crossbody bag is ideal for gift-giving, festivals, or when you want a satisfying make in a short amount of time.
Design + Construction
Granny’s Crossbody Bag draws its design inspiration from the carefree crossbody styles of the 70s, blending vintage charm with everyday functionality.
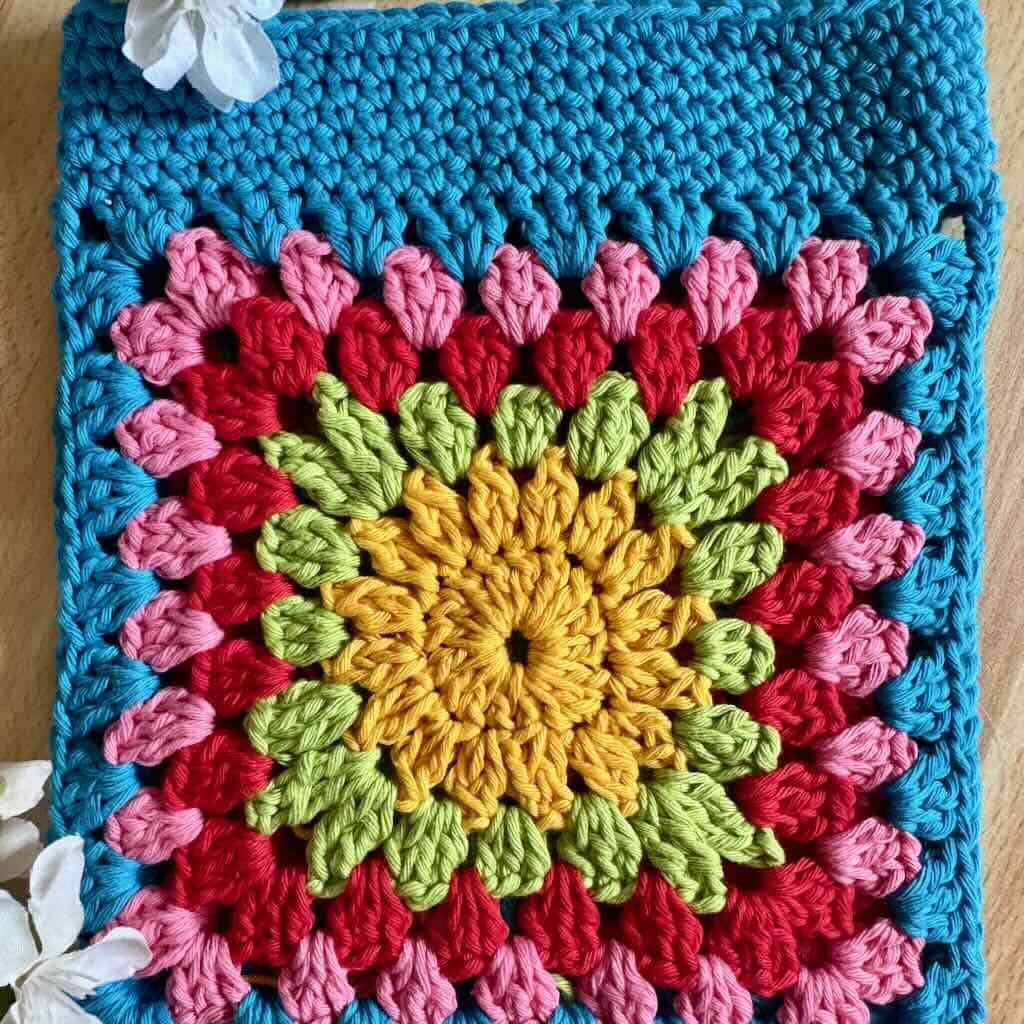
The bag begins with a classic granny square motif, starting from a sun-inspired circle at the center and radiating outward with rounds of the traditional granny stitch, giving it that iconic retro look.
To create the crossbody bag, you’ll crochet two matching squares and join them along three sides to form a roomy pocket, leaving the top open. A neat single crochet border adds structure, while the long, skinny strap makes it comfortable to wear as a true crossbody bag.
Finish it off with an optional button-and-loop closure, or add playful extras like fringe, tassels, or bag charms to make it uniquely yours.
The Yarn
I chose a cotton worsted weight yarn for this crossbody bag because I wanted a yarn that was easy to take care of and had beautiful stitch definition while adding stability to the overall design.
One of my all-time favorite yarns is Paintbox Yarns “Cotton Aran” when I need a worsted weight cotton. It comes in vibrant colors and the price point is budget friendly.
I chose 5 bright colors, with blue as the main color. While blue just happens to be my favorite color, you can choose any color combination you love and make this cute crossbody bag uniquely you.

Where to get the PDF for Granny’s Crossbody Bag
Granny’s Crossbody Bag is a crochet granny stitch bag pattern free for blog subscribers in this blog post. Scroll down to view the free version.
Upgrade to the premium PDF and get a printer friendly and downloadable version of the crossbody bag pattern, available in all my shops.
The premium PDF can be uploaded to your favorite mobile device so you can take your granny square crossbody bag project with you to work on whenever you’re out and about.
The PDF is easy to read and beautifully formatted without ads for a great experience. It includes detailed written instructions, a crochet chart for the square, and suggestions for customizing your crossbody bag.
Get your copy today!


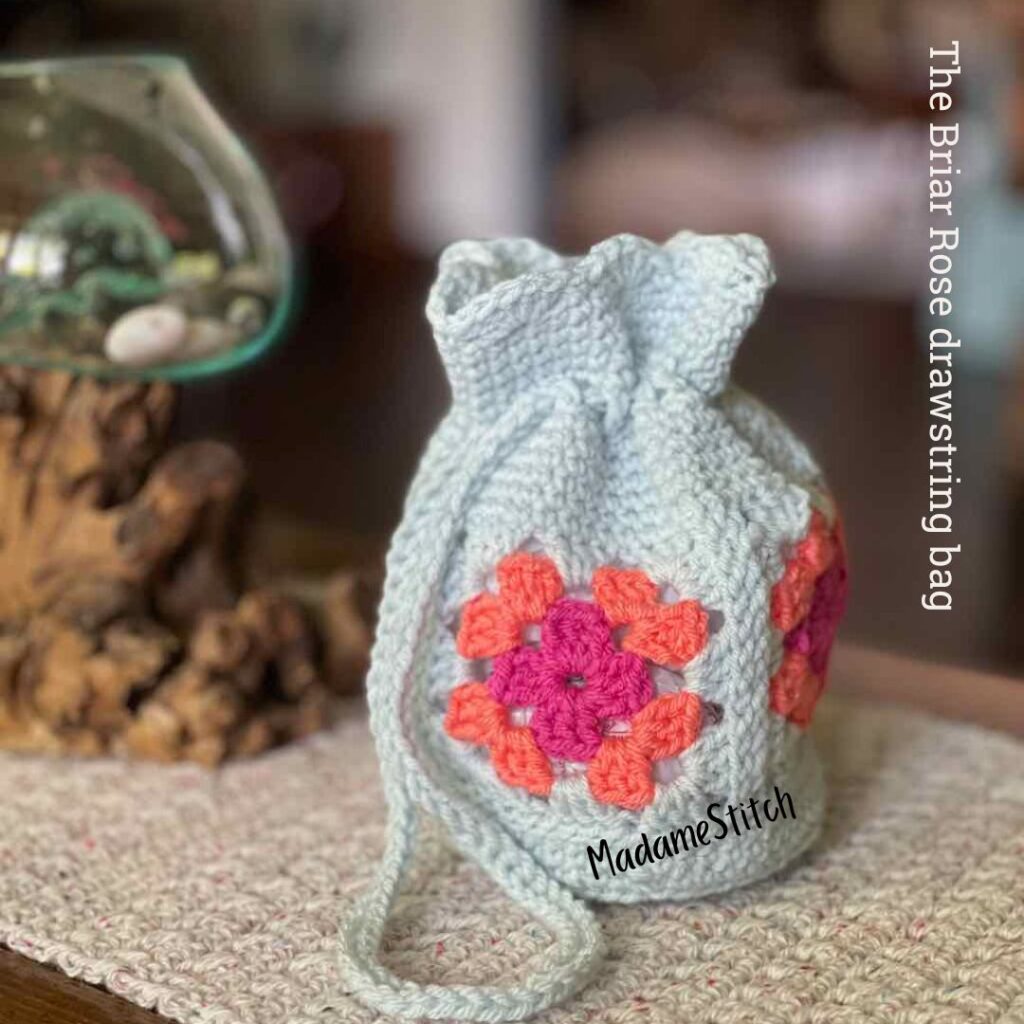
More bags you might love
Granny’s Crossbody Bag Free Pattern Starts Here
General Information
Yarn
Paintbox Yarns “Cotton Aran” 100% cotton worsted weight (1.7 oz/93 yd; 50g/85m)
- Main color (MC) – Kingfisher Blue (635) – 80yds (You’ll need more if adding fringe)
- Color A (CA) – Mustard Yellow (624) – 18yds
- Color B (CB) – Lime Green (629) – 18yds
- Color C (CC) – Rose Red (614) – 23yds
- Color D (CD) – Bubblegum Pink (651) – 33yds
Note: All yardages are approximate. You may use any worsted weight yarn you like.
Hook
US size H-8 (5mm)
Tools + Materials
- Removable stitch marker
- Tapestry needle
- Optional: Bag charm, tassels, magnetic snap closure, toggle button
Finished Size
- The bag measures approx. 7.5″ wide x 9″ tall
- Each square measures approx. 7.5″ square
- The strap is approx. 44-45″ long
Gauge
Rnds 1-3 of the granny square = Approx. 4″
Skill Level: Advanced Beginner
Abbreviations – US crochet terminology
- beg – beginning
- ch – chain
- dc – double crochet
- FPsc – front post single crochet
- hdc – half double crochet
- rep – repeat
- rnd(s) – round(s)
- sc – single crochet
- sk – skip
- sp – space
- st(s) – stitch(es)
- RS – right side
- WS – wrong side
- YO – yarn over
Repeats
- (…) – Work everything within the parentheses in the same st or sp.
- […] – Repeat everything within the brackets the indicated number of times.
Special Stitches
Cluster – [YO, insert hook in the indicated st, YO, pull up a loop, YO, pull through 2 loops] twice, YO, pull through all loops on the hook.
Foundation single crochet (Fsc) – To start the row, ch 2, insert hook in the 2nd ch from the hook, YO, pull up a loop, YO, pull through 1 loop (this forms the chain along the bottom), YO, pull through 2 loops on the hook (sc made).
All other Fsc in the row: Insert hook under both loops of the chain at the bottom of the previous st, YO, pull up a loop, YO, pull through 1 loop (this forms the chain along the bottom), YO, pull through 2 loops on the hook (sc made).
Granny stitch (GS) – 3 dc in the same st or sp.
Stacked single crochet (STsc) – (This stitch is used at the beginning of a round to replace the traditional turning ch-3. It has the appearance of a dc.) – Insert hook in the same st as the loop, YO, pull up a loop, YO, pull through 2 loops (bottom sc made), insert hook through the left vertical bar of the bottom sc, YO, pull up a loop, YO, pull through 2 loops (top sc made).

Note: A standing stitch replaces attaching the yarn and working a series of chains to begin a round. All standing sts begin with a slip knot held firmly against the hook to avoid slipping, then the st is worked as it normally would be.
Standing double crochet (Standing dc) – Make a slip knot, hold the slip knot firmly against the hook with the forefinger of the same hand, YO, insert hook in the indicated st, YO, pull up a loop, [YO, pull through 2 loops] twice.
Standing treble crochet (Standing tr) – Make a slip knot, hold the slip knot firmly against the hook with the forefinger of the same hand, YO twice, insert hook in the indicated st, YO, pull up a loop, [YO, pull through 2 loops] 3 times.
Video Tutorial
Find the full tutorial for Granny’s Crossbody Bag on YouTube.

Pattern Notes
- A ch-1 at the beginning of a round does not count as a stitch.
- A ch-2 or ch-3 may be substituted for the STsc without altering the construction of the square.
- Do not turn after any rnd.
- If you prefer to use a chain to start a round rather than working a standing st, attach the yarn where indicated, then “ch 3” for a ST dc and “ch 4” for a ST tr.
Unlock Exclusive Subscriber Content
To unlock Exclusive Subscriber Content, click on the button in the box below. The Grow.me app window will pop up where you can either create an account or sign in if you already have one.
To create an account, sign in with your existing Google or Facebook account. You can also create an account with an email address and new password.
If you forget your password, simply click the “Forgot my Password”button. I have no access to your Grow account so I’m unable to retrieve or reset your password.
Remember, once you’ve created a Grow account, you never have to do it again. Your Grow account unlocks all the exclusive content created by Grow
Thank you for being a loyal blog subscriber. I hope you enjoy the exclusive content!
Pattern Instructions
Granny Square – Make 2
With CA, ch 4, join with slip st to form ring.
Rnd 1 (RS): (STsc, 15 dc) in the ring, join with slip st to beg st. < 16 dc >
Rnd 2 (RS): (Sc, ch 1, dc) in the 1st st (counts as 1st cluster), ch 1, [cluster in the next st, ch 1] 15 times, join with slip st to beg dc. Fasten off CA. < 16 clusters, 16 ch-1 sp >
Rnd 3: With CB, (Standing tr, tr, ch 3, 2 tr) in any ch-1 sp, GS in the next ch-1 sp, 3 hdc in the next ch-1 sp, GS in the next ch-1 sp, [(2 tr, ch 3, 2 tr) in the next ch-1 sp, GS in the next ch-1 sp, 3 hdc in the next ch-1 sp, GS in the next ch-1 sp] 3 times, join with slip st to beg st. Fasten off CB. < 12 hdc, 8 GS, 16 tr, 4 ch-3 corner sp >
Note: For Rnd 4, the GS are worked in the sp between groups of 2 sts or 3 sts where a ch-1 would normally be.
Rnd 4: With CC, (Standing dc, 2 dc, ch 3, GS) in any ch-3 corner sp, GS in the next sp and in each sp across to the next ch-3 corner sp, [(GS, ch 3, GS) in the ch-3 corner sp, GS in the next sp and in each sp across to the next ch-3 corner sp] 3 times, join with slip st to beg st. Fasten off CC. < 24 GS, 4 ch-3 corner sp >
Rnd 5: With CD, rep Rnd 4. < 28 GS, 4 ch-3 corner sp >
Rnd 6: With MC, rep Rnd 4. < 32 GS, 4 ch-3 corner sp >
Block the squares to prevent curling and ensure a square shape. Weave in ends before moving on.
Sewing the squares together
The 2 squares are sewn together along 3 sides using a whip stitch seam, working through back loops only. The 4th side is left unworked to create the bag opening.
- Hold the squares together with RS facing each other. (The WS is facing out.)
- Attach MC through the middle ch of the corners of both squares.
- Using a whip stitch seam, working through the back loops only, sew the squares together.
- Finish seaming in the middle ch of the corner at the end of the 3rd side.
- Fasten off and weave in ends.
- Turn the bag right side out.
Top Edge of the Bag
With RS facing, attach MC to any st along the open edge of the bag.
Rnd 1: Ch 1, sc in the same st, sc in the next st and in each st, ch sp (before and after the side seams) and side seam around, join with slip st to beg st. < 54 sc >
Note: For Rnds 2-6, place a marker in the 1st st to keep track of where the rnd begins. Move the marker up with each new rnd.
Rnd 2: No ch, sc in the same st and in each st around, join with slip st to beg st.
Rnds 3-6: Rep Rnd 2. Fasten off.
Strap
Row 1 (RS): With MC, Fsc 160 OR Ch 161, (working in the back bump) sc in the 2nd ch from the hook and in each ch across. < 160 sc >
Row 2 (WS): Ch 1, FPsc around the same st and around each st across. < 160 FPsc > Fasten off.
Finishing the Strap
Note: To prevent stretching, the strap is folded in half lengthwise and the edges are sewn together. The surface loop created by the FPsc of Row 2 offers an additional layer of protection against stretching as well as a decorative design feature for the strap.
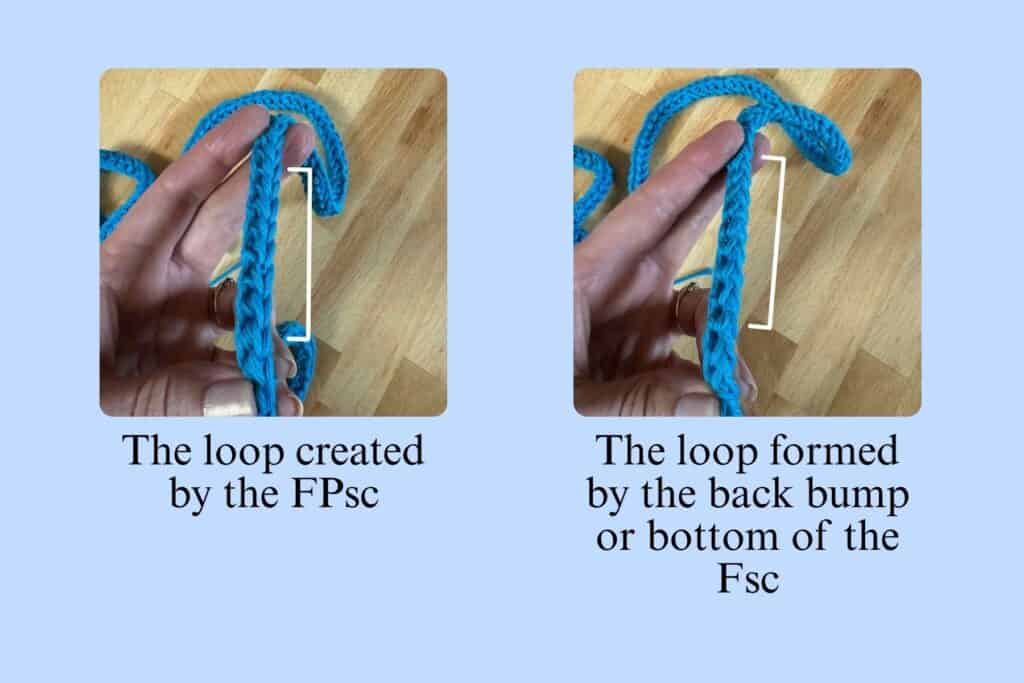
- Fold the strap in half with RS facing out (you’ll be able to see the loops made by the FPsc of Row 2).
- Cut a length of yarn twice as long as the strap.
- Leaving a tail long enough to sew the strap end to the bag, whip st the bottom of Row 1 to the top of Row 2 through the outer loop of each side.
- Align each end of the strap on the inside of the bag above the seam, making sure the loops of Row 2 are touching the inside of the bag. Be sure the strap isn’t twisted. Approx. 1” of each end will be on the inside of the bag.
- Using the yarn tails, sew the strap ends to the inside of the bag.
Weave in any extra yarn ends. Your bag is finished!