The Ultimate Granny Stitch Sampler Blanket for Snuggling This Coming Season
Join the 3rd Annual Granny Stitch Sampler Blanket CAL! Discover fresh stitch combos and see how versatile the classic granny stitch can be.
2025 Granny Stitch Sampler Blanket
It’s here—the 3rd Annual Granny Stitch Sampler Blanket Crochet Along, and I couldn’t be more excited to kick things off! This event has quickly become one of my favorite traditions, and I can’t wait for you to join in on the fun.
As always, my mission is simple: to show you just how versatile the classic granny stitch can be. You know the one—those three double crochets worked together in the same stitch or space. It’s the foundation stitch of the traditional granny square, and yet it never stops surprising us with new possibilities.
This year’s blanket is a one-of-a-kind design that’s back with even more elegance and cozy charm than before.
With fresh stitch combinations and inspiring details, the Granny Stitch Sampler Blanket transforms the cornerstone of the traditional granny square into something truly extraordinary.
Thanks to the creativity of the designers who contributed to this gorgeous blanket, you’ll experience the granny stitch in ways you’ve never seen before.
What is a free crochet along?
Participating in a free crochet along is such a special experience. If you’ve never been a part of one, here’s what you can expect when you join a free crochet along.
- Everyone crochets the same project at the same time.
- Each part of the project is released one at a time. That way all of the participants can work at the same pace.
- The fun part comes when everyone is sharing progress photos with the group. It’s so motivating!
How this crochet along works
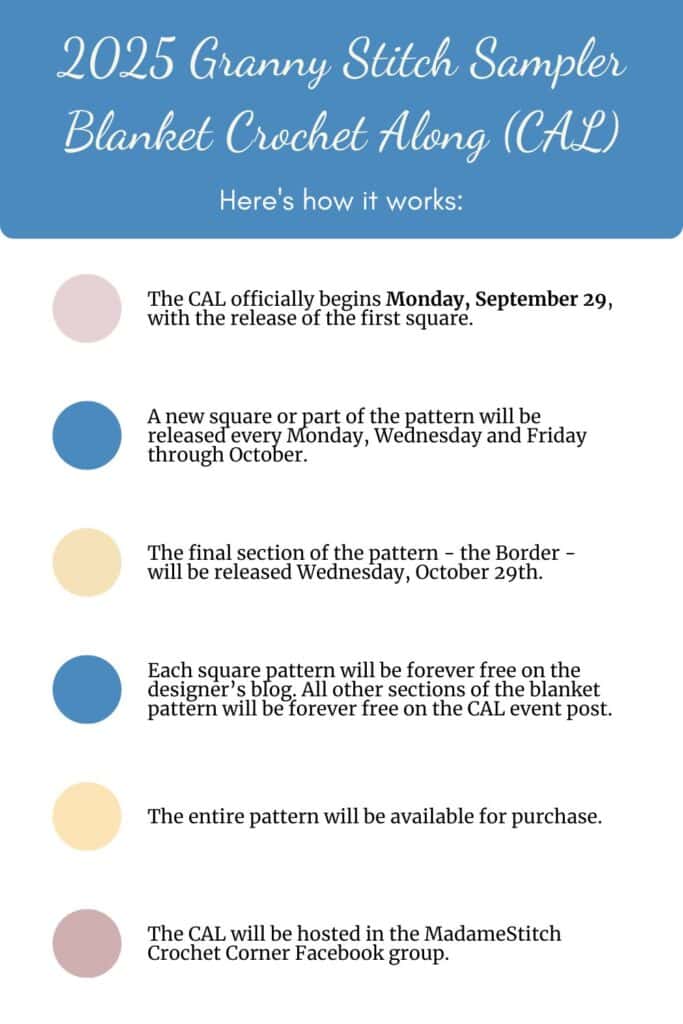
Here’s how to participate in this free crochet along:
- The CAL officially begins Monday, September 29th, with the release of the first square.
- A new square or part of the pattern will be released every Monday, Wednesday and Friday through the month of October.
- The final section of the pattern – the Border – will be released Wednesday, October 29th.
- Each square pattern will be forever free-to-view on the designer’s blog. All other sections of the blanket pattern will be forever free-to-view here on the CAL event post.
- The entire pattern will be available for purchase as a downloadable PDF
- The CAL will be hosted in the MadameStitch Crochet Corner Facebook group.
Remember, you can make the Granny Stitch Sampler Blanket from start to finish by using the free resources that will release over the month of October. Or, if you prefer to have a physical pattern all in one place, I recommend you purchase the full pattern (see below).
Join the Facebook group for the full experience
Don’t miss any of the fun! In the MadameStitch Crochet Corner group you can ask questions, share your progress, and enjoy ALL of the other projects.

Sign up for CAL emails
Get updates sent directly to your inbox. Simply click on the button below, fill out your information, and wait for all the CAL goodness to arrive in real time.

Note: Signing up for the email list DOES NOT mean the pattern will be sent to you. It will be available here or on the designer’s blog post.
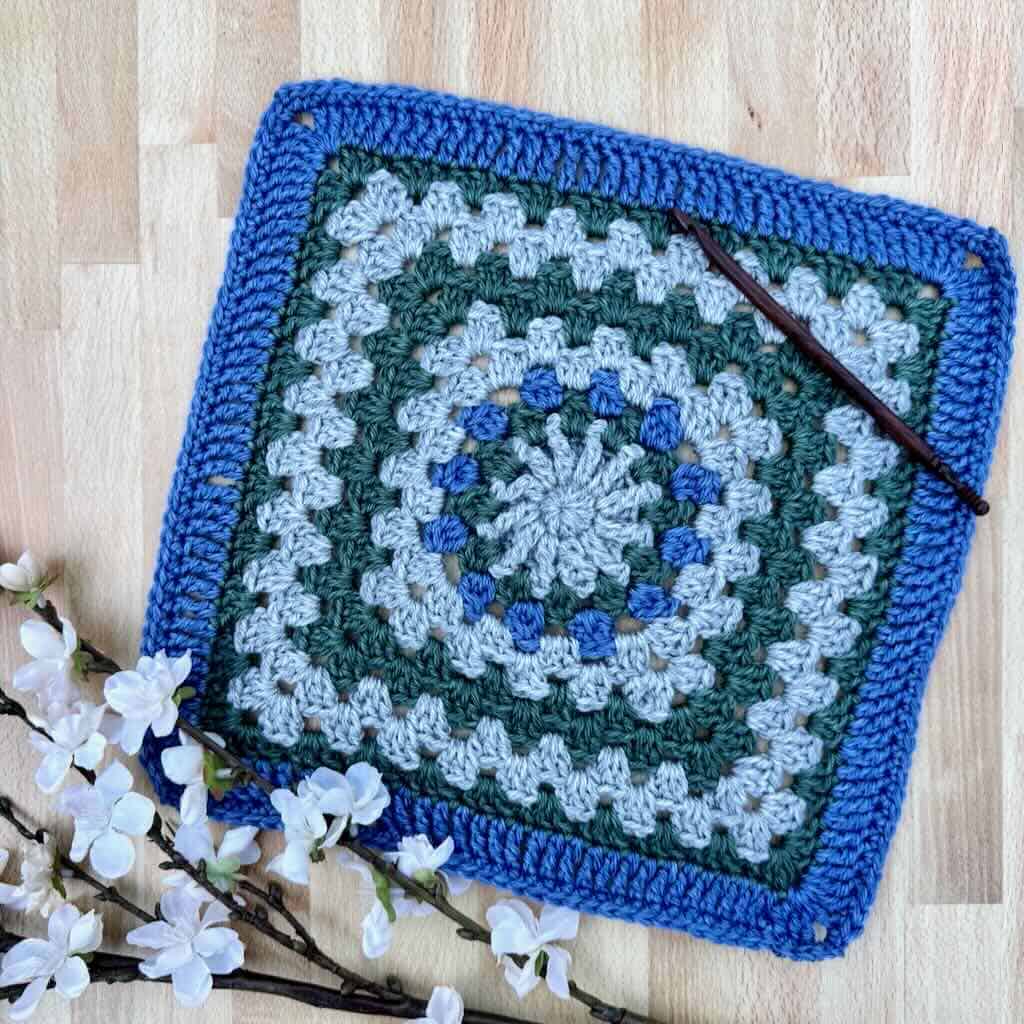
The Granny Stitch Sampler Blanket Designs
What is a granny stitch? The typical interpretation is 3 double crochet worked in the same stitch or space. The granny stitch is the foundation of the traditional granny square.
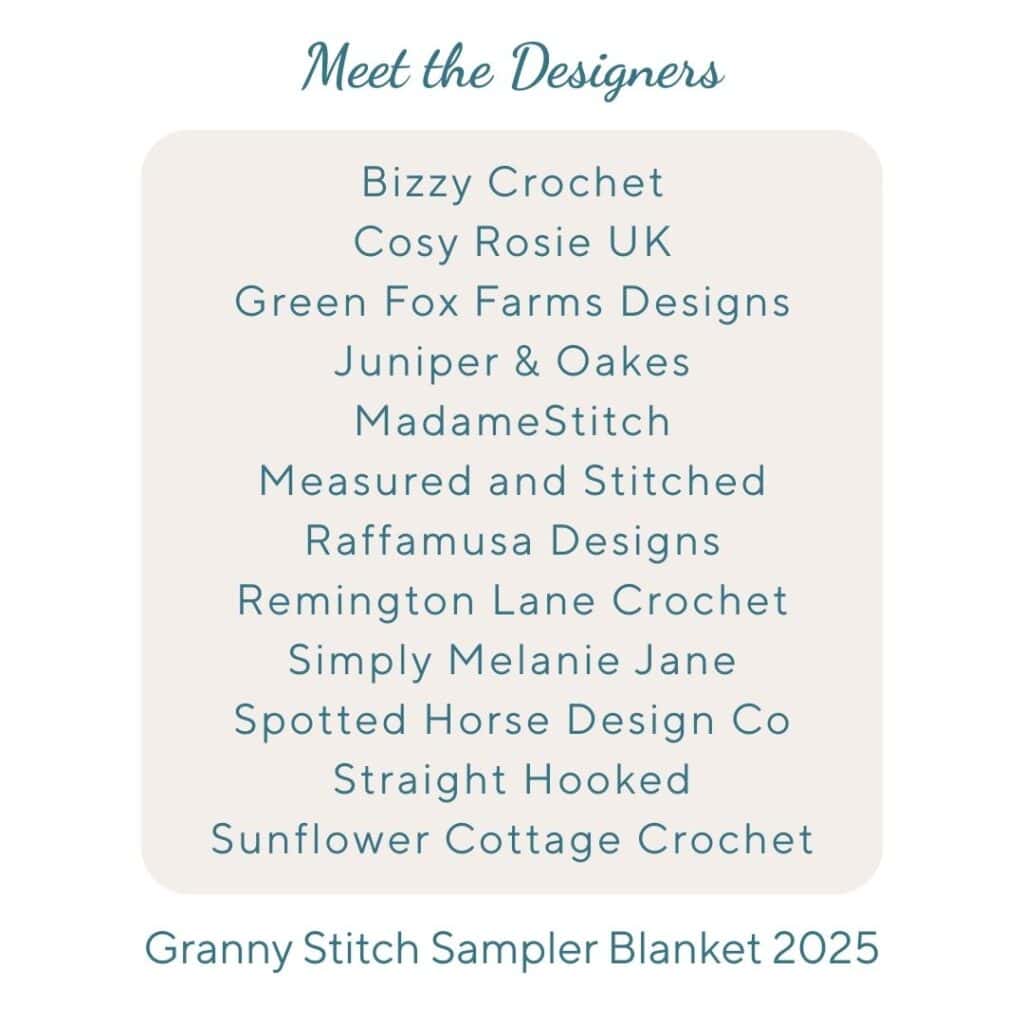
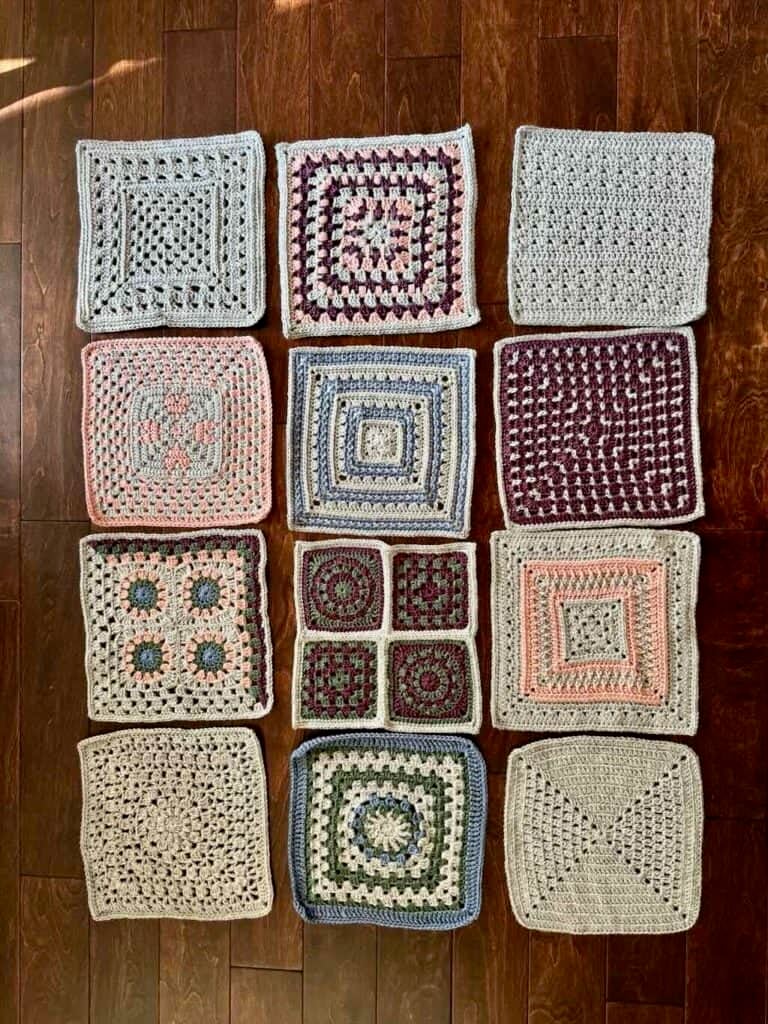
In this granny stitch sampler blanket, my friends and I have bent the rules a bit once again. Eleven designers joined me, each one designing a 12” square that included the granny stitch somewhere in the design. They were free to use any combination of stitches or a technique they wanted.
This year’s granny stitch sampler blanket is like no other. You’ll find a variety of stitches and techniques, including post stitches, bobbles, mosaic crochet and spiked grannies.
Skill Level
Because of the variety of stitches and techniques, I’m listing the general skill level as Advanced Beginner/Intermediate, leaning more toward Intermediate.
This is not a beginner level blanket.
You’ll need experience reading crochet patterns and it would be helpful for you to have tried a few stitches and techniques beyond the basics.
With that said, many of the designers have provided photo and/or video tutorials to help. And, they are available to give you assistance should you need it.
Finished Size
Each square is intended to be 12”. However, they may land in a range of 12.5-13”. As long as all of your squares are approximately the same size, you’ll be fine.
You can adjust the size of each square during blocking to ensure they are all approximately the same size. For the sample, I easily blocked each square to 12.5″ across.
The sample blanket measures approximately 39″ x 52″. Your blanket may be slightly smaller or larger depending upon the size of your finished squares, the seaming method you choose, and the number of rounds for your border.

Gather Your Materials
This post contains affiliate links. That means, if you purchase something using the link, I receive a small commission. You don’t pay any extra and your information is safe. Thanks for supporting my small business.
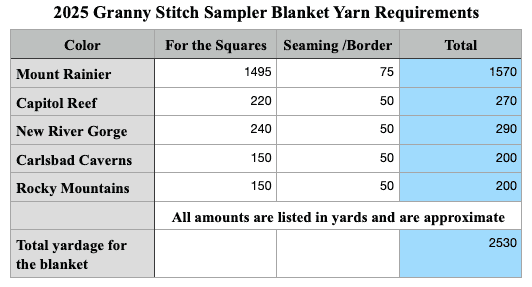
The Yarn
It’s time to gather all the yarn you’ll need for your Granny Stitch Sampler Blanket. The yarn I have listed here is what I used to make the sample. However, individual square patterns will list the yarns and amounts the designer used for the original square design.
Any worsted weight yarn appropriate for blankets will work. Remember, using a different weight yarn will change the size of your blanket and the amount of yarn needed.
All of the yardages are approximate. Buy a little extra yarn to ensure you have enough when you need it.
The entire blanket is worked in the following yarn:
Lion Brand “Heartland” 100% premium acrylic worsted weight (5oz/251yd; 142g/230m)
- Mount Rainier (150T) – 7 skeins
- Capitol Reef (140Q) – 2 skeins
- New River Gorge (146AP) – 2 skeins
- Carlsbad Caverns (108Z) – 1 skein
- Rocky Mountains (181E) – 1 skein
Here’s a breakdown of how much I used for the different components:
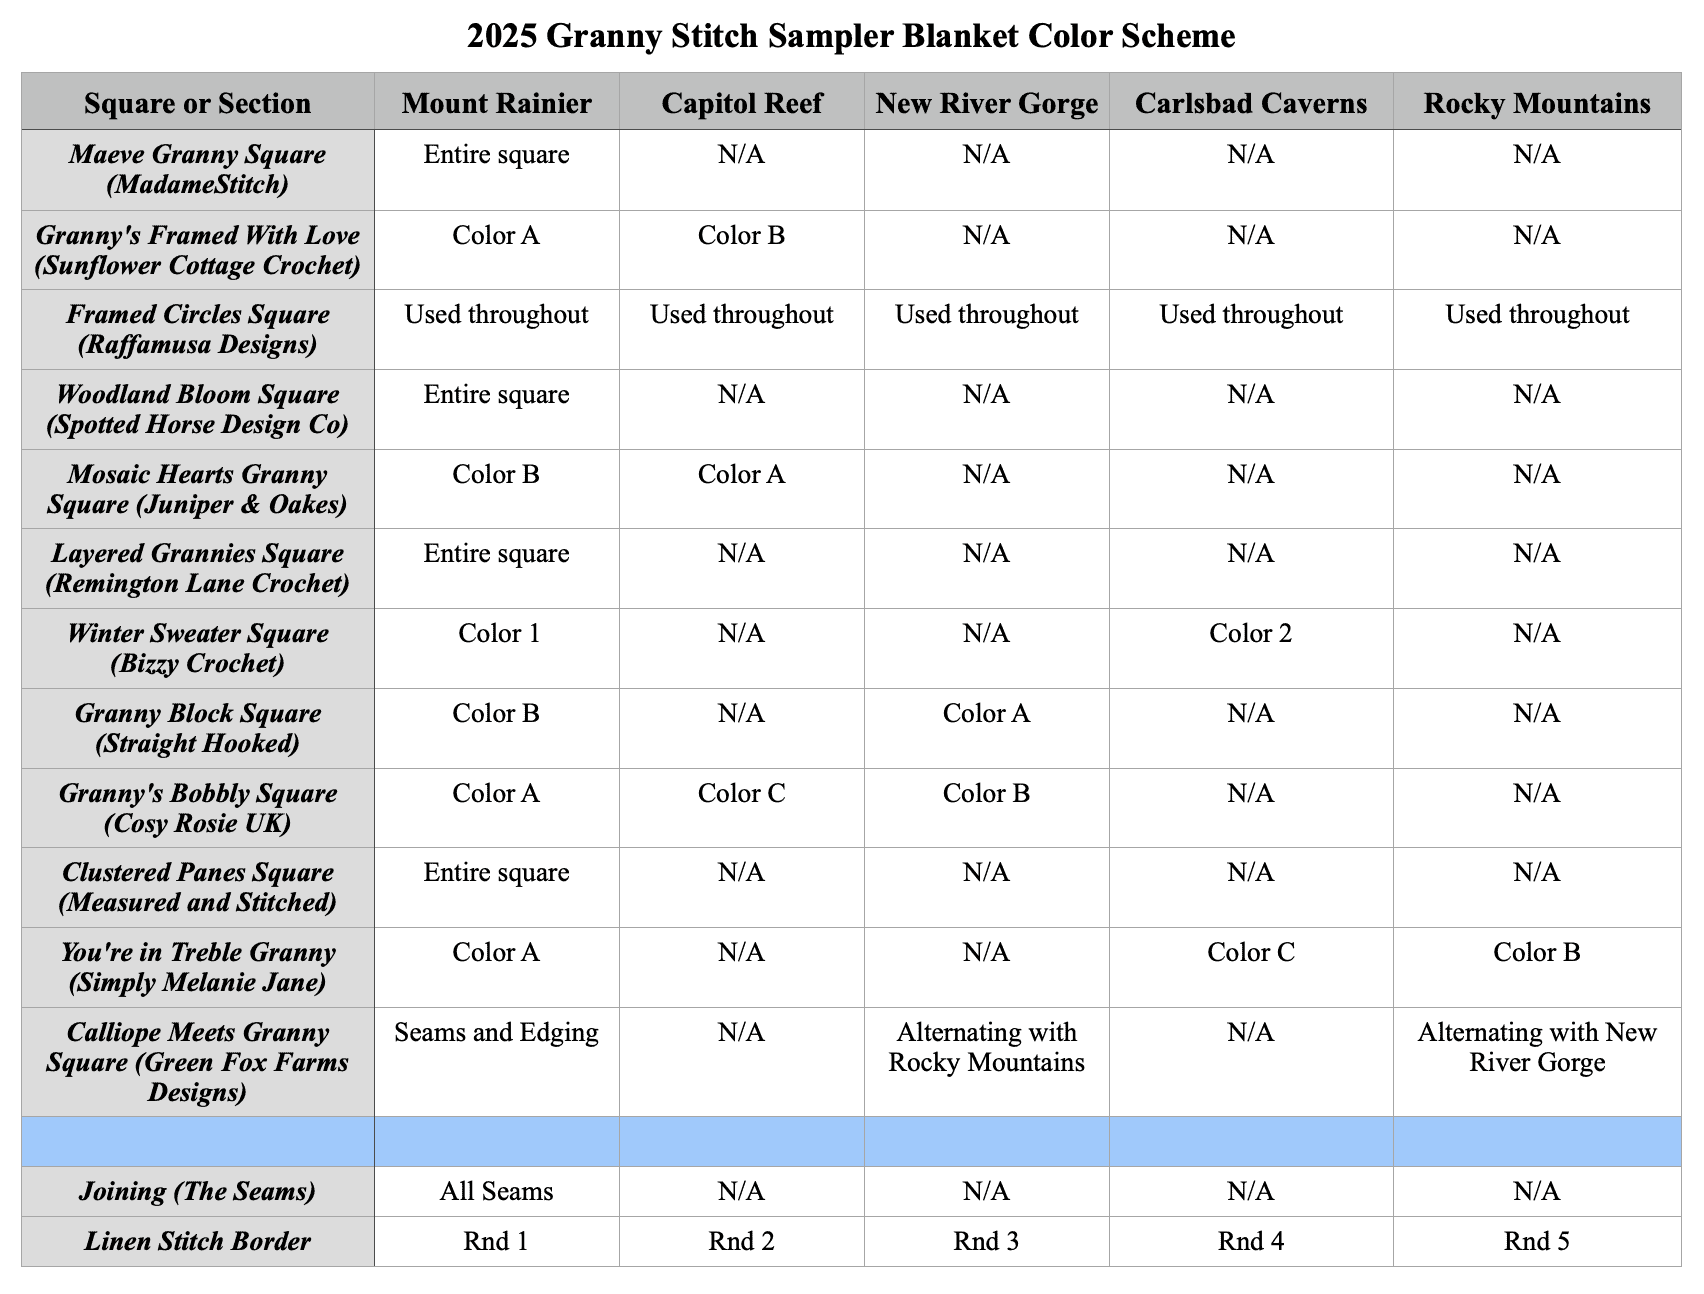
Color Assignment Chart
If you wish to duplicate what I did when I made the sample, this chart shows you what colors I used for each step.
Free Download – Plan Your Colors
Plan your own colors with this handy downloadable color planner. It shows you what each square looks like and gives you a spot for writing in your own colors so you’re ready when the CAL starts!

The Hook
For this year’s blanket, you’ll need a US size H-8 (5mm) hook. However, it’s recommended to check gauge for each square. You may want to have a US size I-9 (5.5mm) on hand just in case.
Other Tools
- Blocking boards and pins
- Removable stitch markers
- Tapestry needle for weaving in ends
Gauge
Gauge is listed in each square pattern. Make sure you check gauge with each new square to ensure all 12 squares are within .5” of each other. Blocking will take care of the rest.
Purchase the full pattern
The full pattern eBook for the 2025 Granny Stitch Sampler Blanket has everything you need to successfully complete the blanket.
Each square pattern contained within is individually written by its designer, giving you the chance to experience her style of pattern writing. You’ll love adding these designers to your list of favorites!
Here are a few other reasons to love the premium PDF:
- You can work at your own pace.
- You won’t need to hop around the blog-o-sphere to find every last bit of the pattern.
- The pattern will be accessible wherever and whenever you need it!
Purchase the premium PDF now at a discounted price of $14.99. Once the CAL is over, the price jumps to $19.99 so don’t delay.
The 2025 Granny Stitch Sampler Blanket Pattern
Free Progress Tracker
I know it can be difficult to keep track of all the moving pieces in this gorgeous blanket. Download this special progress tracker you can use while you’re making the blanket.
General Information
Abbreviations – US crochet terminology
- beg – beginning
- ch – chain
- dc – double crochet
- hdc – half double crochet
- rnd(s) – round(s)
- sc – single crochet
- sk – skip
- sp – space
- st(s) – stitch(es)
- YO – yarn over
- RS – right side
- WS – wrong side
Repeats
- (…) – Work everything within the parentheses in the same st or sp.
- […] – Repeat everything within the brackets the indicated number of times.
- {…} – Repeat everything within the braces the indicated number of times.
Special Stitches
Granny stitch (GS) – 3 dc in the same st or sp
Stacked single crochet (STsc) – (This stitch is used at the beginning of a row or round to replace the traditional turning ch-3. It has the appearance of a dc.) – Insert hook in the same st as the loop, YO, pull up a loop, YO, pull through 2 loops (bottom sc made), insert hook in the left vertical bar of bottom sc, YO, pull up a loop, YO, pull through 2 loops (top sc made)

Blocking
It’s highly recommended that you block each and every square. Blocking ensures that each square is approximately the same size. It will also open up the stitches and show off that fabulous texture!
For the sample, light steam blocking was used. You may use the method of your choice and the one that works best for the yarn you’ve chosen.
Pattern Notes
- Before beginning each new square: Read through the entire pattern. Make a gauge swatch or work the number of rounds for gauge. Practice any stitches or techniques you aren’t familiar with.
- Each square pattern includes all of the information you need to make the square.
- For questions about a particular square, reach out to the individual designer.
Find the links to the square patterns here
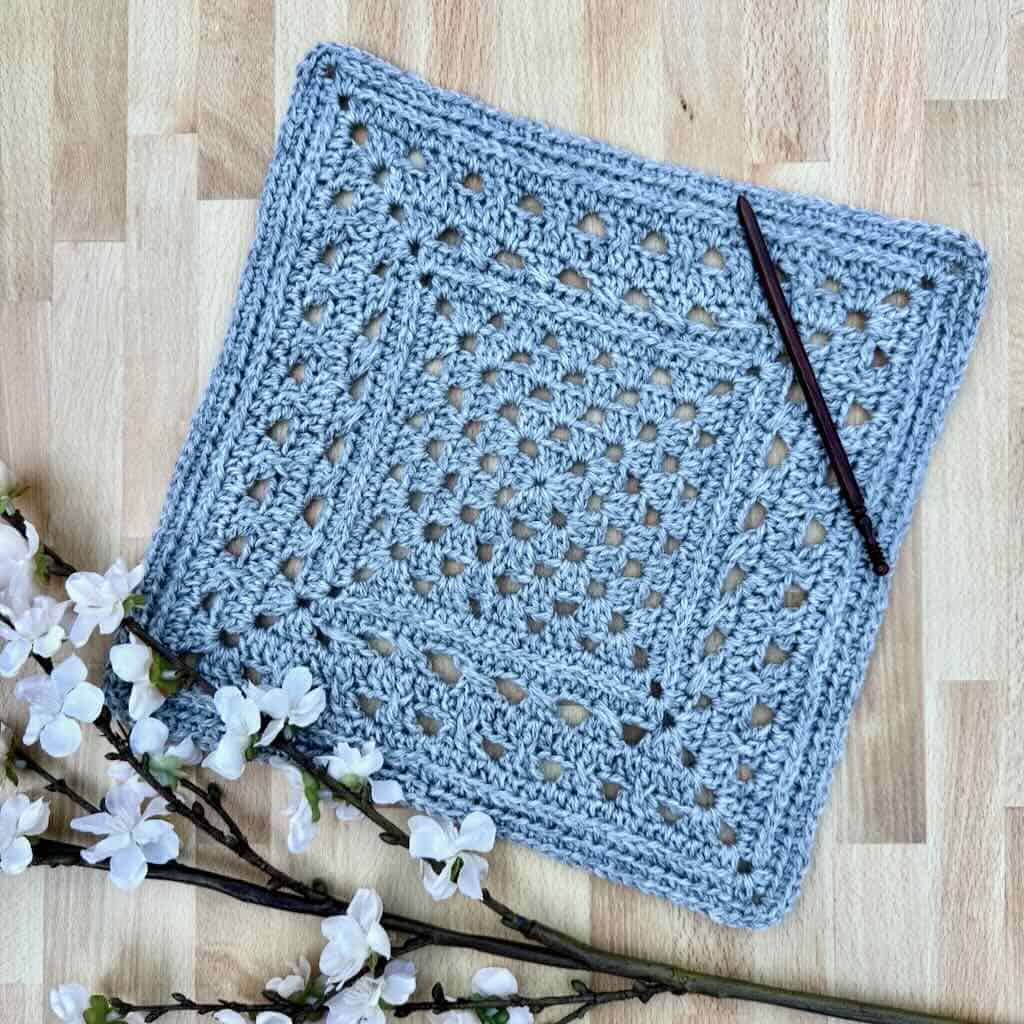
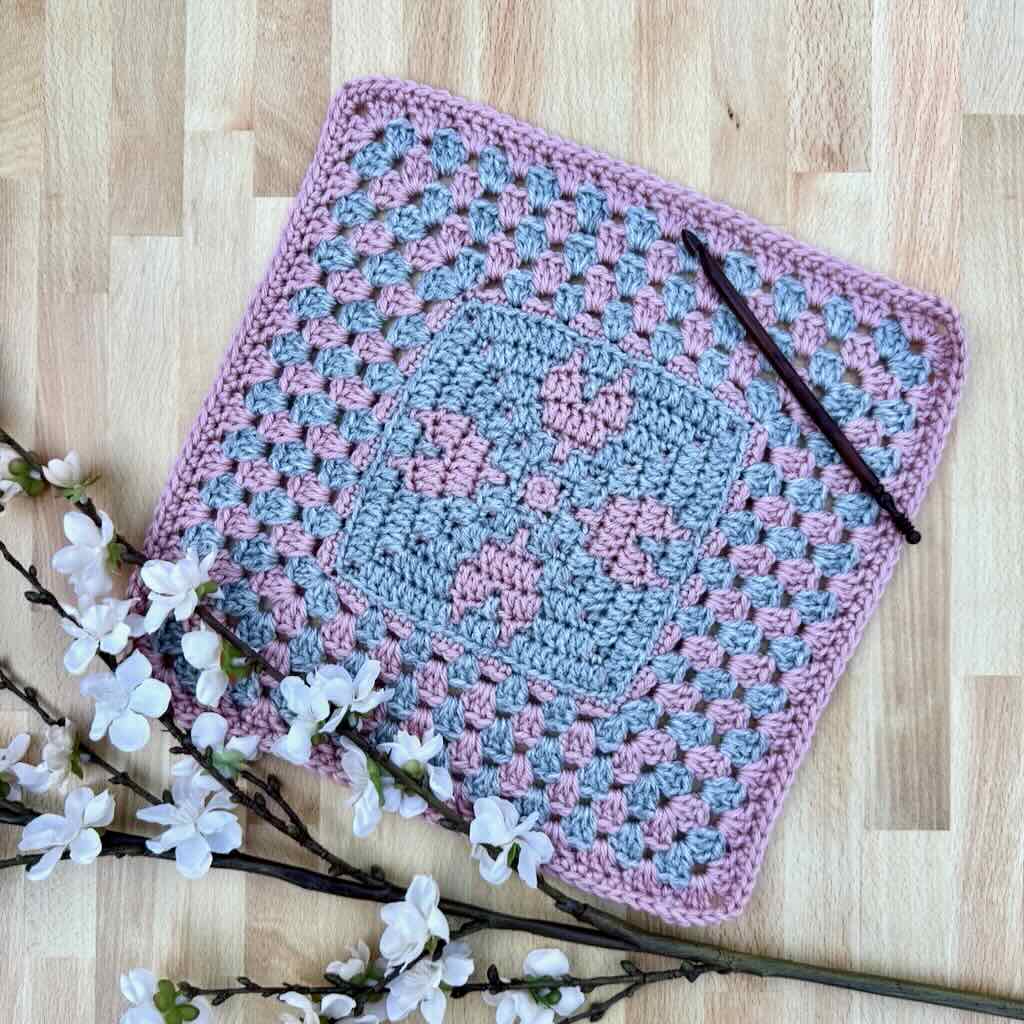
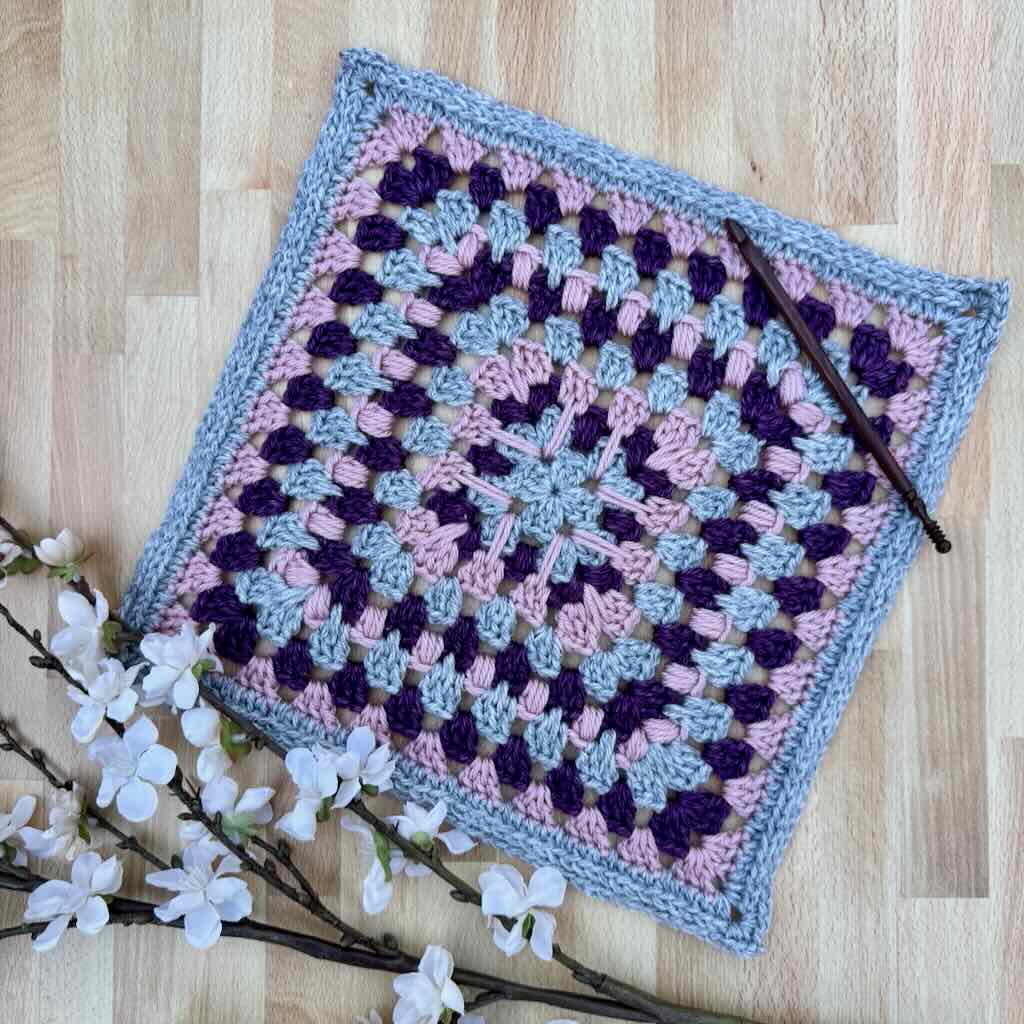
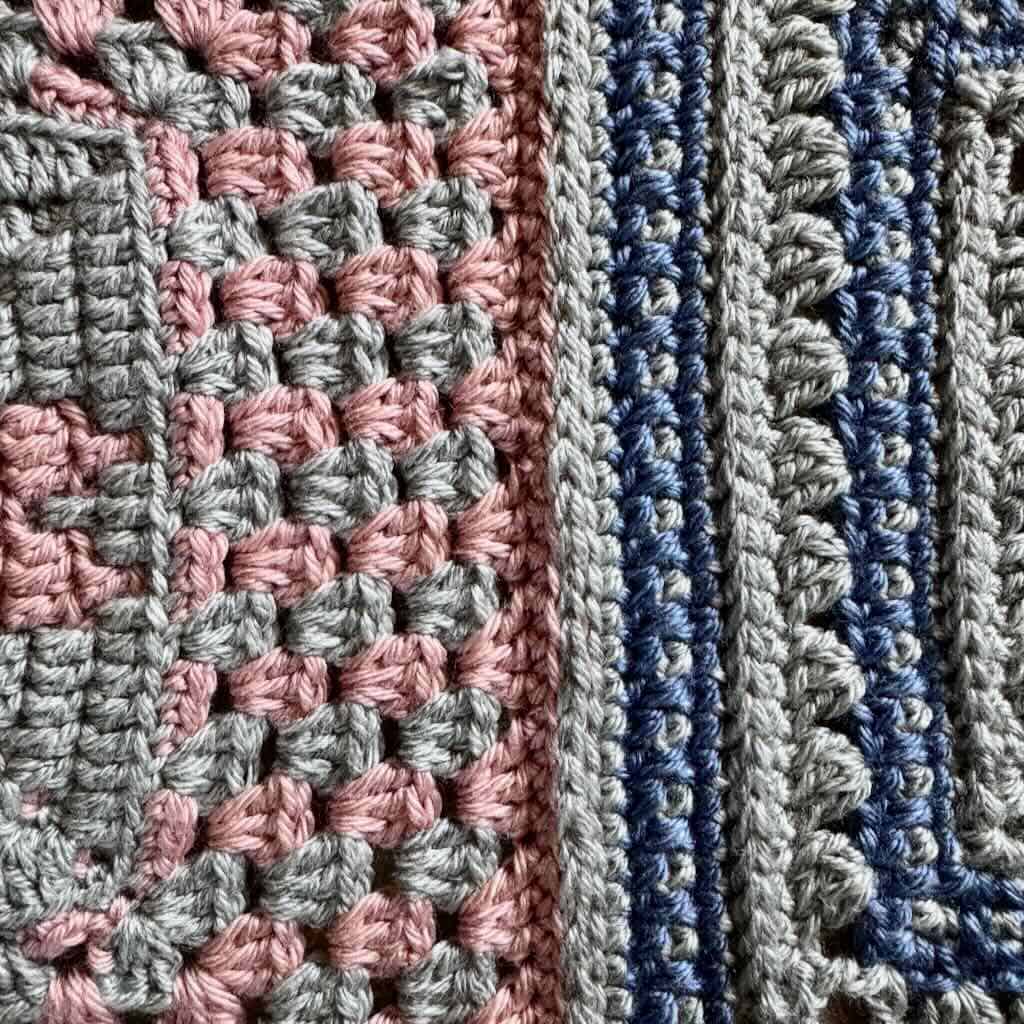
Square 1 – The Maeve Granny Square designed by MadameStitch
Starting with a traditional granny foundation, this square quickly shows its character through granny spike stitches and striking crossed granny stitches. The result is a design that feels both timeless and fresh.
Use the button below to find the free pattern.

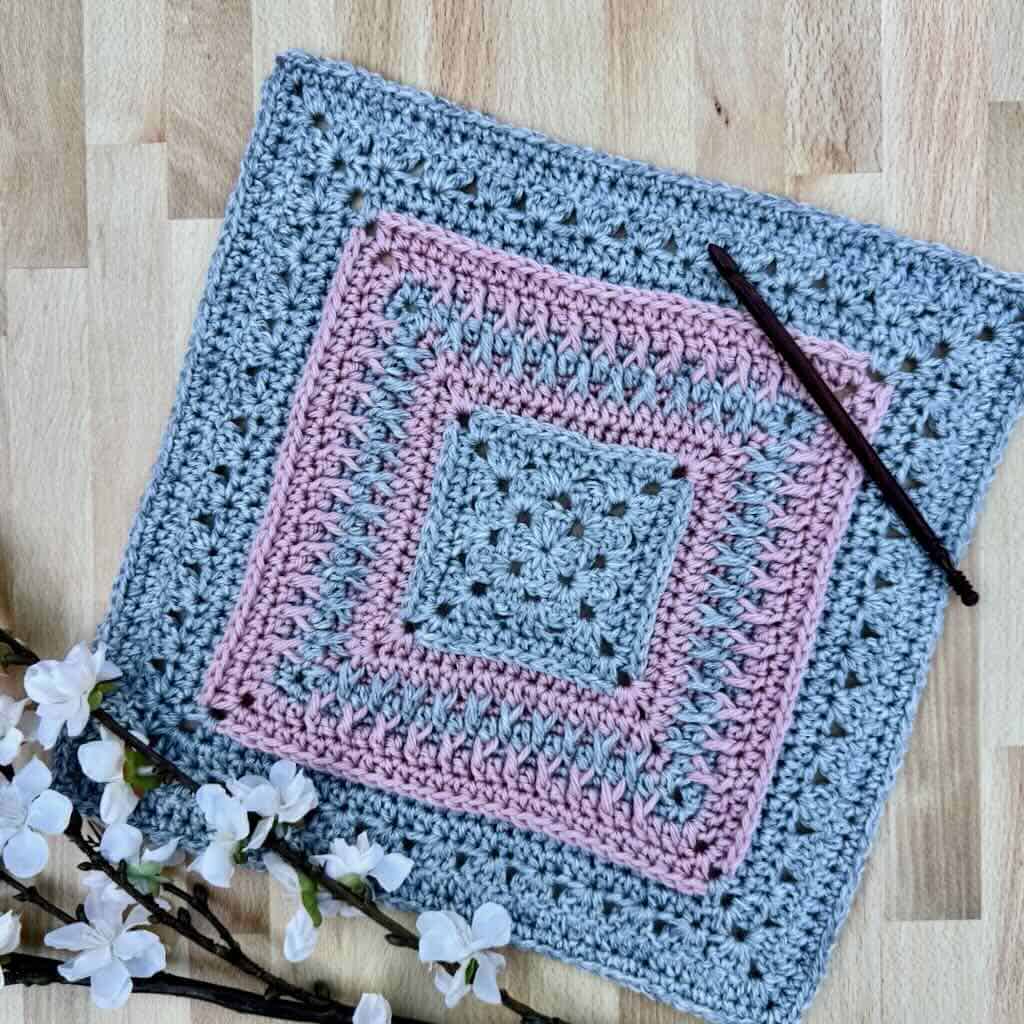
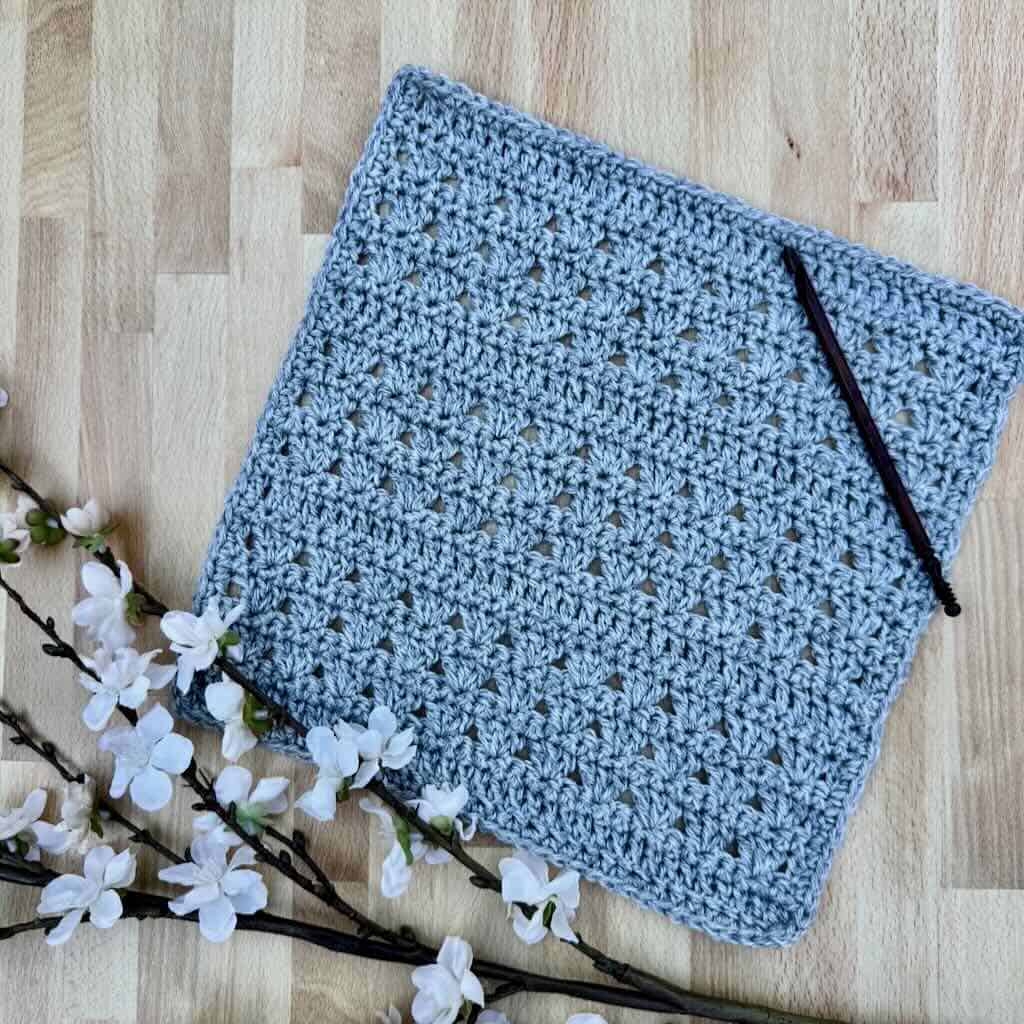
Square 2 – Granny’s Framed With Love designed by Sunflower Cottage Crochet
The Granny’s Framed with Love Square combines the timeless granny stitch with the textured alpine stitch, all framed beautifully with camel stitch for extra definition. Finished with a simple single crochet edging, it’s easy to join to the rest of the blanket.
Use the button below to find the free pattern.

Square 3 – Framed Circles Granny Square designed by Raffamusa Designs
The Framed Circles Granny Square is a fun mixture of 4 small granny squares “framed” by a colorful granny stitch border. It’s certain to be a colorful addition to your blanket!
Use the button below to find the free pattern.
Square 4 – The Woodland Bloom Granny Square designed by Spotted Horse Design Co
Meet the Woodland Bloom Square. A floral twist on the classic granny square, with puff stitches, clusters, and v-stitches that give it so much cozy texture.
Use the button below to find the free pattern.
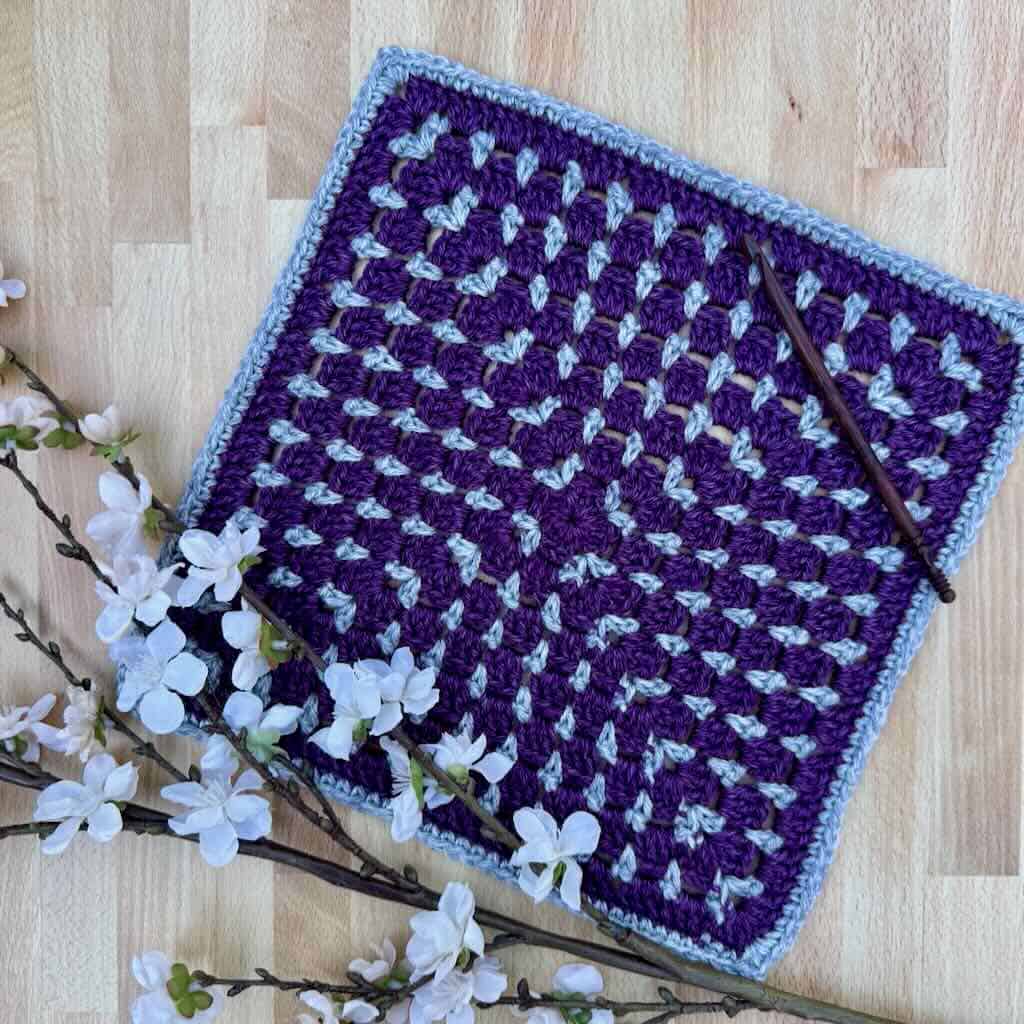
Square 5 – Mosaic Hearts Granny Square designed by Juniper & Oakes
The Mosaic Hearts Granny Square is a beautiful combination of mosaic overlay crochet and traditional granny stitches. Erin is the master of mosaic overlay crochet, with lots of resources to help you out. If you’ve never tried this technique, now is the time!
Use the button below to find the free pattern.
Square 6 – Layered Grannies designed by Remington Lane Crochet
Layered Grannies makes you think of snuggling up under all your Grandma’s handmade blankets, and now you can make your own! Worked in rows, this blanket square whips up quickly and is a lot of fun to make!
Use the button below to find the free pattern.
Square 7 – Winter Sweater Granny Square designed by Bizzy Crochet and Design
Bring sweater-weather vibes to your blanket with this cozy granny stitch square! Its classic texture and timeless design make it a perfect piece for the Granny Stitch CAL.
Use the button below to find the free pattern.
Square 8 – Granny Block Square designed by Straight Hooked
The Granny Block square is a quick and easy square with a stunning finished look!
Use the button below to find the free pattern.
Square 9 – Granny’s Bobbly Square designed by Cosy Rosie UK
Granny’s Bobbly Square is a variation on the traditional granny square that includes different spike stitches and puff stitches to add extra texture.
Use the button below to find the free pattern.

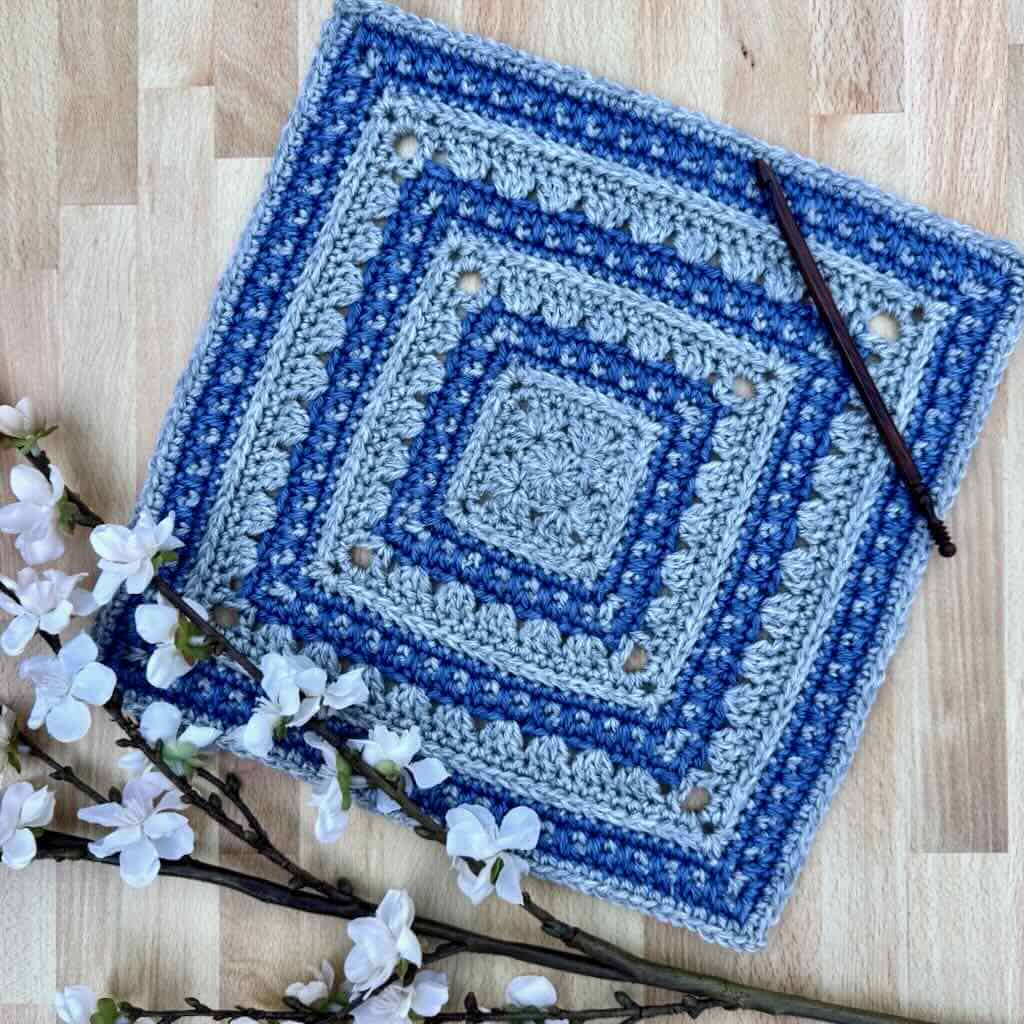
Square 10 – Clustered Panes Blanket Square designed by Measured and Stitched
The cluster stitch shines bright in the Clustered Panes Blanket Square! With alternating sections of cluster stitches and standard double crochet stitches, this blanket square effortlessly combines two textures into one amazing square..
Use the button below to find the free pattern.
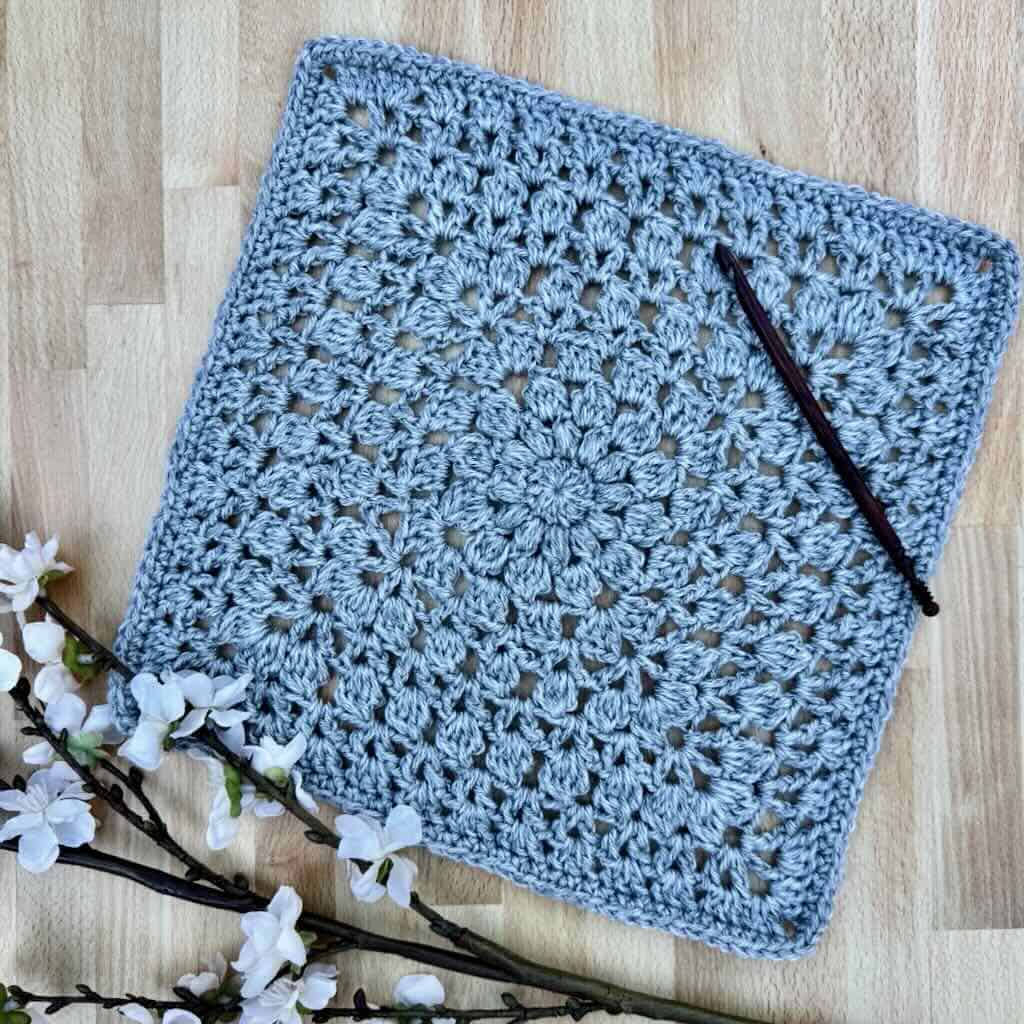
Square 11 – You’re in Treble Granny Square designed by Simply Melanie Jane
Beginning with a circle in this granny square gives a fun twist to the traditional design, and then a bold and unique finish with trebles adds extra height and a striking frame.
Use the button below to find the free pattern.
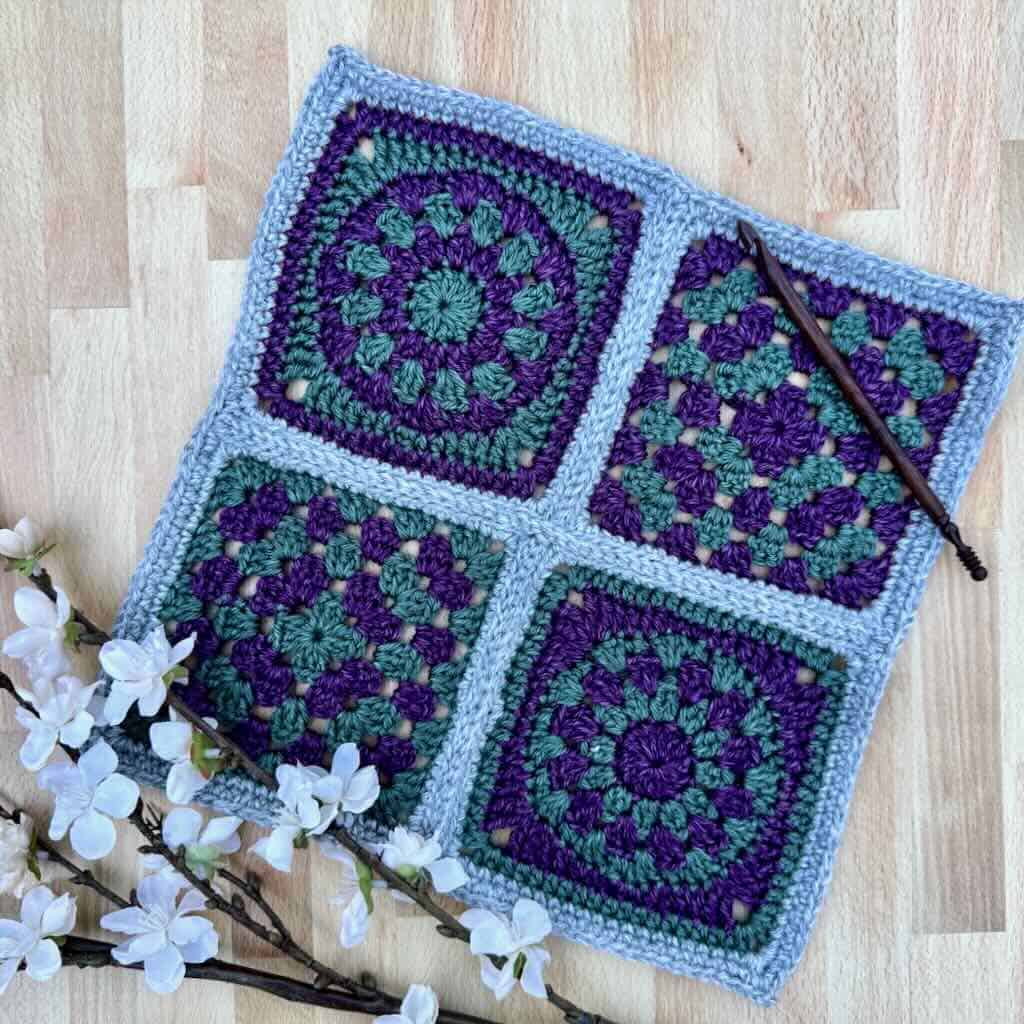
Square 12 – Calliope Meets Granny Square designed by Green Fox Farms Designs
Calliope Meets Granny Square is created with 4 smaller squares seamed together – 2 traditional Granny Squares paired with 2 Calliope Wheel Squares. The Calliope Wheel is a fun and unique combination of mandala and granny square, creating visual interest and a beautiful result!
Use the button below to find the free pattern.
Let’s Put it All Together!
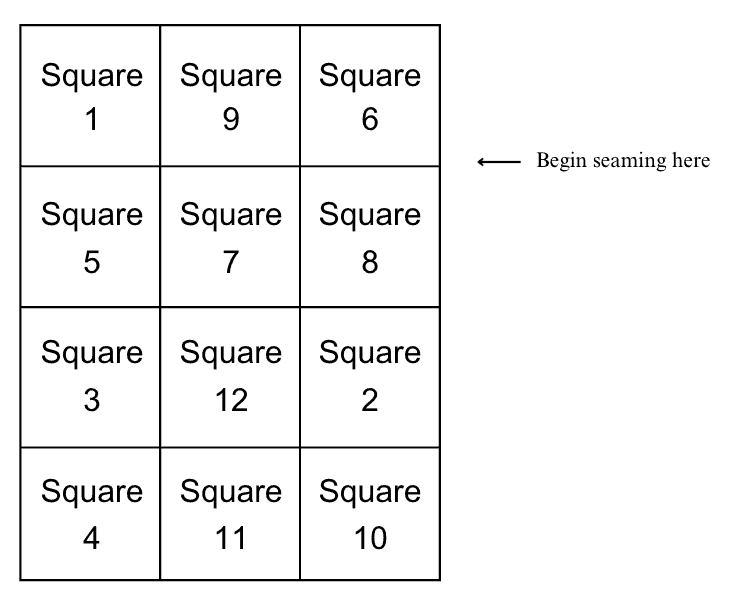
The square numbers correspond to the order in which the squares were released.
How to Assemble the Blanket
- Lay out the squares according to the chart above. When you look at the laid out squares, they should all be right side showing, with the stitch patterns oriented in the correct direction so you’re looking at them top to bottom.
- Using a flat slip stitch seam (or the joining method of your choice), begin where indicated in the chart above.
- Sew all horizontal seams first, then sew the vertical seams.
- Do not weave in the ends. They can be carried under the Border and subsequently secured once the Border is complete.
Flat Slip Stitch Seam
A flat slip stitch seam is worked on the RS of the blanket. This method creates a beautiful surface element that sits flush with the rest of the blanket.
Visit this blog post to find out how to crochet the beautiful flat slip stitch seam.

The Linen Stitch Border
Each of the squares in this blanket has a slightly different number of sts along each edge. The success of the Border depends on evenly spaced sts to avoid buckling or stretching.
In Rnd 1, you’ll work 45 sts across the side of the square regardless of the number of sts that square has.
How to work 45 sts along the side of each square
- Place a marker in the center st of the square’s side.
- Work 22 sc before the marker with the 23rd in the st with the marker.
- Move the marker up.
- Work 22 sc between the marker and the seam.
- If there are more than 45 sts along the square’s side, evenly space decreases to reach the required number of sts.
- If there are less than 45 sts along the square’s side, evenly space increases to reach the required number of sts.
Rnd 1: Attach Mount Ranier to any corner, ch 1, [(sc, ch 2, sc) in the same corner sp, 45 sc across the side of each square, working a sc in each seam] 4 times, join with slip st to beg st, fasten off.
Note for Rnd 2: There may or may not be a st to sk before a corner.
Rnd 2: Attach Capitol Reef to any ch-2 sp, ch 1, (sc, ch 2, sc) in the same ch-2 corner sp, ch 1, sk 1 st, [sc in the next st, ch 1, sk 1 st] across to the next ch-2 corner sp, {(sc, ch 2, sc) in the ch-2 corner sp, ch 1, sk 1 st, [sc in the next st, ch 1, sk 1 st] across to the next ch-2 corner sp]} 3 times, join with slip st to beg st, fasten off.
Rnd 3: Attach Carlsbad Caverns to any ch-2 sp, ch 1, (sc, ch 2, sc) in the same ch-2 corner sp, ch 1, [sc in the next ch-1 sp, ch 1] across to the next ch-2 corner sp, {(sc, ch 2, sc) in the ch-2 corner sp, ch 1, [sc in the next ch-1 sp, ch 1] across to the next ch-2 corner sp]} 3 times, join with slip st to beg st, fasten off.
Rnd 4: With New River Gorge, rep Rnd 3.
Rnd 5: With Rocky Mountains, rep Rnd 3.
Fasten off and weave in all ends.
Can’t wait to start!
Me, too! So glad you’re joining the CAL!
Best,
Debbie
Can’t wait to get started, however I think ill be doing mine in DK weight as that’s what I have an abundance of
It will definitely be a little smaller. But, what a great way to use up your stash!
Best,
Debbie
happy to be here
So glad to have you here!
I believe that the granny square is beautiful
I absolutely agree with you!
Sorry I have trouble to download no 2 pattwern by Helen
Marie,
There are no free downloads for the square patterns. To get the printed PDFs you must purchase the full pattern eBook.
Best,
Debbie
Very pretty squares! I love them!