Maeve Granny Square – A Bold, Modern Twist on the Traditional
Discover the Maeve Granny Square crochet pattern, blending classic granny stitches with bold spikes and crosses for a modern, cozy design.
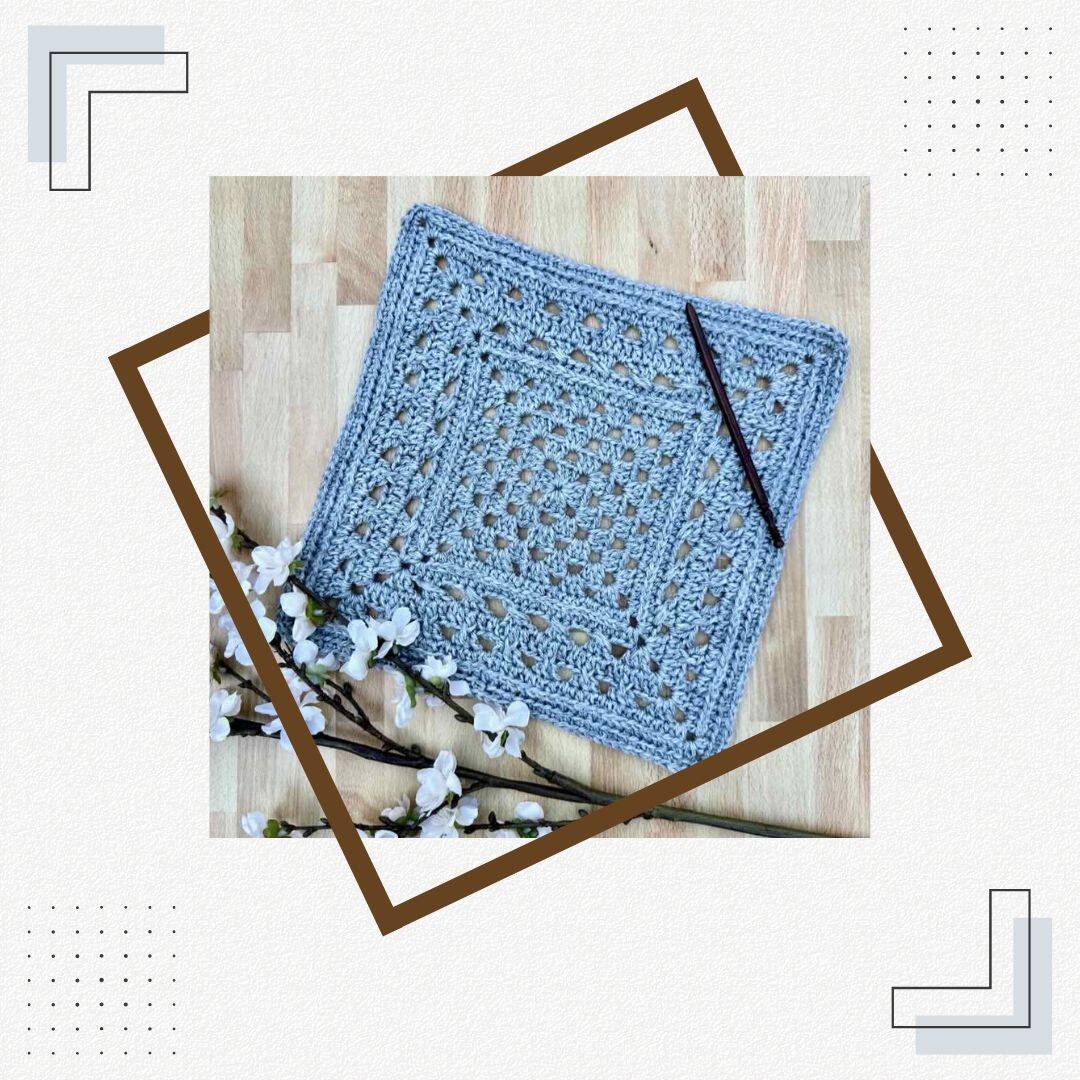
The Maeve Granny Square
The granny square is one of the most versatile crochet design features in the crochet toolbox. And, it just happens to be my favorite crochet design element!
The traditional granny square can seem so plain and ordinary. And, yet, with some creative tweaking it can adopt a bold, modern look.
That’s what the Maeve granny square has to offer. Designed specifically for the 2025 Granny Stitch Sampler Blanket, it’s a creative take on a classic design.
Design + Construction
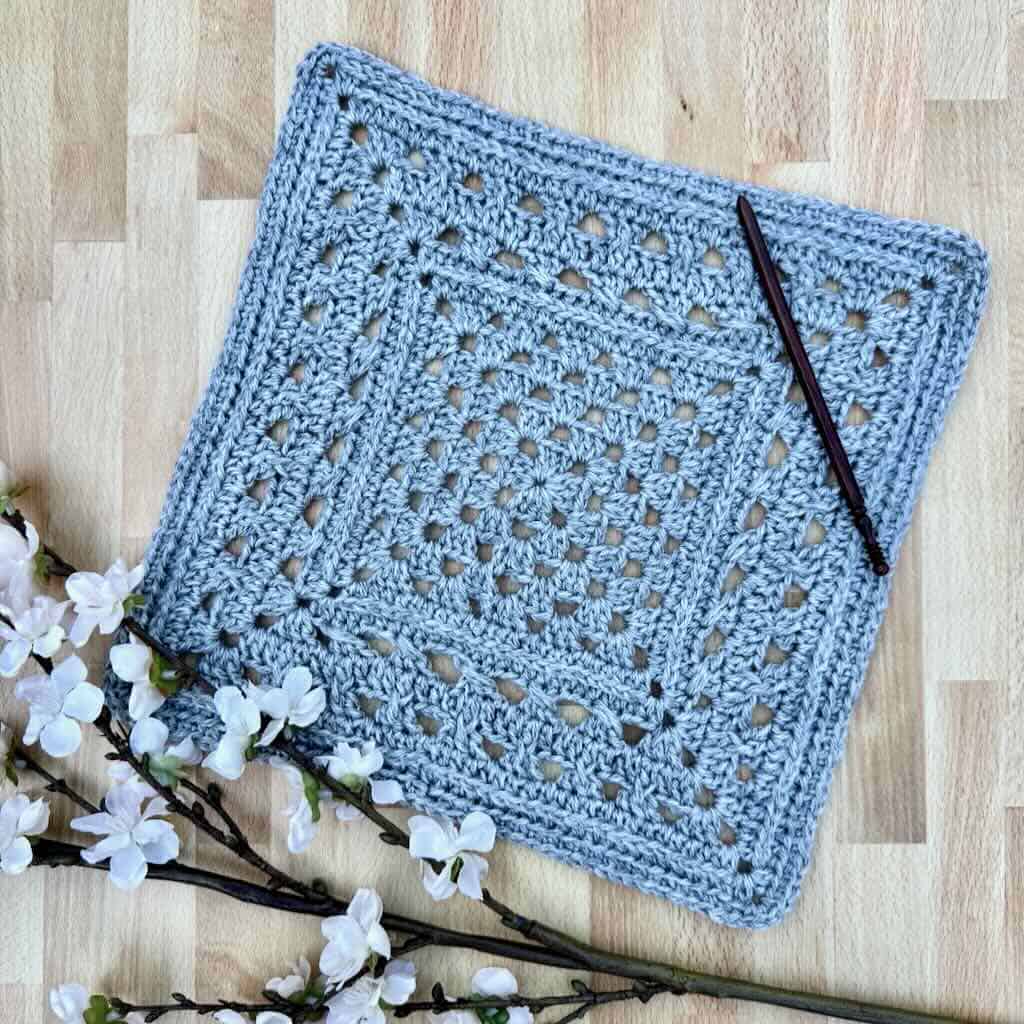
At the heart of the Maeve granny square is the traditional granny stitch. It’s that little stitch – 3 double crochets worked in the same space – that gives the classic granny square its iconic look.
To add subtle texture, I’ve popped in a round of half double crochets worked in the 3rd loop (aka the camel stitch). This little beauty has become one of my favorites for adding surface texture. It’s easy, quick and not fussy at all.
The 2 new kids on the block are the crossed granny stitch and the spiked granny stitch. Both include 3 double crochets just like they’re cousin but what you do with those 3 double crochets makes them unique.
In the crossed double crochet, the 3rd double crochet of the group is worked in a skipped stitch, “crossing” it over the other 2. The middle stitch of the spiked granny stitch is worked as a front post stitch, giving it the look of a spike.
All together, the Maeve granny square combines the traditional with the modern for a subtle, striking statement.
The Yarn
I chose Lion Brand’s “Heartland” worsted weight yarn, partly because that’s the yarn chosen for the Granny Stitch Sampler Blanket.
Lion Brand “Heartland” 100% premium acrylic worsted weight (5oz/251yd; 142g/230m)
However, my real motivation is that it’s just the most glorious blanket yarn ever!
I’m not a happy crocheter unless the yarn I’m using is soft, easy to work with, and makes my project look stunning. Heartland ticks all three of those things off the list, making it my perfect choice.
If Heartland isn’t your thing, no worries! Choose your favorite worsted weight yarn for making blankets. Or, maybe find what you have in your stash. The granny square doesn’t take much yarn so you can mix and match throughout for your own unique take on Maeve.
Yarn Substitute
Want to choose another yarn but you don’t know what would work?
Use my handy Yarn Substitution Worksheet to figure it out.

Or, click here to find a similar yarn to Heartland.
Where to get the Maeve Granny Square PDF
The Maeve Granny Square is a free crochet granny stitch square pattern in this blog post. Scroll down to view the free version.
Upgrade to the premium PDF if you’d like a printer friendly and downloadable version of the PDF, available for purchase it in my Ravelry shop.
The premium PDF can be uploaded to your favorite mobile device so you can take your Maeve granny square placemat project with you to work on whenever you’re out and about.
The PDF is easy to read and beautifully formatted without ads for a great experience. Plus, you’ll find helpful photo tutorials for the crossed and spiked granny stitches.
Get your copy today!


The Maeve Granny Square Free Pattern
General Information
Yarn
Lion Brand “Heartland” 100% premium acrylic worsted weight (5oz/251yd; 142g/230m)
Mount Rainier (150T) – 125-150yds
Any worsted weight yarn appropriate for a blanket will work for this square. Substituting another yarn may alter the finished size of the square.
Hook
US size H-8 (5mm)
Finished Size
Approx. 12-12.5″ square
Gauge
Rnds 1-3 = approx. 4″ measured across
Skill Level – Advanced Beginner/Intermediate
Abbreviations – US crochet terminology
- beg – beginning
- ch – chain
- dc – double crochet
- FPdc – front post double crochet
- hdc – half double crochet
- rep – repeat
- rnd(s) – round(s)
- sc – single crochet
- sk – skip
- sp – space
- st(s) – stitch(es)
- RS – right side
- WS – wrong side
- YO – yarn over
Repeats
- ( … ) – Work everything within the parentheses in the same st or sp
- [ … ] – Work everything within the brackets the number of times indicated
- { … } – Work everything within the braces the number of times indicated
Special Stitches
Crossed granny stitch (crossed GS) – sk 1 st, dc in the next 2 sts, dc in the skipped st.
Granny stitch (GS) – 3 dc in the same st or sp
Half double crochet in the 3rd loop (hdc 3lp) – when working with the RS of the sts facing – YO, insert hook through the 3rd loop that sits just under and behind the top loop of the stitch, YO, pull through the 3rd loop, YO, pull through all 3 loops on hook to complete the hdc.
Invisible join: At the end of the rnd, remove the working loop from hook, insert hook from back to front through the top of the 1st st of the rnd, add the working loop back onto the hook and pull through to the WS, continue as instructed

Spiked granny stitch (spiked GS) – The spiked granny stitch is worked the same as a traditional granny stitch with the exception of the center dc. [Dc in the indicated st, FPdc around the same dc, dc in the same st as the 1st dc which sits behind the FPdc]
Stacked single crochet (STsc) – (This stitch is used at the beginning of a round to replace the traditional turning ch-3. It has the appearance of a dc.) – Insert hook in the same st as the loop, YO, pull up a loop, YO, pull through 2 loops (bottom sc made), insert hook in the left vertical bar of the bottom sc, YO, pull up a loop, YO, pull through 2 loops (top sc made).

Pattern Notes
- Do not turn after any rnd. The RS will always be facing you.
- A ch-1 at the beg of a rnd does not count as a st.
- A ch-2 or ch-3 may be substituted for the STsc at any time without altering the construction of the square.
- Pay close attention to the number of stitches and chains worked in each corner space. Those numbers change to ensure the square lays flat.
Video Tutorial
For the full pattern video tutorial on YouTube, click here or on the photo below.
Pattern Instructions
Ch 4, join with slip st to form ring.
Rnd 1: (STsc, 2 dc) in the ring (counts as 1st GS), ch 3, [GS in the ring, ch 3] 3 times, join with slip st to beg st. < 4 GS, 4 ch-3 corner sp >
Rnd 2: STsc in the ch-3 corner sp to the right of the hook, ch 1, [(GS, ch 3, GS) in the next ch-3 corner sp, ch 1] 3 times, (GS, ch 3, 2 dc) in the same sp as the STsc to complete the 1st corner, join with slip st to beg st. < 8 GS, 4 ch-1 sp, 4 ch-3 corner sp >
Rnd 3: Slip st in the ch-1 sp, (STsc, 2 dc) in the ch-1 sp, ch 1, [(GS, ch 3, GS) in the next ch-3 corner sp, ch 1, GS in the ch-1 sp, ch 1] 3 times, (GS, ch 3, GS) in the next ch-3 corner sp, ch 1, join with slip st to beg st. < 12 GS, 8 ch-1 sp, 4 ch-3 corner sp >
Rnd 4: STsc in the ch-1 sp to the right of the hook, ch 1, GS in the next ch-1 sp, ch 1, {(GS, ch 3, GS) in the next ch-3 corner sp, [ch 1, GS in the next ch-1 sp] twice, ch 1} 3 times, (GS, ch 3, GS) in the next ch-3 corner sp, ch 1, 2 dc in the same sp as the STsc to complete the 1st GS, ch 1, join with slip st to beg st. < 16 GS, 12 ch-1 sp, 4 ch-3 corner sp >
Rnd 5: Slip st in the ch-1 sp, (STsc, 2 dc) in the ch-1 sp, ch 1, GS in the next ch-1 sp, ch 1, {(GS, ch 3, GS) in the next ch-3 corner sp, [ch 1, GS in the ch-1 sp] 3 times, ch 1} 3 times, (GS, ch 3, GS) in the next ch-3 corner sp, ch 1, GS in the next ch-1 sp, ch 1, join with slip st to beg st. < 20 GS, 16 ch-1 sp, 4 ch-3 corner sp >
Rnd 6: Ch 1, hdc in the same st and in each st and ch-1 sp across to the ch-3 corner sp, [(2 hdc, ch 2, 2 hdc) in the ch-3 corner sp, hdc in the next st and in each st and ch-1 sp across to the next ch-3 corner sp] 3 times, (2 hdc, ch 2, 2 hdc) in the ch-3 corner sp, hdc in the next st and in each st and ch-1 sp across to the beg st, invisible join. < 23 hdc along each side, 4 ch-2 corner sp >
Note for Rnd 7: The 1st hdc 3lp after each corner is worked in the hidden st.
Rnd 7: Ch 1, hdc 3lp in the same st and in each st across to the ch-2 corner sp, [(2 hdc, ch 2, 2 hdc) in the ch-2 corner sp, hdc 3lp in the next st and in each st across] 3 times, (2 hdc, ch 2, 2 hdc) in the ch-2 corner sp, hdc 3lp in the next st and in each st across to the beg st, join with slip st to beg st. < 23 hdc 3lp along each side, 16 hdc, 4 ch-2 corner sp >
Note: The 3rd skipped st is actually the skipped st of the crossed GS. (See Fig. 1 in Special Stitches)
Rnd 8: Slip st in the next st, ch 2 (counts as 1st dc), dc in the next st, dc in the slip st join (counts as 1st crossed GS), ch 1, sk 3, [crossed GS, ch 1, sk 3] twice, (GS, ch 3, GS) in the ch-2 corner sp, {ch 1, sk 3 sts, [crossed GS, ch 1, sk 3 sts] 5 times, (GS, ch 3, GS) in the ch-2 corner sp} 3 times, ch 1, sk 3 sts, crossed GS, ch 1, sk 3 sts] twice, join with slip st to beg ch-2. < 20 crossed GS, 8 GS, 24 ch-1 sp, 4 ch-3 corner sp >
Rnd 9: STsc, dc in the next st and in each st and ch-1 sp across, (2 dc, ch 3, 2 dc) in the ch-3 corner sp, [dc in the next st and in each st and ch-1 sp across, (2 dc, ch 3, 2 dc) in the ch-3 corner sp] 3 times, dc in the next st and in each st and ch-1 sp across to the beg st, join with slip st to beg st. < 31 dc along each side, 4 ch-3 corner sp >
Note for Rnd 10: The spiked GS of this rnd should visually line up with the center of the crossed GS of Rnd 8. (See Special Stitches)
Rnd 10: Slip st in the next st, (ch 2 loosely, FPdc, dc) in the same st (counts as the 1st spiked GS), ch 1, sk 3 sts, [spiked GS, ch 1, sk 3 sts] 3 times, (GS, ch 3, GS) in the ch-3 corner sp, {ch 1, sk 3 sts, [spiked GS, ch 1, sk 3 sts] 7 times, (GS, ch 3, GS) in the ch-3 corner sp}3 times, ch 1, sk 3 sts, [spiked GS, ch 1, sk 3 sts] 3 times, join with slip st to top of ch-2. < 28 spiked GS, 8 GS, 32 ch-1 sp, 4 ch-3 corner sp >
Rnd 11: Rep Rnd 6. < 39 hdc along each side, 4 ch-2 corner sp >
Rnd 12: Rep Rnd 7. < 39 hdc 3lp along each side, 16 hdc, 4 ch-2 corner sp >
Rnd 13: No ch, sc in the same st and in each st across to the ch-2 corner sp, 3 sc in the ch-2 corner sp, [sc in the next st and in each st across to the next ch-2 corner sp, 3 sc in the ch-2 corner sp] 3 times, sc in the next st and in each st across to the beg st, join with slip st to beg st. < 43 sc along each side, 3 sc in each ch-2 corner sp >
Fasten off and weave in ends
Lightly steam block to desired size. Blocking will soften the yarn and open up the stitches for beautiful stitch definition and gorgeous drape.
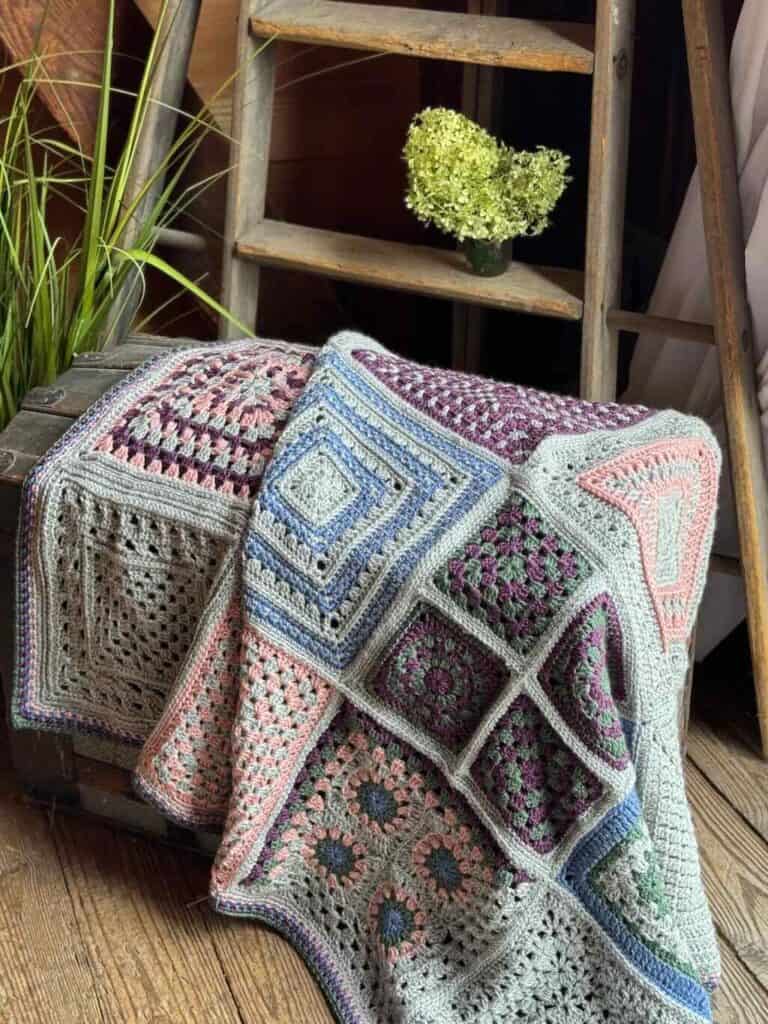
The Maeve Granny Square is part of the 2025 Granny Stitch Sampler Blanket Free Crochet Along.
It’s a gorgeous blanket made up of 12 squares designed by 12 different crochet designers.
The granny stitch is included in every square in fresh, modern ways to create a one-of-a-kind blanket.


The video was a great help in getting this square completed.
I have never done this pattern, but it looks like fun.
I love this granny square; with the additional stitches it gives it such a flair.
Thank you, Yvonne! I’m so glad you enjoy it!