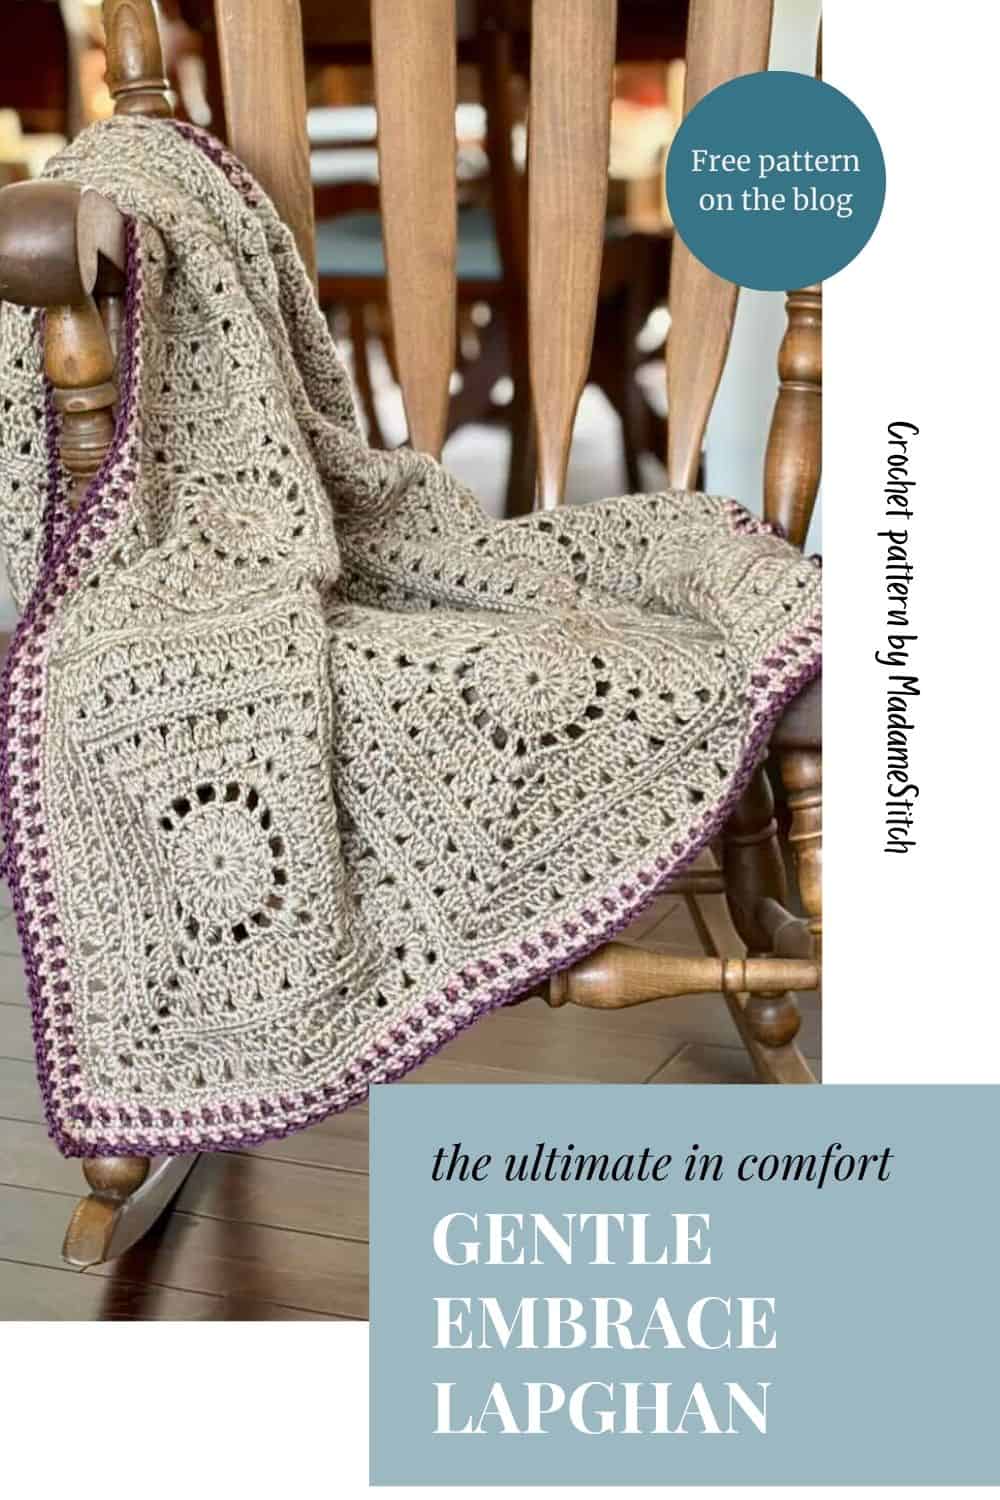
A Handmade Granny Square Lap Blanket, a Beautiful Expression of Love
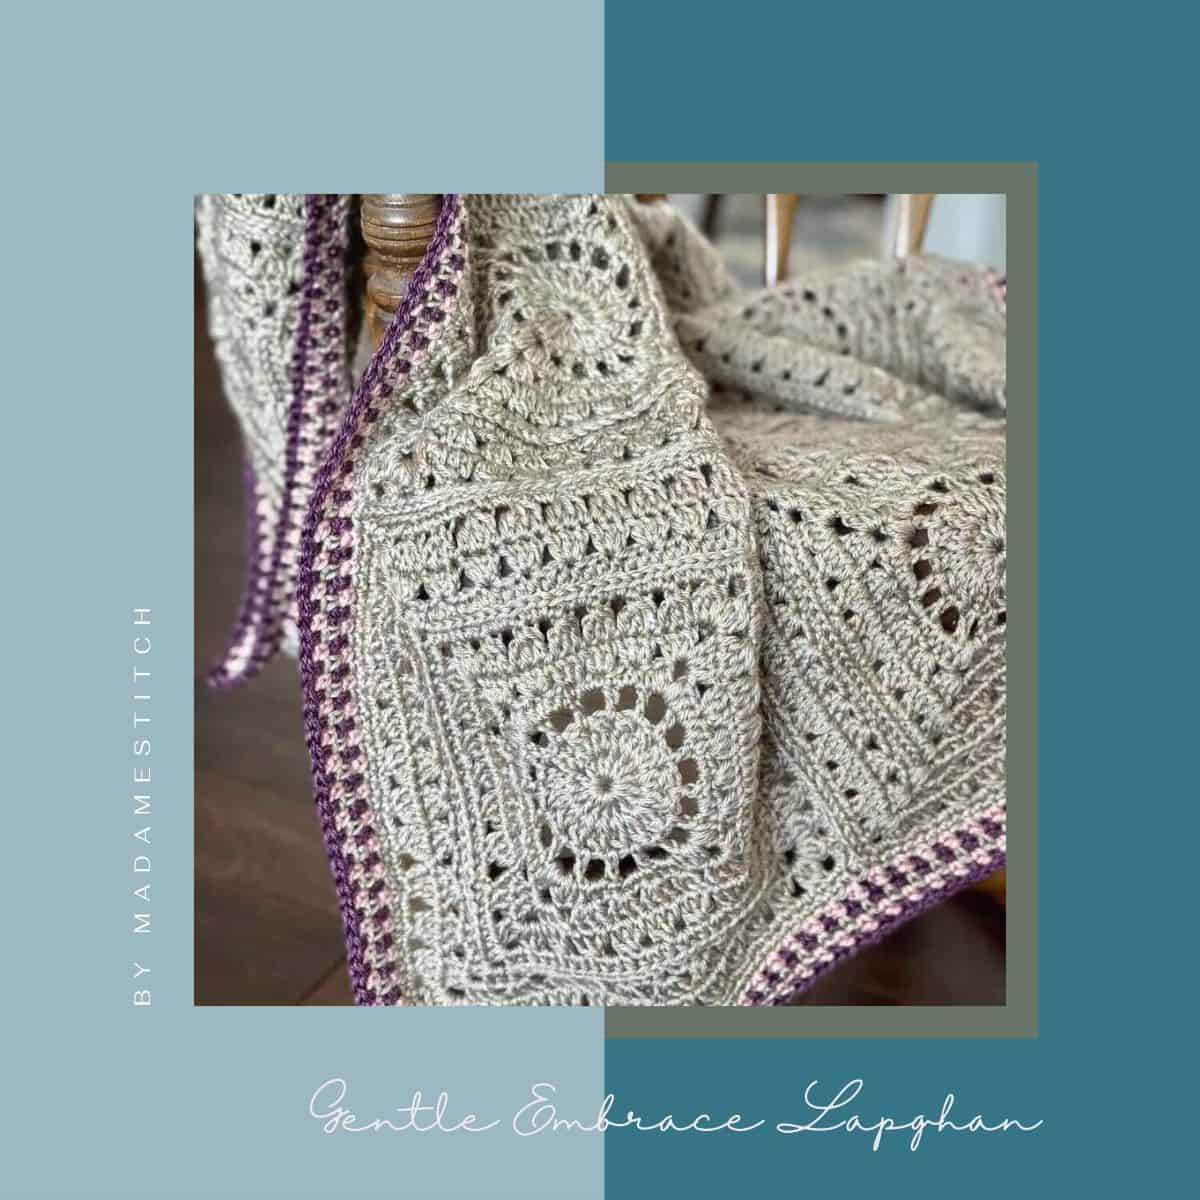
A handmade granny square lap blanket can be a beautiful expression of love for anyone, especially those with limited mobility. The Gentle Embrace Lapghan is the perfect size.
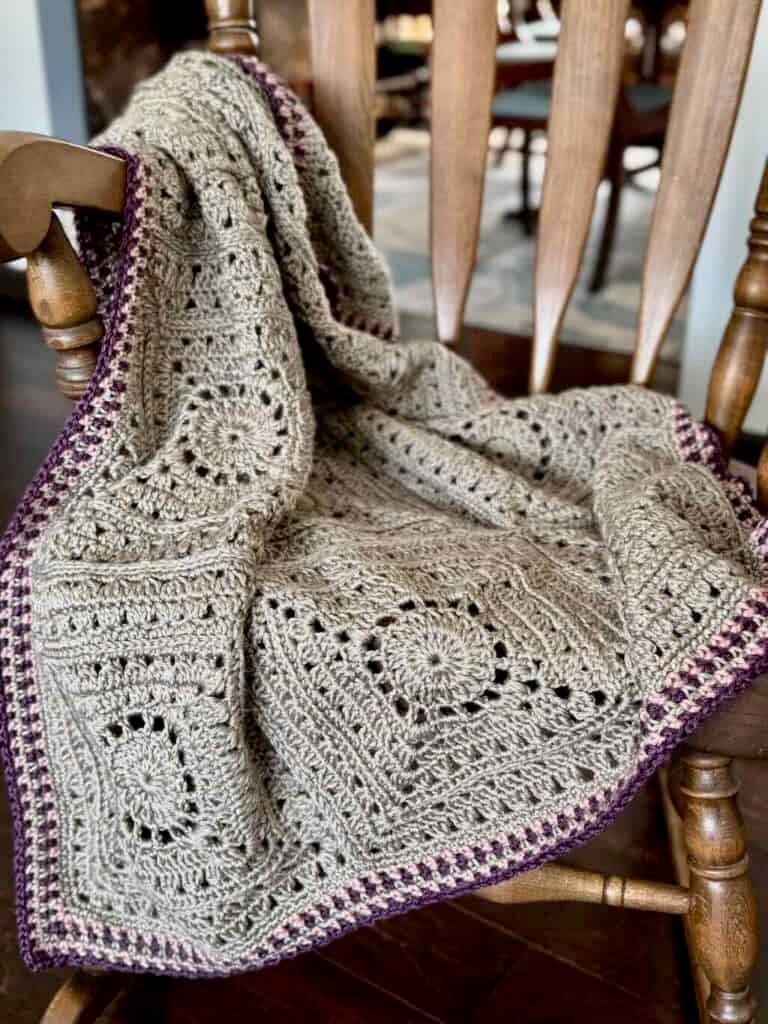
There’s something profoundly comforting about weight and warmth settling across your lap. A lapghan isn’t just a small blanket; it’s a gentle embrace when life gets heavy, a splash of color on gray days, and a soft cocoon that says “rest and relax here.”
For those who spend hours in a favorite chair, recovering in a hospital bed, or are simply seeking comfort during life’s challenging seasons, a handmade lapghan becomes more than yarn and stitches. It transforms into a companion that offers both physical warmth and emotional solace.
The Gentle Embrace Lapghan is a granny square lap blanket designed to embody all of these qualities through vintage character and texture. It invites you to linger a little longer in moments of peace.
A granny square lap blanket is perfect for those who are confined to wheelchairs or recliners. Hospital or nursing home residents enjoy the benefits of a cozy granny square lap blanket. They’re especially cozy for those receiving chemotherapy treatments.
Most of all, this beautiful granny square lap blanket is meant for anyone who wants a warm, cozy companion when there’s a chill in the air.
A Granny Square Lap Blanket You’ll Fall in Love With
Design + Construction
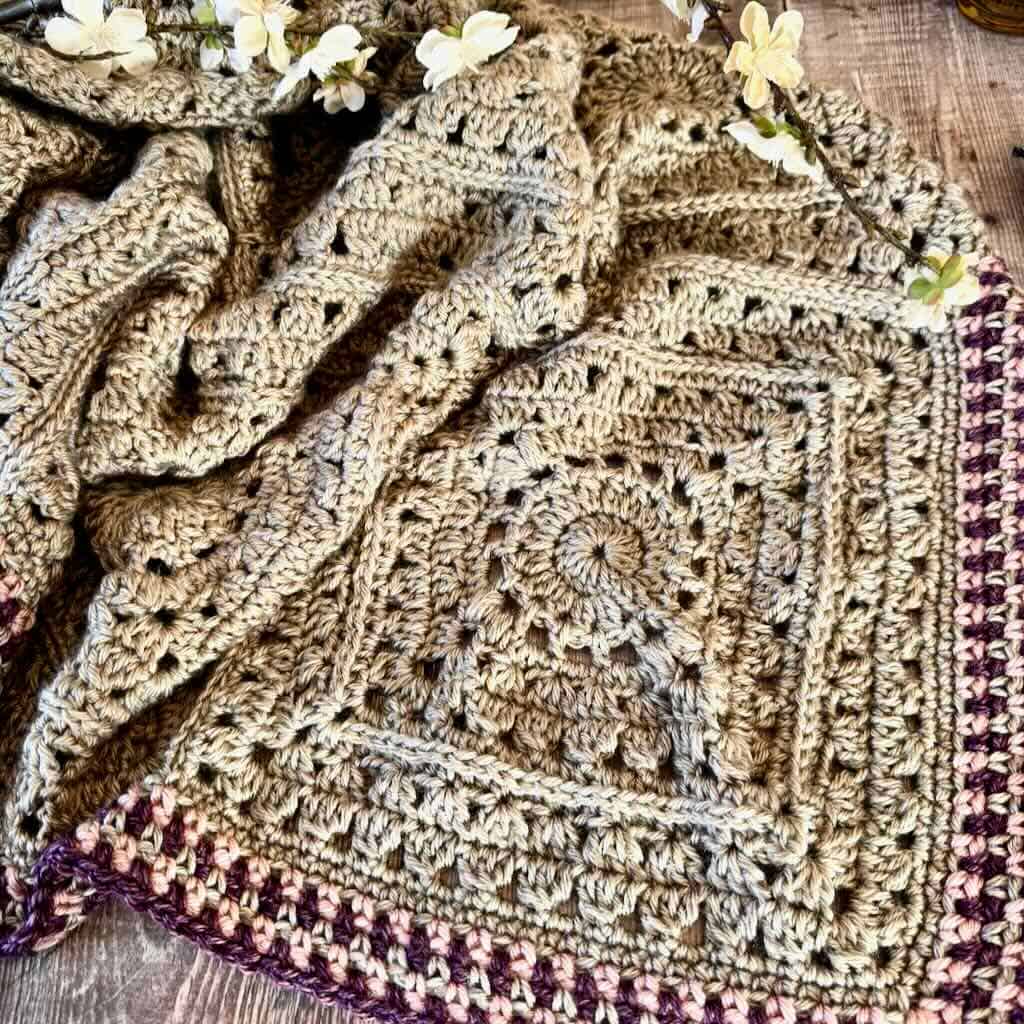
Granny squares are an ideal design element for a lapghan. Their slightly open stitching creates a fabric that’s breathable yet warm, perfect for year-round comfort.
This pattern features a generous 12-inch square that puts the iconic granny square front and center, combining its traditional charm with subtle texture variations.
The larger square size offers multiple advantages: it creates a bold, cohesive look while inviting those relaxing, meditative moments as each square grows beneath your hook. You’ll need fewer squares to achieve even the most generous blanket size, which means less time weaving in ends and fewer seams to sew – a win for any crocheter.
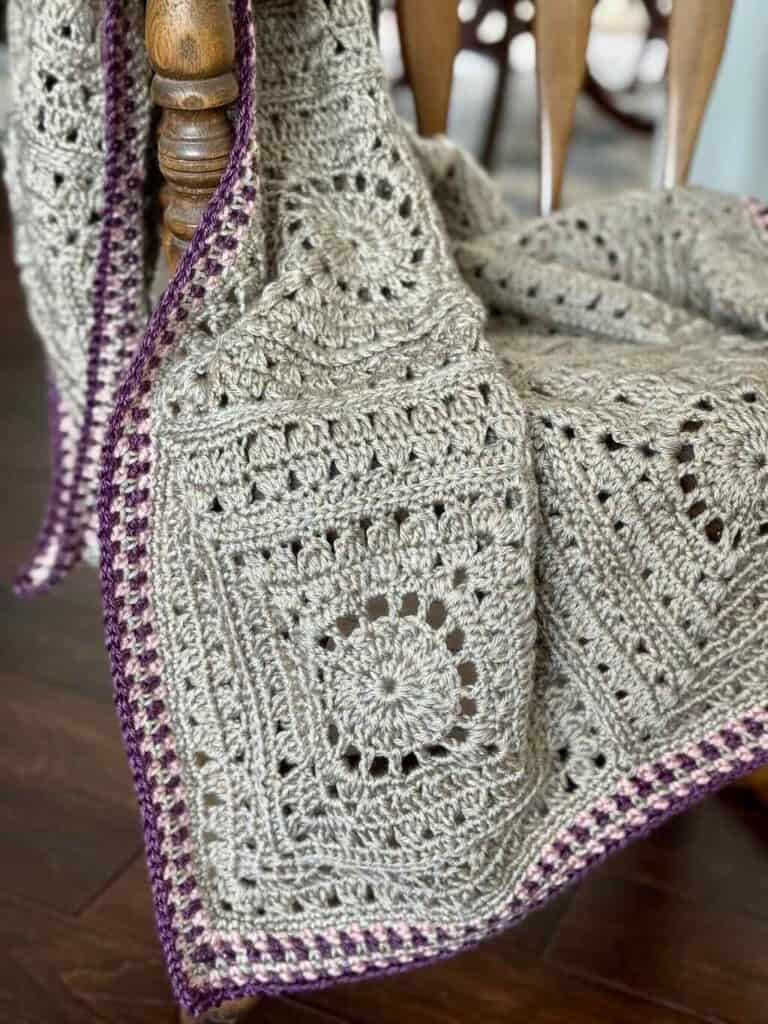
The squares are joined into the larger piece using a flat slip stitch seam, an easy alternative to whip stitching that adds even more subtle texture to the finished piece. A simple linen stitch border frames the entire granny square lap blanket, providing the perfect finishing touch with its repetitive, satisfying rhythm.
In the pattern, both here on the blog and in the premium PDF, I give you information to make 3 sizes, making it easy to find the ideal size for you:
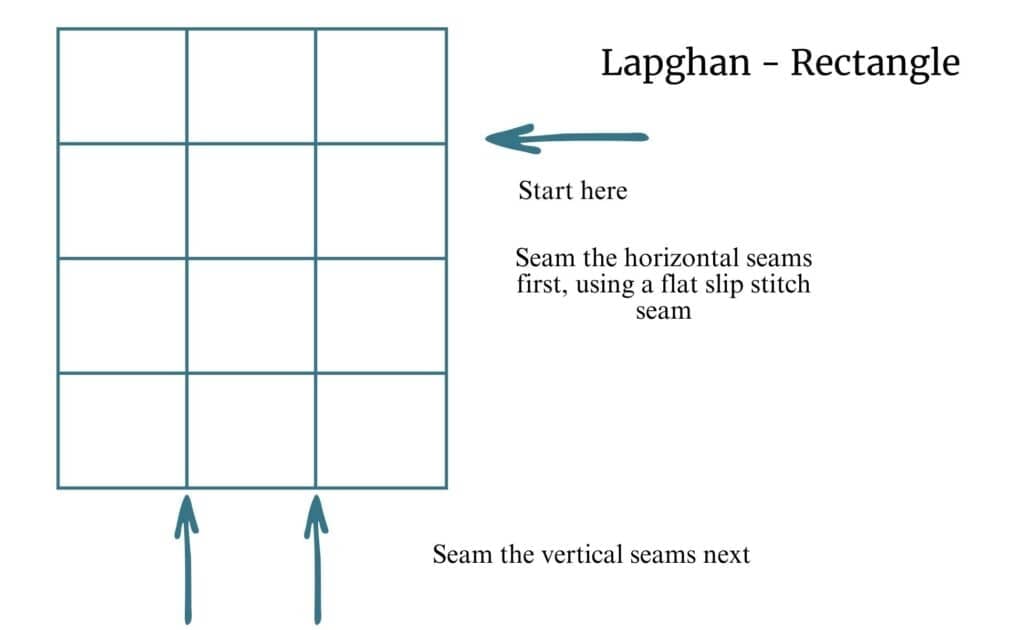
- Lapghan (rectangle) size: 39″ x 51″ using 12 squares
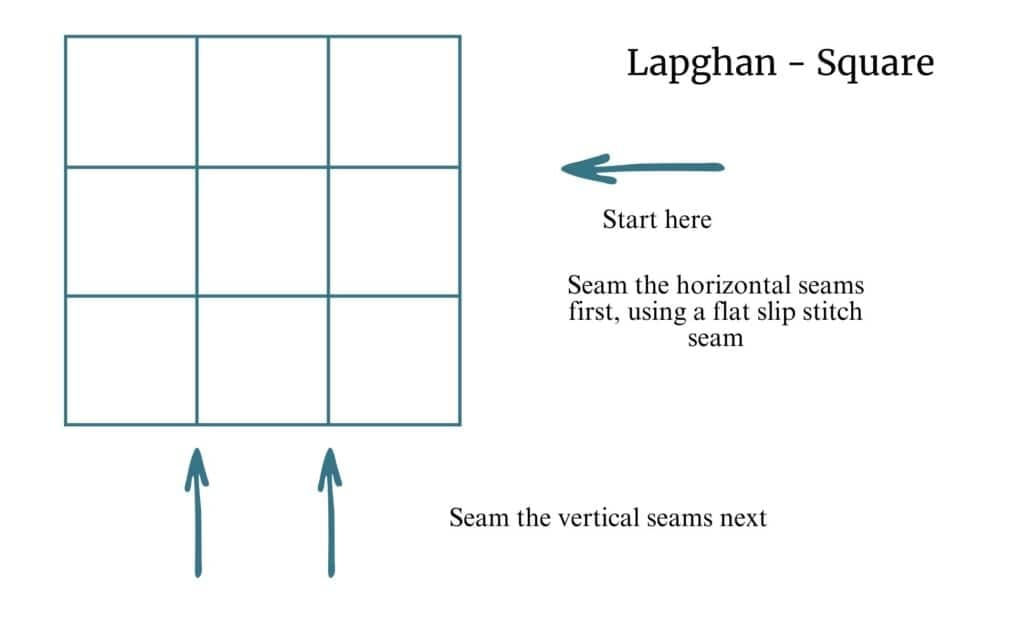
- Lapghan (square) size: 39″ x 39″ using 9 squares
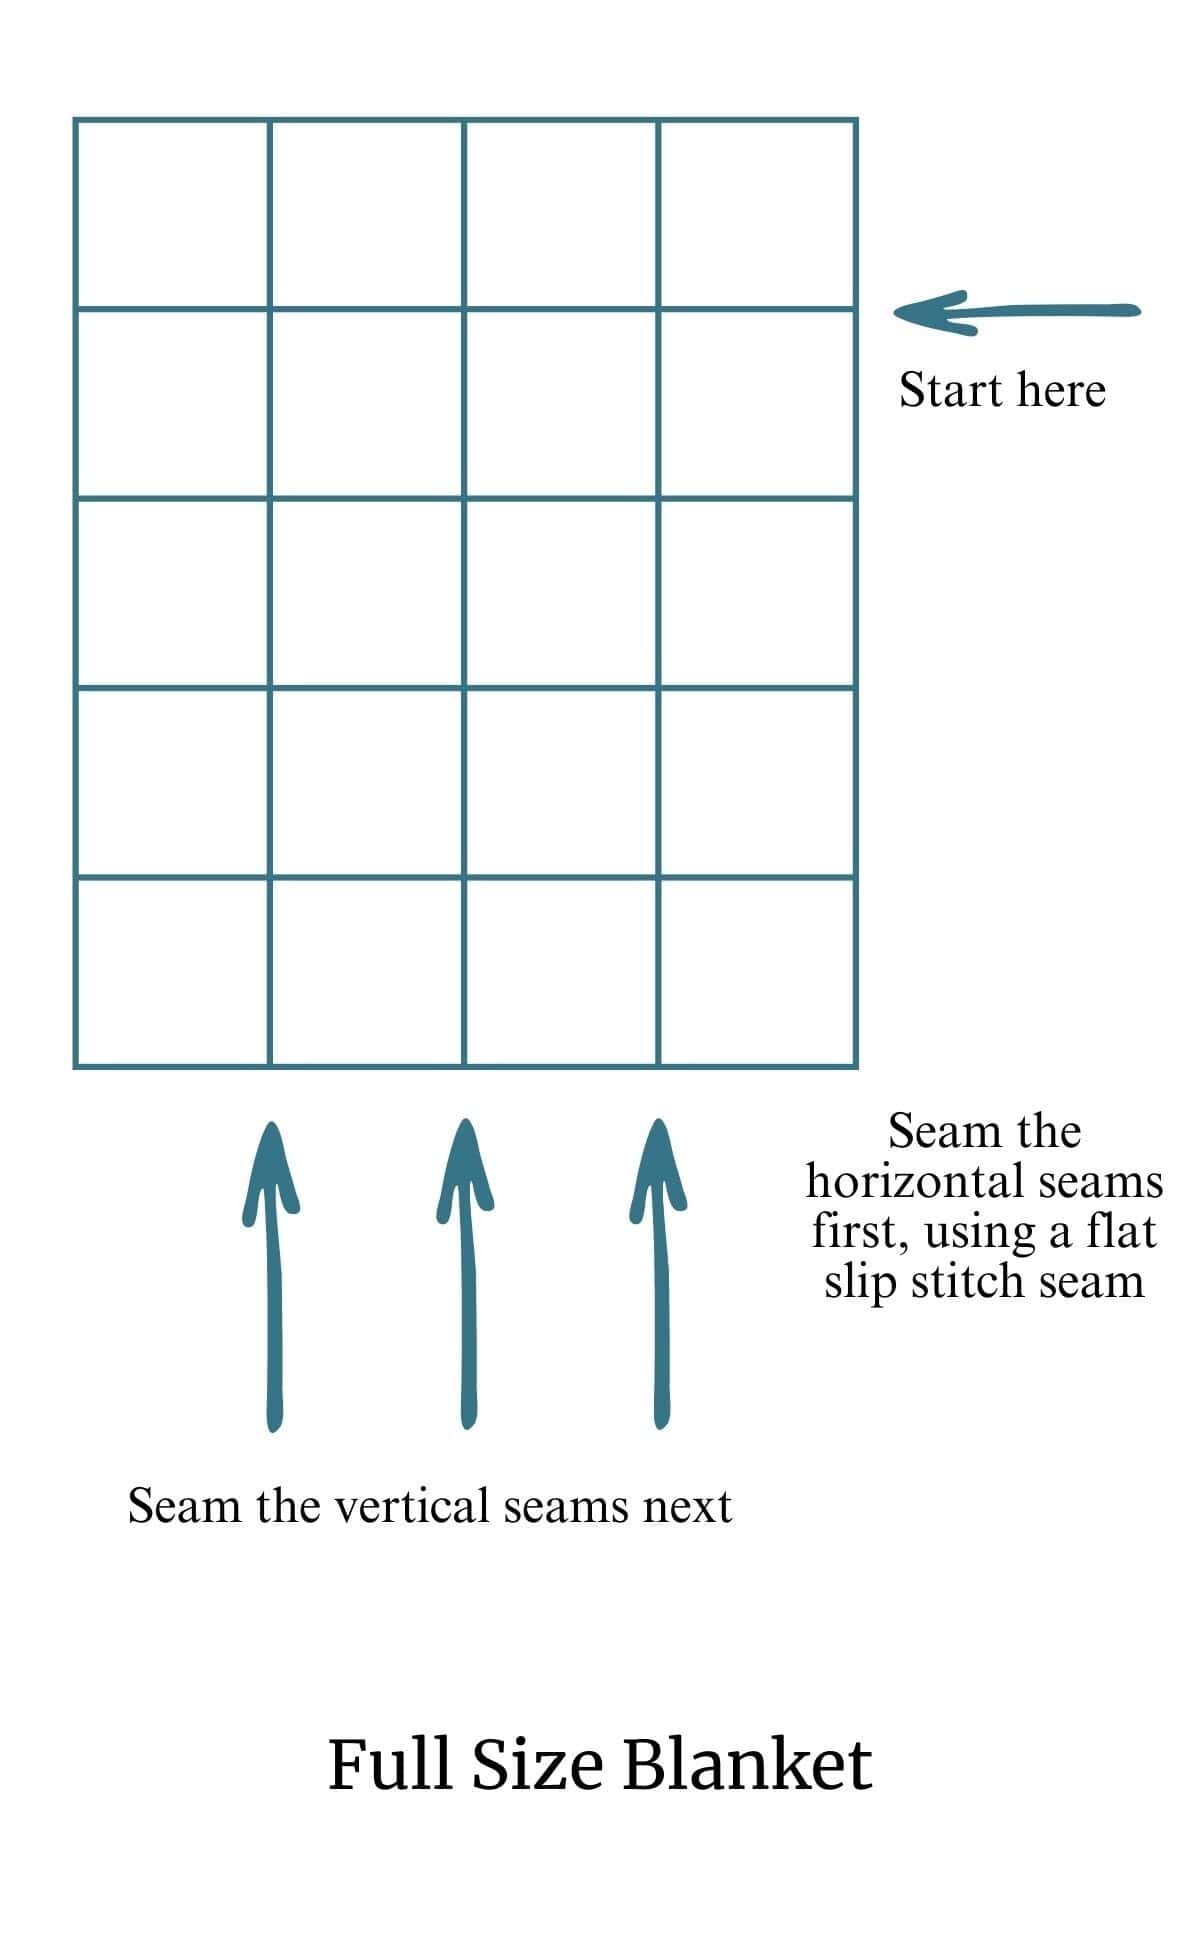
- Full size blanket: 51″ x 63″ using 20 squares

Yarn + Hook
This granny square lap blanket can be worked in any worsted weight yarn you choose. Because the lapghan is intended for comfort. be sure to choose a yarn that’s durable, easy care and, most importantly, soft to the touch.
Lion Brand’s Heartland is my all-time favorite choice for blankets. The beautifully curated selection of colors, all based on iconic American landmarks, gives you a wide array to choose from. The yarn itself is soft to work with and cozy to snuggle up with.
It’s truly the perfect option for any cozy blanket.
While Lion Brand recommends a 5.5 mm hook for Heartland, I use a 5mm (US size H-8) hook instead. While still creating beautiful drape, it provides more structure to the fabric which is important when working with granny squares.
I did use a 5.5mm (US size I-9) for the seaming and border to be sure they were loose enough to match the drape of the squares. You’ll need both sizes.
Yarn Substitution
Maybe you have something in your stash you’d like to use but you’re not quite sure if it will work.
Use my handy free download – Yarn Substitution Worksheet – and you’ll have your answer!

Or, click HERE to find some curated substitutes for Heartland.
The Lapghans for Charity Blog Hop
I’m excited to be the featured designer on Friday, February 13th.
Hosted by Simply Melanie Jane, this blog hop offers daily featured designs, all lapghans meant to be donated to charity. Running through the month of February, each day’s featured design can be downloaded absolutely free.
On Friday, February 13rd, you can get the premium PDF for the Gentle Embrace Lapghan as a free download.
To get your free PDF, click on the graphic below and follow the instructions once you arrive.

Check out all of the other beautiful blankets offered during this blog hop by clicking the button below.

Where to get the premium PDF for the Gentle Embrace Lapghan
The Gentle Embrace Lapghan is a free crochet granny stitch lap blanket pattern in this blog post. Scroll down to view the free version.
Upgrade to the premium PDF and you’ll get a printer friendly, downloadable version of the pattern.
The premium PDF can be uploaded to your favorite mobile device so you can take your Gentle Embrace Lapghan project with you to work on whenever you’re out and about.
The PDF is easy to read, beautifully formatted without ads for the ultimate pattern reading experience.
Get your copy from one of my shops today!


The Gentle Embrace Lapghan Free Pattern
General Information
Yarn
Lion Brand “Heartland” 100% premium acrylic worsted weight (5oz/251yd; 142g/230m)
Main Color (MC) – Grand Canyon (See yardages with the Finished Sizes)
Contrasting colors for Border – 40 yds needed for each round:
- Capital Reef
- New River Gorge
All yardages are approximate. Have extra yarn on hand.
Hooks
- US size H-8 (5mm) for the squares
- US size I-9 (5.5mm) for the seams, border
Finished Sizes
- Lapghan (rectangle) – 39” x 51” – approx. 1825 yds of MC needed
- Lapghan (square) – 39” x 39” – approx. 1425 yds of MC needed
- Full Size Blanket – 51” x 63″ – approx. 2900 yds of MC needed
- Each square measures approx. 12″ across.
Gauge
Rnds 1-2 of the square (measuring across) = approx. 3″
Skill Level: Advanced Beginner/Intermediate
Abbreviations – US crochet terminology
- beg – beginning
- ch – chain
- dc – double crochet
- hdc – half double crochet
- rep – repeat
- rnd(s) – round(s)
- sc – single crochet
- sk – skip
- sp – space
- st(s) – stitch(es)
- YO – yarn over
Repeats
- (…) – Work everything within the parentheses in the same st or sp.
- […] – Repeat everything within the brackets the indicated number of times.
- {…} – Repeat everything within the brackets the indicated number of times.
Special Stitches
Chain-1 space (ch-1 sp) – The number denotes the number of chains made.
Chain-3 corner space (ch-3 corner sp) – The number of chains worked in a corner.
2 double crochet cluster (2dc cl) – YO, insert hook in indicated st, YO, pull up loop, YO, pull through 2 loops, YO, insert hook in same st, YO, pull up loop, YO, pull through 2 loops, YO, pull through 3 loops on hook.
Double crochet 2 together (dc2tog) – [YO, insert hook in next st, YO, pull up loop, YO, pull through 2 loops] twice, YO, pull through all loops on the hook. This dc2tog is worked with the beg ch-2 across the 3 dc of the 1st GS of Rnd 6.
Double crochet 3 together (dc3tog) – [YO, insert hook in next st, YO, pull up loop, YO, pull through 2 loops] 3 times, YO, pull through 4 loops. This dc3tog is worked over the 3 dc of the GS below in Rnd 5.
Granny stitch (GS) – 3 dc in the same st or sp.
Half double crochet in the 3rd loop (hdc 3lp) – when working from the front side of the stitch below – YO, insert hook through the 3rd loop that sits behind and just under the top loop of the stitch, YO, pull through 3rd loop, YO, pull through all 3 loops on hook to complete the hdc.
Invisible join: At the end of the rnd, remove working loop from hook, insert hook from back to front through the top of the 1st st of the rnd, add working loop back onto hook and pull through to the wrong side of the square; continue as instructed.
Puff – YO, insert hook in indicated sp, YO, pull up loop, [YO, insert hook in same sp, YO, pull up loop] twice, YO, pull through 7 loops on hook.
Stacked single crochet (STsc) – (This stitch is used at the beginning of a row or round to replace the traditional turning ch-3. It has the appearance of a dc.) – Insert hook in same st as loop, YO, pull up loop, YO, pull through 2 loops (bottom sc made), insert hook in left vertical bar of bottom sc, YO, pull up loop, YO, pull through 2 loops (top sc made).
Pattern Notes
- Do not turn after any rnd. All rnds are worked with right side facing.
- A ch-1 at the beg of a rnd does not count as a st.
- A ch-3 may be substituted for the STsc without altering the construction of the square.
Pattern Instructions
Squares
- Lapghan (rectangle) – Make 12
- Lapghan (square) – Make 9
- Full Size Blanket – Make 20
With 5mm hook, ch 4, join with slip st to form a ring. OR, use a magic ring, tightening the ring at the end of Rnd 1.
Rnd 1: (STsc, 15 dc) in the ring, join with slip st to beg st. < 16 dc >
Rnd 2: (Ch 2, dc) in the same st (counts as 1st 2dc cl), ch 1, [2dc cl in next st, ch 1] 15 times, join with slip st to beg dc. < 16 2dc cl, 16 ch-1 sp >
Rnd 3: Slip st into the ch-1 sp, STsc, ch 2, [dc in the next ch-1 sp, ch 2] 15 times, join with slip st to beg st. < 16 dc, 16 ch-2 sp >
Rnd 4: Ch 1, hdc in the same st, 3 hdc in the next ch-2 sp, sc in the next st, 3 sc in the next ch-2 sp, sc in the next st, 3 hdc in the next ch-2 sp, hdc in the next st, [(puff, ch 3, puff) in the next ch-2 sp, hdc in the next st, 3 hdc in the next ch-2 sp, sc in the next st, 3 sc in the next ch-2 sp, sc in the next st, 3 hdc in the next ch-2 sp, hdc in the next st] 3 times, (puff, ch 3, puff) in the next ch-2 sp, join with slip st to beg st. Fasten off. < 8 puffs, 20 sc, 32 hdc, 4 ch-3 corner sp >
Click here to watch the video tutorial for Rnds 1-4.
Note for Rnd 5: Count the hidden st after each corner when skipping 3 sts.
Rnd 5: Attach yarn to any ch-3 corner sp, (STsc, 2 dc, ch 3, GS) in the same corner sp, sk 3 sts, GS in next st, [sk 2 sts, GS in the next st] 3 times, sk 2 sts, [(GS, ch 3, GS) in the ch-3 corner sp, sk 2 sts, GS in the next st, [sk 2 sts, GS in the next st] 3 times, sk 3 sts] 3 times, join with slip st to beg st. < 24 GS, 4 ch-3 corner sp >
Rnd 6: Ch 2, dc2tog over the next 2 sts (counts as 1st dc3tog), ch 2, (dc3tog, ch 3, dc3tog) in the ch-3 corner sp, ch 2, {[dc3tog across the next GS, ch 2] 6 times, (dc3tog, ch 3, dc3tog) in the next ch-3 corner sp} 3 times, ch 2, [dc3tog across the next GS, ch 2] 5 times, join with slip st to beg dc2tog. < 32 dc3tog, 28 ch-2 sp, 4 ch-3 corner sp >
Rnd 7: Ch 1, hdc in the same st, 2 hdc in the ch-2 sp, hdc in the top of the dc3tog, (2 hdc, ch 2, 2 hdc) in the ch-3 corner sp, [hdc in the top of the next dc3tog, 2 hdc in the next ch -2 sp] 7 times, hdc in the last dc3tog, {(2 hdc, ch 2, 2 hdc) in the corner sp, [hdc in the top of the next dc3tog, 2 hdc in the next ch-2 sp] 7 times, hdc in the next dc3tog} 3 times, (2 hdc, ch 2, 2 hdc) in the ch-3 corner sp, [hdc in the top of the next dc3tog, 2 hdc in the next ch -2 sp] 6 times, invisible join. < 26 hdc across each side, 4 ch-2 corner sp >
Note for Rnd 8: Be sure to work a hdc 3lp in the hidden st that may be covered by the corner sts from Rnd 7.
Rnd 8: Ch 1, hdc 3lp in the same st and in each st across to the ch-2 corner sp, [(2 hdc, ch 2, 2 hdc) in the ch-2 corner sp, hdc 3lp in the next st and in each st across to the next ch-2 corner sp] 3 times, (2 hdc, ch 2, 2 hdc) in the ch-2 corner sp, hdc 3lp in the next st and in each st across to the beg st, join with slip st to beg st. < 26 hdc 3lp across each side, 16 hdc, 4 ch-2 corner sp >
Click here to watch the video tutorial for Rnds 5-8.
Note for Rnd 9: Count the hidden st in the 3 skipped sts after each corner.
Rnd 9: (STsc, 2 dc) in the same st (counts as the 1st GS), sk 3 sts, GS in the next st, sk 3 sts, (GS, ch 3, GS) in the ch-2 corner sp, {[sk 3 sts, GS in the next st] twice, [sk 2 sts, GS in the next st] 5 times, sk 3 sts, GS in the next st, sk 3 sts, (GS, ch 3, GS) in the ch-2 corner sp} 3 times, [sk 3 sts, GS in the next st] twice, [sk 2 sts, GS in the next st] 4 times, sk 2 sts, join with slip st to beg st. < 10 GS across each side, 4 ch-3 corner sp >
Rnd 10: (Sc, ch 1) in the same st, dc2tog over the next 2 sts (counts as the 1st dc3tog), ch 2, [dc3tog across the next GS, ch 2] twice, (dc3tog, ch 3, dc3tog) in the ch-3 corner sp, ch 2, {[dc3tog across the next GS, ch 2] 10 times, (dc3tog, ch 3, dc3tog) in the next ch-3 corner sp} 3 times, ch 2, [dc3tog across the next GS, ch 2] 7 times, join with slip st to beg dc2tog. < 48 dc3tog, 44 ch-2 sp, 4 ch-3 corner sp >
Rnd 11: Ch 1, sc in the same st, [2 sc in the ch-2 sp, sc in the top of the dc3tog] across to the corner sp, {3 sc in the ch-3 corner sp, [sc in the top of the dc3tog, 2 sc in the ch-2 sp] across to the last st, sc in the top of the dc3tog} 3 times, 3 sc in the ch-3 corner sp, [sc in the top of the dc3tog, 2 sc in the ch-2 sp] across to the beg st, join with slip st to beg st. < 34 sc across each side, 3 sc in each corner >
Click here to watch the video tutorial to finish the square.
Fasten off and weave in ends. Block to the desired finished size.
Seaming
The squares are seamed using a flat slip stitch seam. However, you may use any method you prefer.
Use the 5.5mm (US size I-9) hook for the flat slip stitch seam.
- With wrong sides held together, use a flat slip stitch seam to connect the 2 squares along one side.
- Work from the center sc of one corner to the center sc of the next corner.
- Pick up the next 2 squares and seam them together in the same manner.
- Repeat until all squares in the row are seamed together.
- Seam all of the horizontal seams first, then finish the vertical seams.
Click here to watch the video tutorial for a Flat Slip Stitch Seam.
Border
The linen stitch border can be worked with as many colors and rounds as suits your taste. This is where the blanket can be made bigger without adding more squares.
The following instructions are how the sample was made.
Use the 5.5mm (US size I-9) hook for the Border.
Rnd 1: Attach MC to the center sc of any corner, ch 1, (sc, ch 2, sc) in the same center sc, sc in the next st and in each st across to the center sc of the next corner, [(sc, ch 2, sc) in the center sc, sc in the next st and in each st across to the center sc of the next corner] 3 times, join with slip st to beg st, fasten off.
Note for Rnd 2: There may or may not be a st to sk before a corner.
Rnd 2: Attach Capitol Reef to any ch-2 corner sp, ch 1, (sc, ch 2, sc) in the same ch-2 corner sp, ch 1, sk 1 st, [sc in the next st, ch 1, sk 1 st] across to the next ch-2 corner sp, {(sc, ch 2, sc) in the ch-2 corner sp, ch 1, sk 1 st, [sc in the next st, ch 1, sk 1 st] across to the next ch-2 corner sp]} 3 times, join with slip st to beg st, fasten off.
Rnd 3: Attach New River Gorge to any ch-2 sp, ch 1, (sc, ch 2, sc) in the same ch-2 corner sp, ch 1, [sc in the next ch-1 sp, ch 1] across to the next ch-2 corner sp, {(sc, ch 2, sc) in the ch-2 corner sp, ch 1, [sc in the next ch-1 sp, ch 1] across to the next ch-2 corner sp]} 3 times, join with slip st to beg st, fasten off.
Rnd 4: With MC, rep Rnd 3.
Rnd 5: With Capital Reef, rep Rnd 3.
Rnd 6: With New River Gorge, rep Rnd 3.
Continue repeating Rnd 3 to your desired Border width OR
Fasten off and weave in all ends.