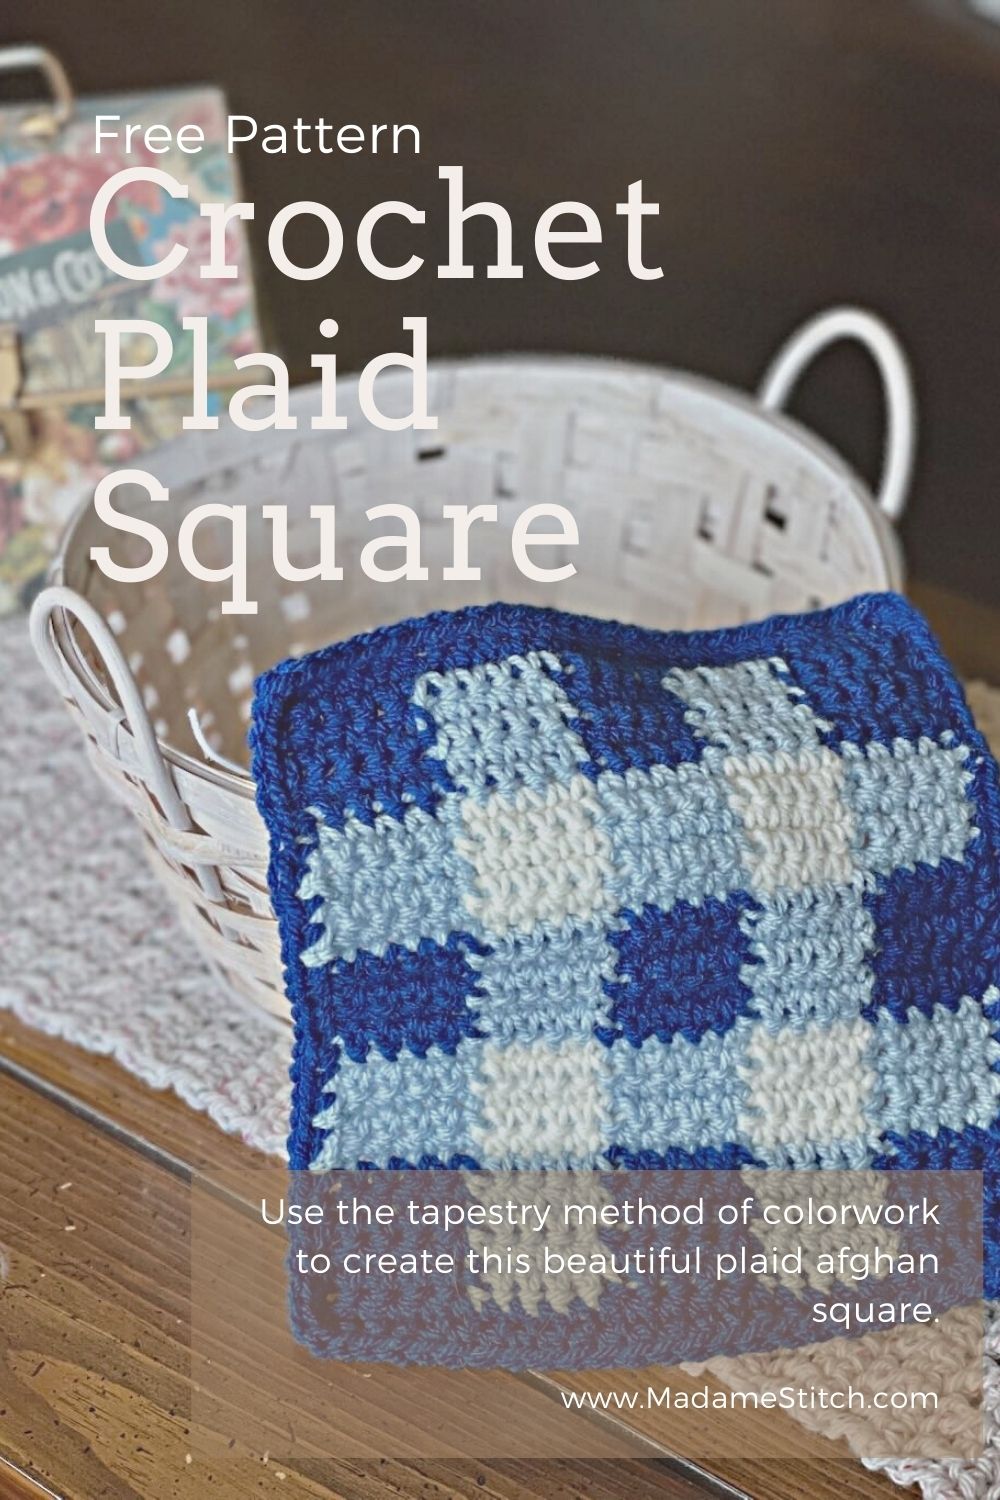
An easy tapestry crochet plaid square perfect for blankets
Try your hand at tapestry crochet with this crochet plaid square. It’s easy and fun to make!

This crochet plaid square was designed as part of the Fireside Throw, a beautiful stitch sampler blanket that’s perfect for cuddling under during the cold winter months.
If you were to think of a fabric pattern that evokes images of winter time and snuggly things, plaid would be one of the first things to come to mind. Imagine a cozy flannel shirt or warm winter hat.
This crochet plaid square adds a look of comfort to any winter project you decide to add it to. It’s absolutely perfect for winter blankets – what it is designed for. However, you can use the crochet plaid square in pillows, table coverings, even wearables – anywhere you want a beautiful wintertime look.
Design + Construction
If you’ve never done much color work or crocheted anything using the tapestry method, this little crochet plaid square makes a great first project to learn the technique.
The color changes in the tapestry method are worked by carrying the non-working yarn rather than dropping it and restarting it later in the row. You’ll have less ends to weave in and the spots where the color changes are blend into the fabric.
The tapestry method can create a thicker material if the non-working yarn is allowed to bunch as it’s being carried. That can easily be remedied by gently tugging on the non-working yarn before picking it up to start working with it to ensure that it’s laying flat under the previous stitches.
I chose a 5.5mm hook for this crochet plaid square because it helped the single crochets relax a bit and created a square that was the right size for the Fireside Throw. However, you can use any hook that gets you the size you need.
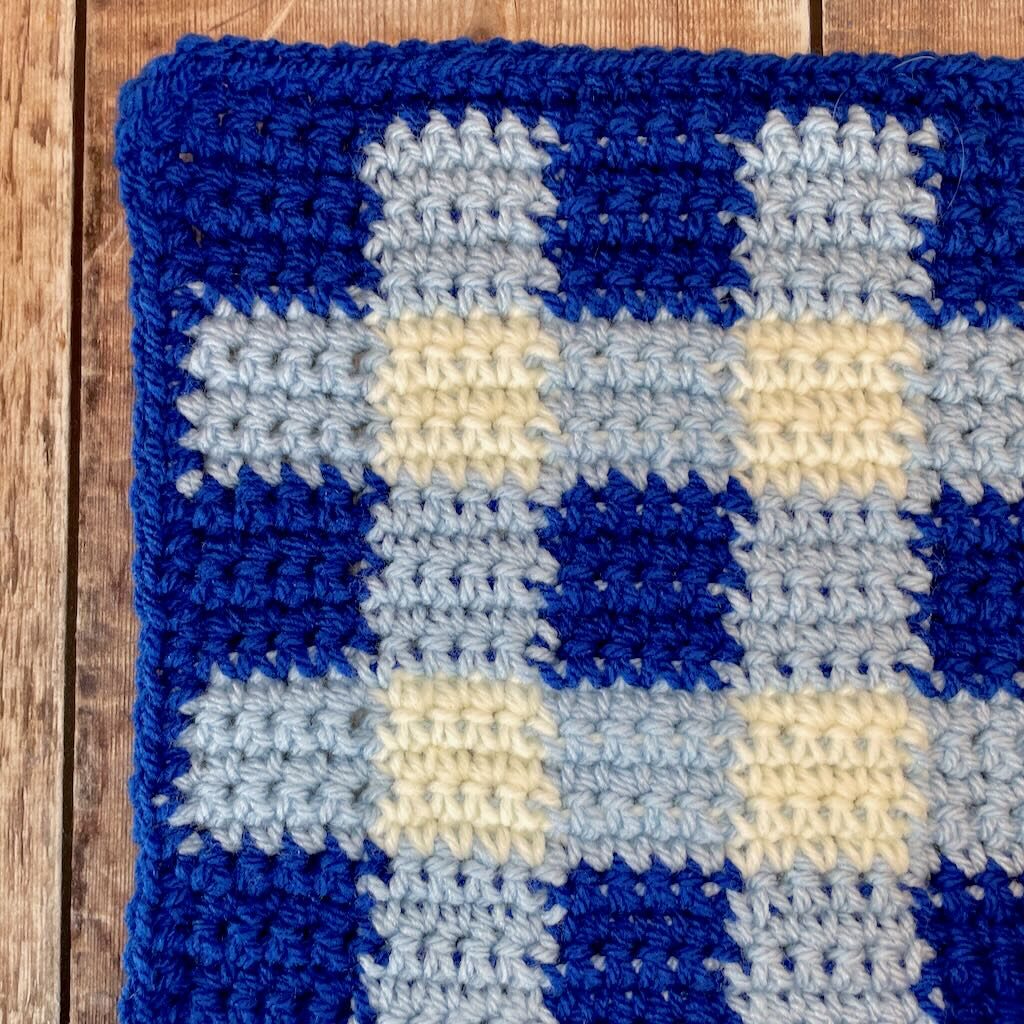
The body of the square has a grid of 5 x 5 color squares and is finished off with a round of single crochets to create an even edge for seaming squares together.
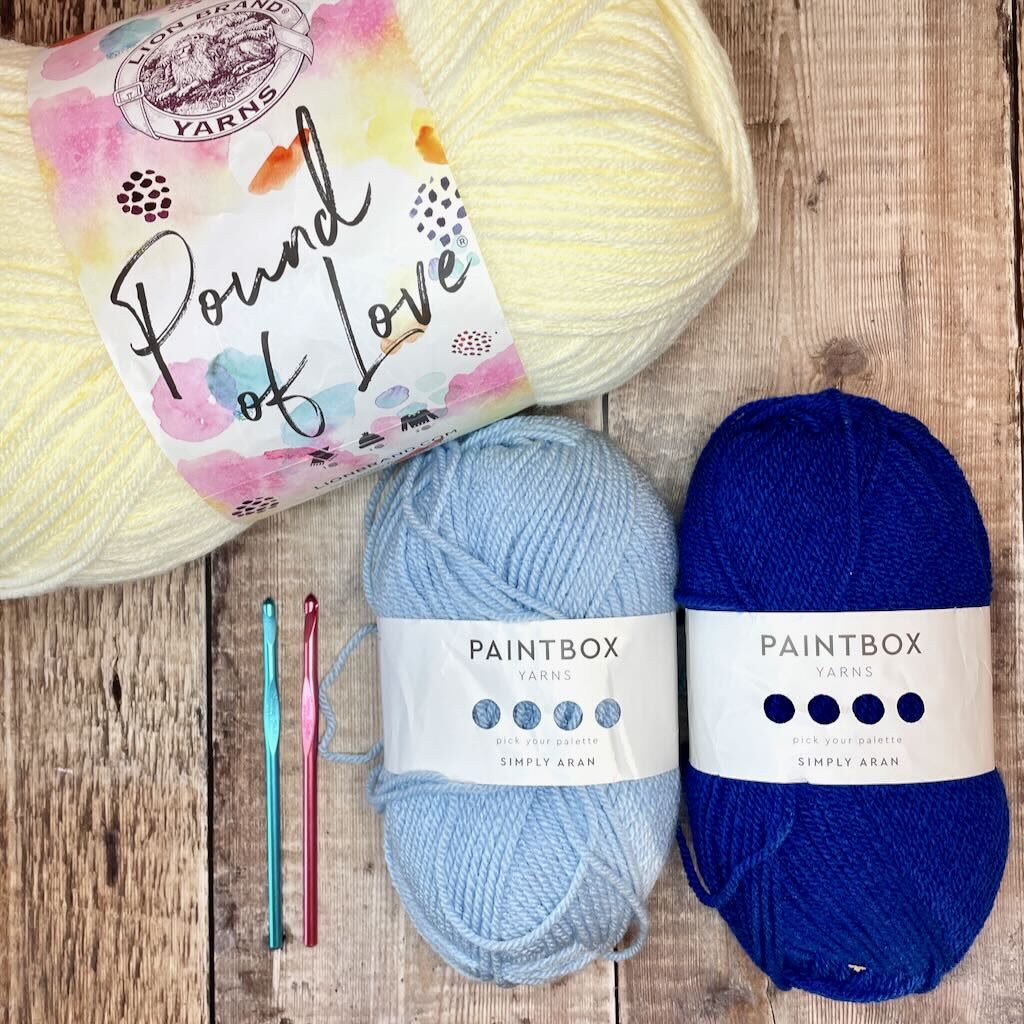
The yarn for the crochet plaid square
This post contains affiliate links. That means, if you purchase something using the link, I receive a small commission. You don’t pay any extra and your information is safe. Thanks for supporting my small business.
Because this crochet plaid square was designed for the Fireside Throw CAL, the yarn I chose was already determined by what was needed for the entire blanket. Here are the yarns I used in the sample:
- Paintbox Yarns “Simply Aran” 100% acrylic worsted weight in Color #240 – Royal Blue
- Paintbox Yarns “Simply Aran” 100% acrylic worsted weight in Color #235 – Duck Egg Blue
- Lion Brand “Pound of Love” 100% premium acrylic worsted weight in Color #99 – Antique White
These yarns are soft to the touch, easy to work with, and have a beautiful drape, especially if using them for a blanket.
The crochet plaid square doesn’t take a lot of each color so you may be able to gather something from your stash if using this for a smaller project.
Any worsted weight yarn will work for this crochet plaid square. You’ll need 3 colors. To make the plaid look work, choose a dark color, a medium shade of the darker color and a neutral color like white or gray.
Why buy the PDF when the pattern is free here on the blog?
Sometimes it’s just handier to have a printed document or a downloadable PDF for your favorite device. The PDF format is easy to read and ad-free. Get your copy in my Ravelry shop.
The Fireside Throw blanket pattern
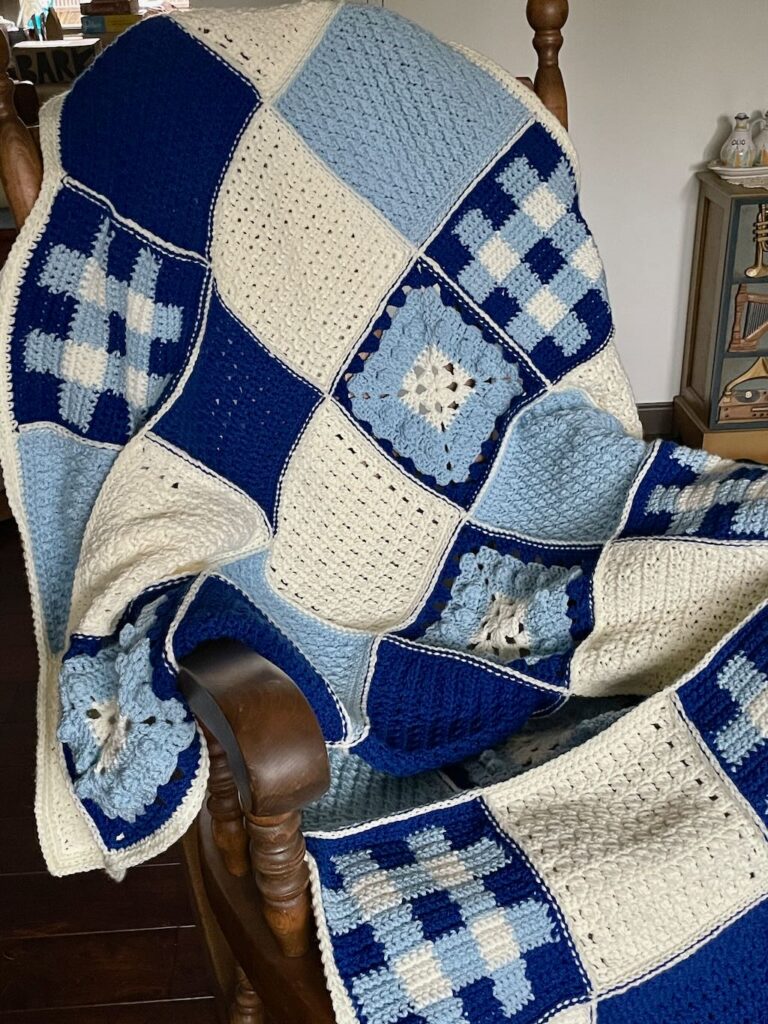
As I mentioned earlier, this square is included in the Fireside Throw CAL. You can purchase the full pattern for $8 through February 13th after which the price increases to $12.
This beautifully formatted PDF includes everything you need to make your very own Fireside Throw. Here’s what you’ll get with your copy:
- Written instructions for all 6 squares in the blanket
- Detailed instructions for assembly and adding the simple border
- Tips that will help you as you make your blanket
Click here to get the full pattern PDF for the Fireside Throw blanket.
Here’s what you need to make the crochet plaid square
Thank you for staying on this post and reading my patterns right here on the blog, without copy/pasting. When you stay here to follow the free version of my pattern, I am compensated for my time and energy. This is a great, free way to support a designer. If you would like to save this for later, bookmark the page to save it in your mobile browser.
Yarn
- Paintbox Yarns “Simply Aran” 100% acrylic worsted weight in Color #240 – Royal Blue
- Paintbox Yarns “Simply Aran” 100% acrylic worsted weight in Color #235 – Duck Egg Blue
- Lion Brand “Pound of Love” 100% premium acrylic worsted weight in Color #99 – Antique White
You’ll need approx. 1.5 oz total for each square.
Hook
US size I-9 or size needed for an 8.5” square
Tools
- Removable stitch marker
- Tapestry needle for weaving in ends
Finished size: Approx. 8.5″square
Gauge: 15 sc x 13 rows = 4″
Skill level: Advanced beginner
Abbreviations – US crochet terminology
- beg – beginning
- ch – chain
- rep – repeat
- sc – single crochet
- st(s) – stitch(es)
- RS – right side
- WS – wrong side

Written Instructions for the crochet plaid square
Thank you for staying on this post and reading my patterns right here on the blog, without copy/pasting. When you stay here to follow the free version of my pattern, I am compensated for my time and energy. This is a great, free way to support a designer. If you would like to save this for later, bookmark the page to save it in your mobile browser.
Pattern Notes
- A ch 1 at the beg of the row does not count as a st.
- When changing to a color that has been carried, tug slightly before beginning to crochet with the new color to be sure the yarn is lying flat under the stitches just made, not bunched up.
- Keep all yarn ends on the wrong side of the square.
- In most cases, the non-working yarn is carried as the sts are worked in the 2nd, 3rd and 4th squares of the row. However, the non-working yarn is carried across the 5th square at the end of Sections 1 & 3 where noted.
- To change colors, on the last step of the sc, drop the working yarn and finish the sc with the new color.
Pattern Instructions
Body
Note: The instructions for the body of the square are divided into 5 sections. Each section represents a row of 5 squares across worked in the same color combination. Note where the color changes are.
With MC, ch 26.
Row 1 (WS): Sc in 2nd ch from hook and in each ch across, turn. (25 sc)
Section 1
Row 2 (RS): Ch 1, sc in same st and in each of the next 4 sts, with CA sc in next 5 sts, with MC sc in next 5 sts, with CA sc in next 5 sts, with MC sc in next 5 sts, turn. (25 sc)
Rows 3-6: Rep Row 2. At the end of Row 6, cut MC.
At the end of Row 6, carry CA to the end of the row to start Row 7.
Section 2
Row 7: With CA, ch 1, sc in same st and in each of the next 4 sts, with CB sc in next 5 sts, with CA sc in next 5 sts, with CB sc in next 5 sts, with CA sc in next 5 sts, turn. (25 sc)
Rows 8-11: Rep Row 7. In Row 11, cut CB before the last 5 sts of the row.
Section 3
Carry CA under the first 5 sts of Row 12.
Row 12: With MC, ch 1, sc in same st and in each of the next 4 sts, with CA sc in next 5 sts, with MC sc in next 5 sts, with CA sc in next 5 sts, with MC sc in next 5 sts, turn. (25 sc)
Rows 13-16: Rep Row 12. At the end of Row 16, cut MC.
At the end of Row 16, carry CA to the end of the row to start Row 17.
Section 4
Rows 17-21: Rep Rows 7-11.
Section 5
Rows 22-26: Rep Rows 12-16.
Row 27 (WS): Continuing with MC, ch 1, sc in same st and in each st across, turn.
Do not fasten off. Continue to Edging.
Edging
Note: To evenly space the sc along the row ends, place a marker at the halfway point. Work 11 sc on either side of the marker and into the spot where the marker is for a total of 23 sc between corners.
Top edge: Ch 1, sc in same st and in each st across to last st, 3 sc in last st.
Side 1: Rotate 90 degrees, work 23 sc evenly across side.
Bottom edge: Rotate 90 degrees, 3 sc in 1st foundation ch, sc in next ch and in each ch across to last ch, 3 sc in last ch.
Side 2: Rotate 90 degrees, work 23 sc evenly across side, 2 sc in same sp as 1st st of Top Edge to complete the corner, use invisible slip st join to 1st st of Top Edge.
Fasten off and weave in all ends.
[mailerlite_form form_id=3]

2 Comments