A cozy warm granny square infinity scarf crochet pattern
It’s time to crochet yourself (or someone you love) a cozy warm granny square infinity scarf perfect for the changing seasons.
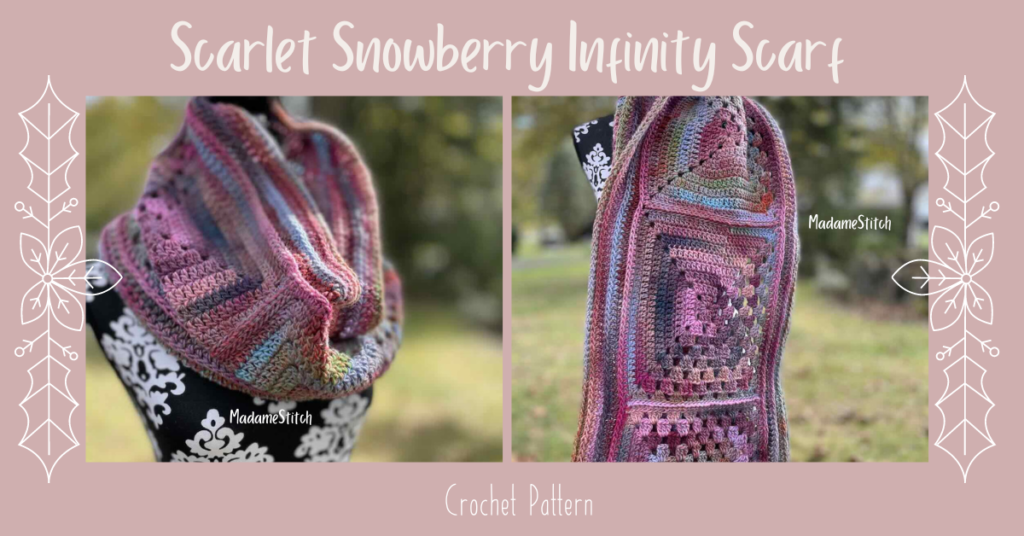
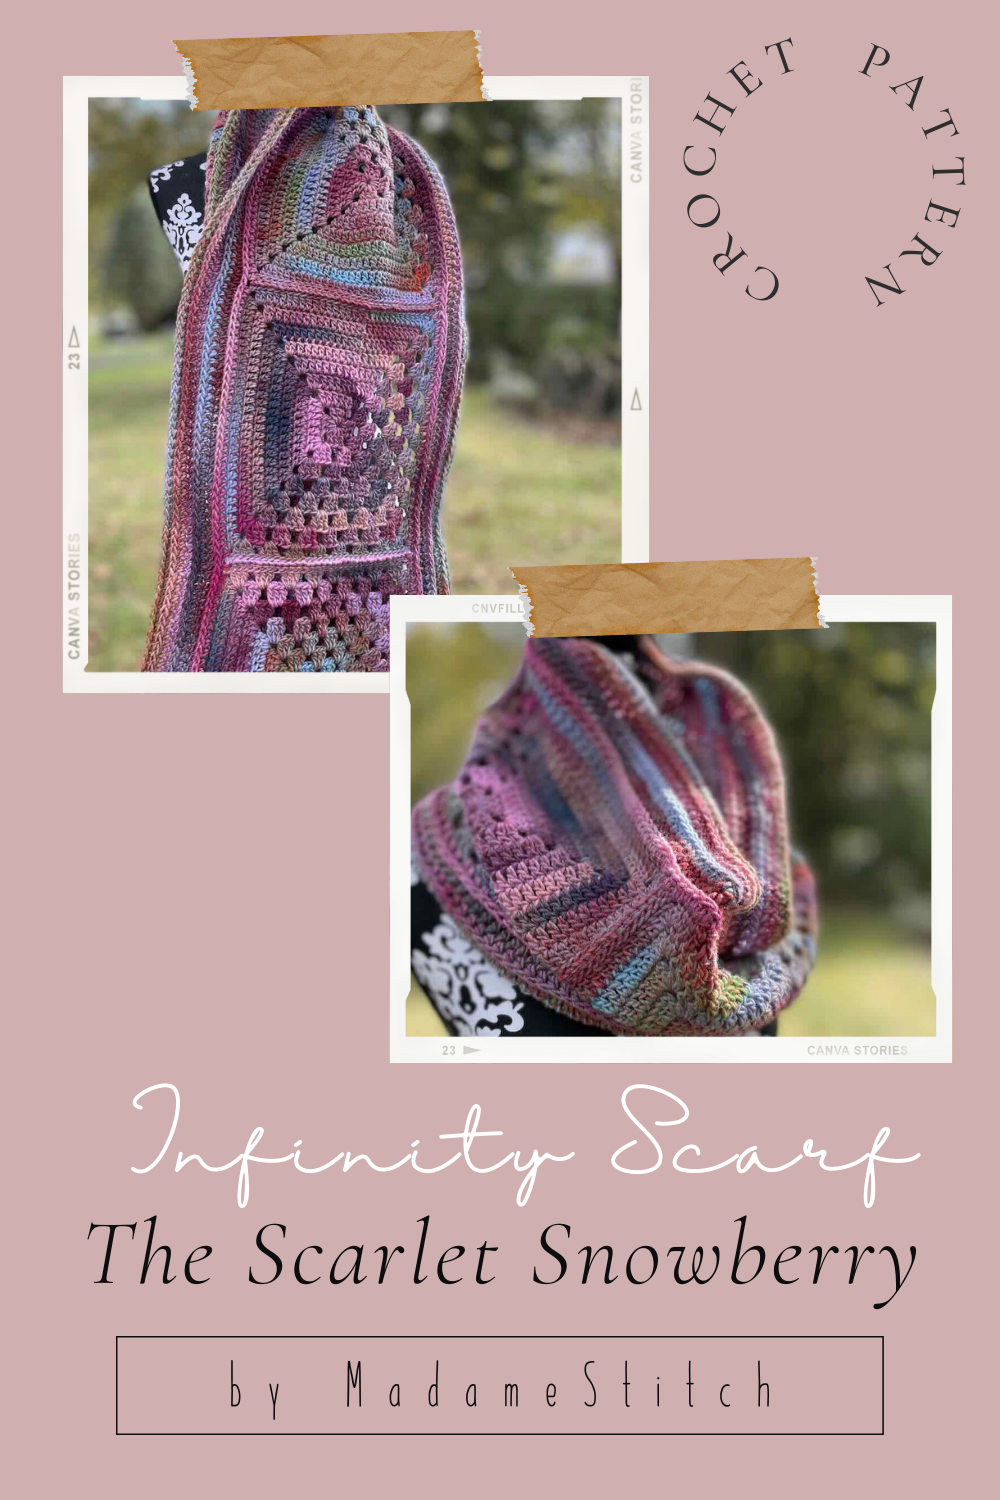
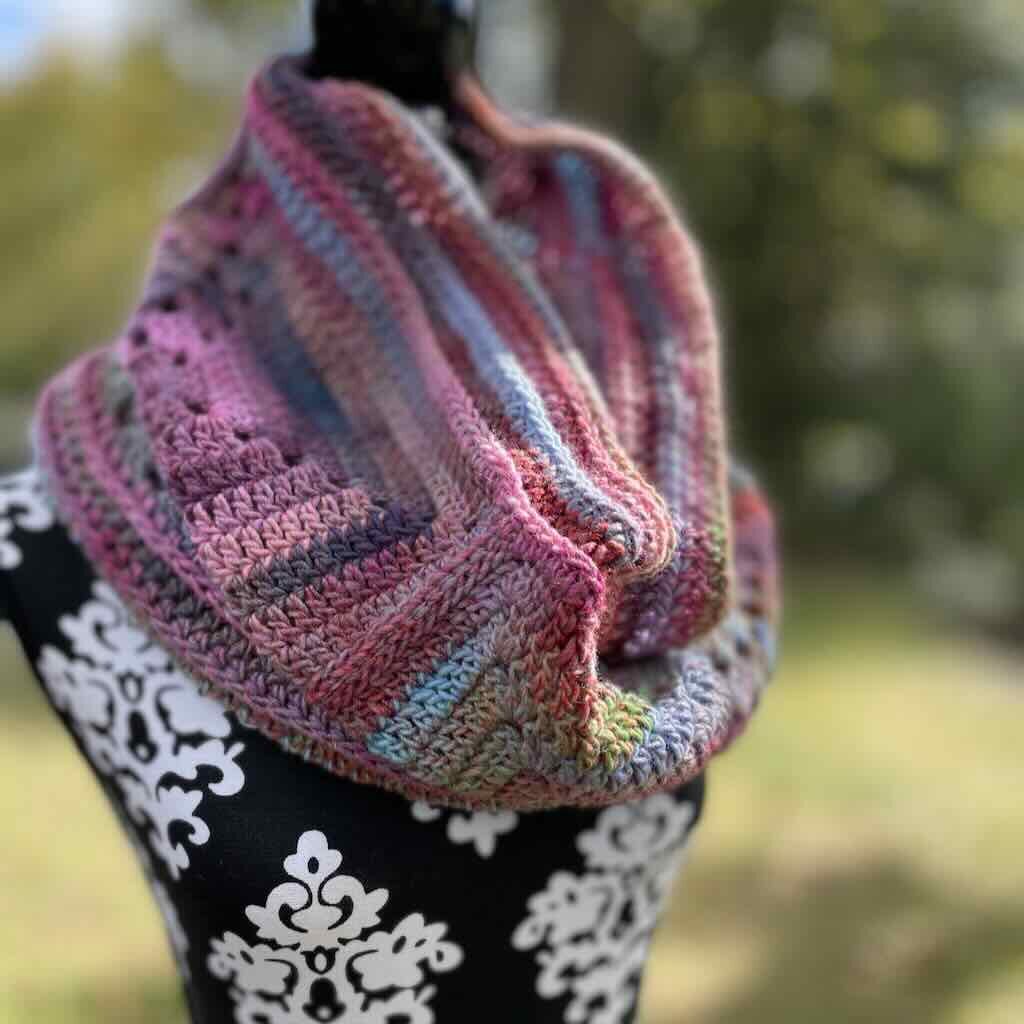
The Scarlet Snowberry – a granny square infinity scarf
I love to wear scarves and cowls when the weather gets cooler, especially a piece like this granny square infinity scarf. Not only do they keep me warm, they make me feel so put together and keep me looking stylish.
For me, a beautiful granny square infinity scarf puts the finishing touches on my outfit and serves to protect me against the elements at the same time. It’s important to me that what I wear makes me look and feel great.
What I love most about a design like this granny square infinity scarf is that I have a crochet project that helps me relax while I make it and comes together quickly so I don’t have to wait to wear it. It becomes a mindful crochet project – yarn that feels soft to the touch, plus gorgeous colors and simple stitches.
Design + Construction of the granny square infinity scarf
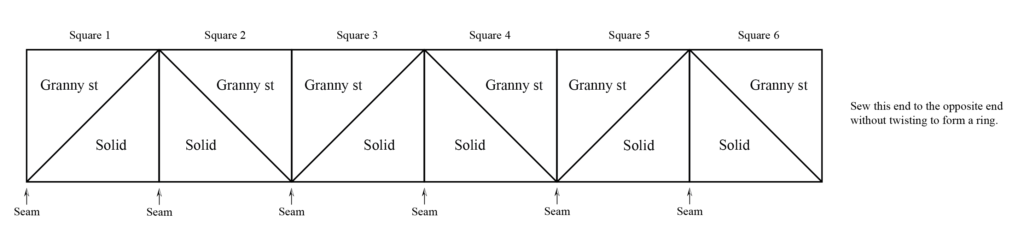
The centerpiece of this granny square infinity scarf is my Half and Half Granny Square. As you know, I never miss an opportunity to use some granny square element in my designs!

The Half and Half granny square is an interesting variation of the traditional basic granny square and just as easy to crochet. The construction of the granny square creates the illusion that 2 triangles are sewn together.
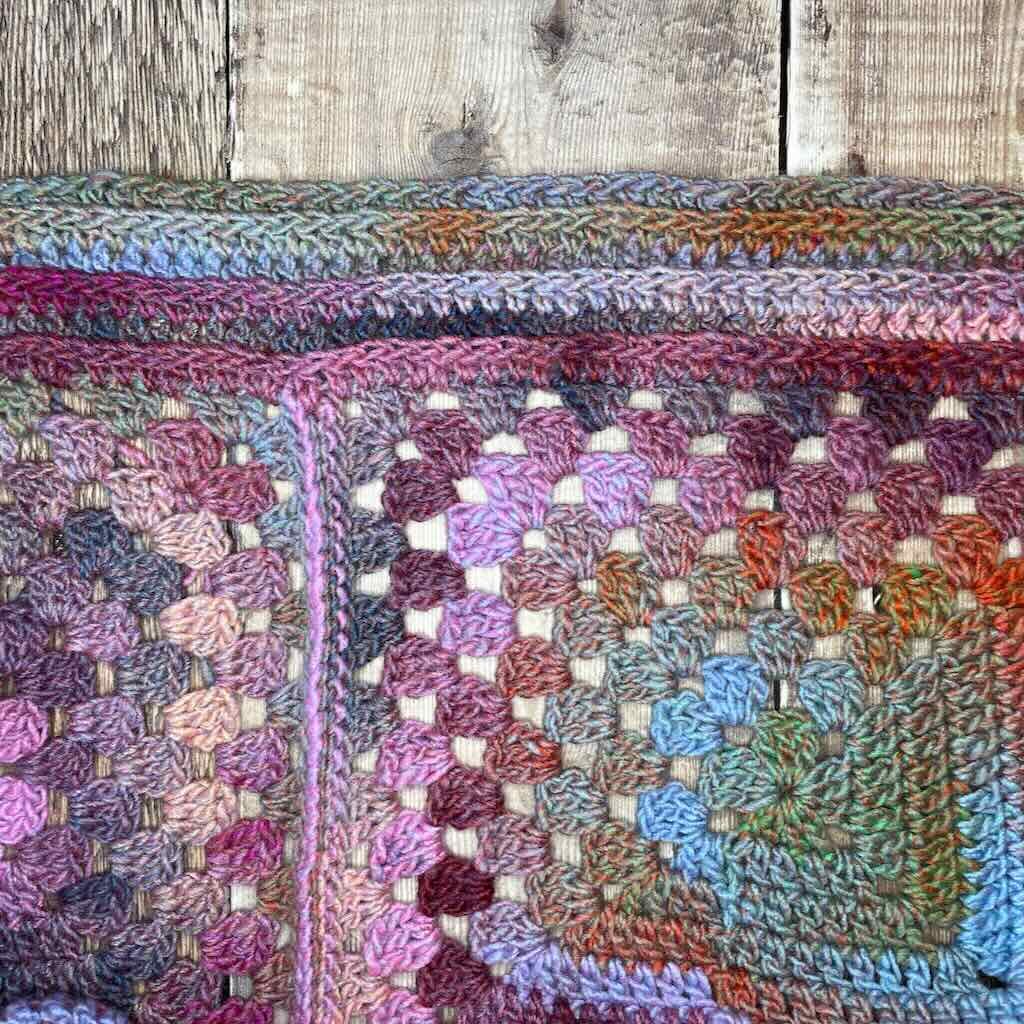
When the 6 10” squares are sewn together, the eye is drawn to the line between the solid and granny stitch sections that creates a zigzag pattern when the squares are assembled in a ring. The visual effect is subtle but effective in elevating an otherwise plain and simple look. I used the slip stitch seaming method to add a bit more texture to the scarf.
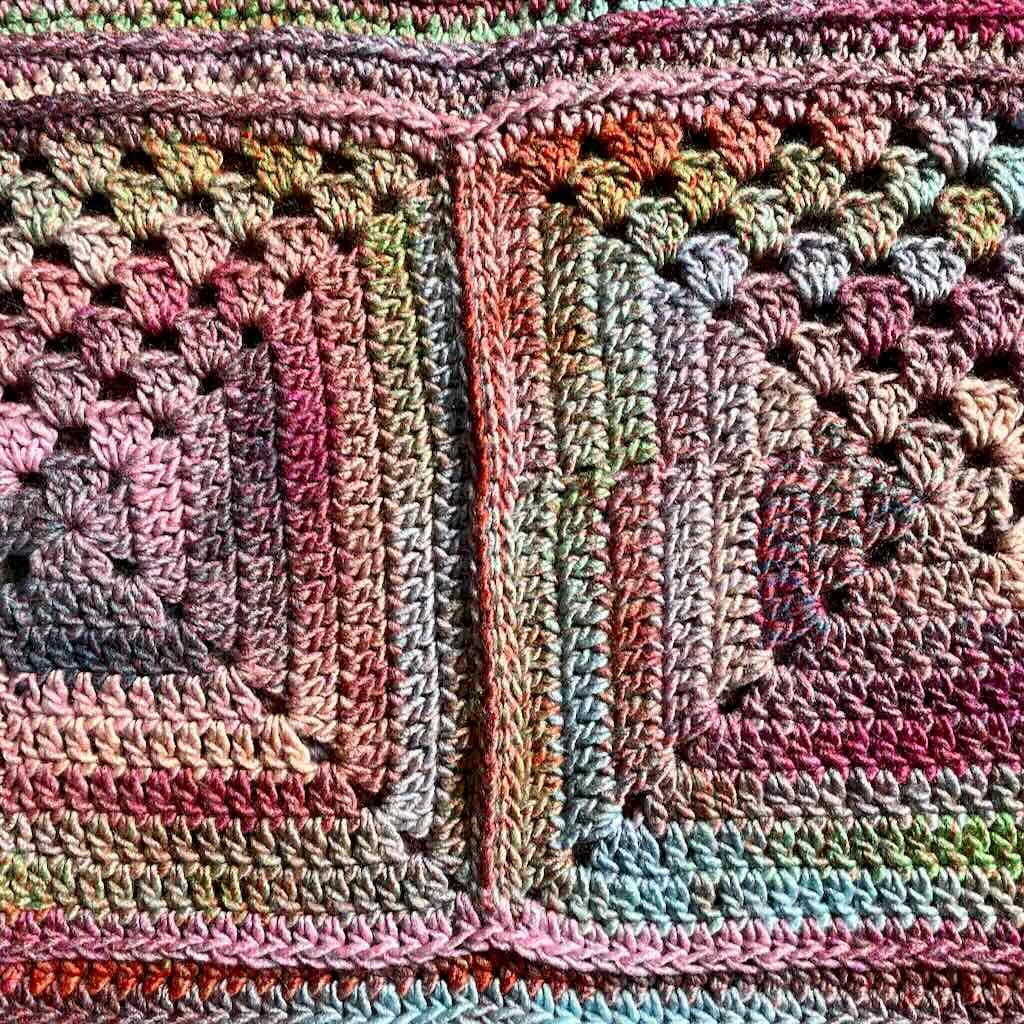
Once the oversized squares are sewn together in a ring, an extra wide border is worked around both edges. The borders are worked in alternating rows of half double crochet and half double crochet in the 3rd loop (or camel stitch) which produces beautiful rows of surface loops to add even more subtle texture.
The Yarn
This post contains affiliate links. That means, if you purchase something using the link, I receive a small commission. You don’t pay any extra and your information is safe. Thanks for supporting my small business.
In April I had the great good fortune to spend a weekend retreat with 6 other crochet designers in Colorado. One of the designers, Helen of Sunflower Cottage Crochet, joined us from the UK. She brought me a ball of Sirdar’s “Jewelspun” – I instantly fell in love with it!
When she asked me to be a guest designer on her blog, I knew I had to make something out of the yarn she gave me. That’s how the Scarlet Snowberry granny square infinity scarf came to be.
This is my first experience with Sirdar yarns and it won’t be the last. In fact, I’m currently designing a baby blanket with one of their beautiful DK weight baby yarns.
Jewelspun is a 100% acrylic aran/worsted weight yarn that has a unique hand spun look and frequent color changes. It’s the perfect choice for simple designs like this granny square infinity scarf because the yarn adds so much color and texture to the design.
With a generous 546 yards per ball, this yarn is a great value and leaves you with fewer ends to weave in – always a plus!
While Sirdar is a UK based yarn company, “Jewelspun” is distributed in the US by the online store Webs. They offer great pricing and fast shipping.
The pattern for this granny square infinity scarf is written in English using US crochet terminology. The skill level is Advanced Beginner because of the seaming technique and the half double crochets worked in the 3rd loop.
What you’ll need to make this granny square infinity scarf
- Yarn: Sirdar “Jewelspun” – 2 balls of Glacier
- Hook: US size I-9 (5.5mm)
- A tapestry needle for weaving in ends
What’s included in the PDF?
- Detailed written instructions and notes.
- A chart for the square
- A schematic and assembly chart
Where can I get the PDF for the Scarlet Snowberry Infinity Scarf?
What you’ll need to make this granny square infinity scarf
Thank you for staying on this post and reading my patterns right here on the blog, without copy/pasting. When you stay here to follow the free version of my pattern, I am compensated for my time and energy. This is a great, free way to support a designer. If you would like to save this for later, bookmark the page to save it in your mobile browser.
Yarn
Sirdar “Jewelspun” worsted weight acrylic (7oz/546yd; 200g/504m) – 2 balls
Sample worked in Color #844 – Glacier
Hook
US size I-9 (5.5mm)
Finished size: Approx. 60″ x 14″
Gauge: Each square measures 10″; Rnds 1-3 = 4″
Skill level: Advanced beginner
Abbreviations – US crochet terminology
- beg – beginning
- ch – chain
- dc – double crochet
- hdc – half double crochet
- hdc 3lp – See Special Stitches
- rep – repeat
- rnd(s) – round(s)
- sc – single crochet
- sp – space
- st(s) – stitch(es)
- STsc – See Special Stitches
- YO – yarn over
Special Stitches
Half double crochet in the 3rd loop (hdc 3rd loop) – YO, insert hook in 3rd loop (on backside of st), YO, draw up loop, YO, pull through all 3 loops on hook.
Stacked single crochet (STsc) – (This stitch is used at the beginning of a row or round to replace the traditional turning ch-3. It has the appearance of a dc.) – Insert hook in same st as loop, YO, draw up loop, YO, pull through 2 loops (bottom sc made), insert hook in left vertical bar of bottom sc, YO, draw up loop, YO, pull through 2 loops (top sc made).

Written Instructions for the granny square infinity scarf
Thank you for staying on this post and reading my patterns right here on the blog, without copy/pasting. When you stay here to follow the free version of my pattern, I am compensated for my time and energy. This is a great, free way to support a designer. If you would like to save this for later, bookmark the page to save it in your mobile browser.
Half and Half Granny Square
Make 6
Notes:
- To make the join in the square as invisible as possible, Rnds 2-8 begin with a ‘ch 1’ followed by a dc in the same st. Pull up the chain to almost the height of the dc to avoid pulling.
- Do not turn after any round.
- A ‘ch 3’ may be substituted for the STsc if you prefer. It will not alter the construction; however, an STsc blends into the fabric more easily than a ‘ch 3’.
- Pay close attention the number of dc worked in each corner. The corner counts are different to accommodate the difference between the granny stitch and solid dc sections of the square.
Ch 4, join with slip st to form a ring. (Or use a magic ring if you prefer.)
Rnd 1: STsc, 2 dc in ring, ch 3, (3 dc in ring, ch 3) 3 times, join with slip st to beg st. (4 3-dc groups, 4 ch-3 sp)
Rnd 2: Ch 1, dc in same st and in each st across to next corner sp, (2 dc, ch 2, 2 dc) in corner, dc in next st and in each st across to next corner sp, (2 dc, ch 2, 3 dc) in corner, ch 1, (3 dc, ch 2, 3 dc) in next corner, ch 1, (3 dc, ch 2, 2 dc) in next corner, join with slip st to beg st. (4 3-dc groups, 14 dc, 4 ch-2 sp, 2 ch-1 sp)
Rnd 3: Ch 1, dc in same st and in each st across to next corner sp, (2 dc, ch 2, 2 dc) in corner, dc in next st and in each st across to next corner sp, (2 dc, ch 2, 3 dc) in corner, ch 1, 3 dc in ch-1 sp, ch 1, (3 dc, ch 2, 3 dc) in next corner, ch 1, 3 dc in ch-1 sp, ch 1, (3 dc, ch 2, 2 dc) in next corner, dc in next 2 sts, join with slip st to beg st. (6 3-dc groups, 22 dc, 4 ch-2 sp, 4 ch-1 sp)
Rnd 4: Ch 1, dc in same st and in each st across to next corner sp, (2 dc, ch 2, 2 dc) in corner, dc in next st and in each st across to next corner sp, (2 dc, ch 2, 3 dc) in corner, ch 1, [3 dc in next ch-1 sp, ch 1] across to next corner sp, (3 dc, ch 2, 3 dc) in corner, ch 1, [3 dc in next ch-1 sp, ch 1] across to next corner sp, (3 dc, ch 2, 2 dc) in corner, dc in next st and in each st across to beg st, join with slip st to beg st. (8 3-dc groups, 30 dc, 4 ch-2 sp, 6 ch-1 sp)
Rnds 5-8: Rep Rnd 4. (16 3-dc groups, 62 dc, 4 ch-2 sp, 14 ch-1 sp)
Fasten off and weave in ends.
Assembly
The assembly schematic shows you the orientation of each square. Be sure to line the squares up with solid edges matching and granny stitch edges matching according to the schematic. Note: When the squares are lined up properly, one edge of the ring will all be granny stitch, the other edge will be solid double crochet.
With wrong sides held together, slip stitch each seam (or use the seaming method of your choice). Without twisting, sew the ends together to form a ring.
Border
Notes:
- Do not turn after any round.
- Be sure the first hdc 3lp of the round is worked behind the ‘ch 1’ of the previous round. It may be difficult to see.
- The loop at the beg of Rnd 2 may pull to the front of the fabric. Be sure to join the rnd to this loop because it’s actually the top loop of the first hdc.
Border for the granny stitch edge
Rnd 1 (for the granny st edge): With right side facing, attach the yarn to any granny square corner to the left of a seam, ch 1, hdc in the same sp, hdc in each st and ch-1 sp across to next corner sp, hdc in corner, hdc in the center of the seam, [hdc in next corner sp, hdc in each st and ch-1 sp across to next corner sp, hdc in corner, hdc in the center of the seam] 5 times, join with slip st to beg hdc. (204 hdc)
Rnd 2: Pull up loop but do not ch, hdc 3lp in same st and in each st around, join with slip st to beg st. (204 hdc 3lp)
Rnd 3: Ch 1, hdc in same st and in each st around. (204 hdc)
Rnds 4-5: Rep Rnds 2 & 3.
Rnd 6: Rep Rnd 2.
Border for the solid dc edge
Rnd 1 (for the solid dc edge): With right side facing, attach the yarn to any granny square corner to the left of a seam, ch 1, hdc in the same sp, hdc in each st across to next corner sp, hdc in corner, hdc in the center of the seam, [hdc in next corner sp, hdc in each st across to next corner sp, hdc in corner, hdc in the center of the seam] 5 times, join with slip st to beg hdc. (204 hdc)
Work Rnds 2-6 from the granny st edge to complete the Border for the solid dc edge.
Fasten off and weave in ends.


5 Comments