An easy dog blanket crochet pattern for your best friend
The Raleigh Dog blanket is a beginner friendly dog blanket crochet pattern. Read on for more details!
Thank you for staying on this post and reading my patterns right here on the blog, without copy/pasting. When you stay here to follow the free version of my pattern, I am compensated for my time and energy. This is a great, free way to support a designer. If you would like to save this for later, bookmark the page to save it in your mobile browser.
My dog, Daisy, loves to curl up on a big pile of blankets almost every evening. I’ve been adding handmade blankets to her pile. Luckily, she isn’t the type of dog to chew on things and she doesn’t have a constant need to destroy things (except the occasional toy). Slowly, the pile is beginning to be her special domain.
This blanket is named after one of my son’s rescue dogs. Raleigh was the perfect companion and such a special part of his family. She recently passed away and I’ve dedicated this beautiful blanket to her memory.
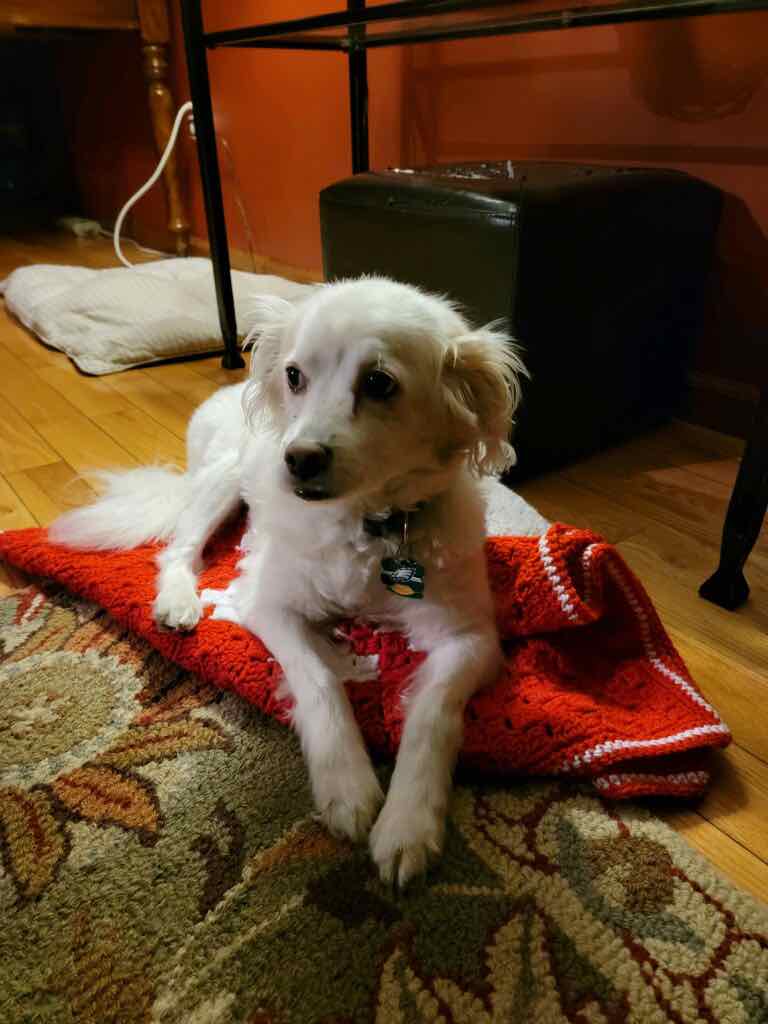
A blanket can provide comfort for a rescue dog and be a piece they can call all their own when they finally find a forever home. The Raleigh Dog Blanket can be a comforting gift for a small or medium sized dog, something just for them. It’s perfect for lounging on or adding to the dog bed.
Design + Construction
This dog blanket crochet pattern is designed as a quasi sampler blanket. I wanted anyone who made it to have fun learning new stitches while creating something so special. And, if you already know all of these stitches, the squares make a great mindful crochet or travel project. Each square takes about 1.2oz of worsted weight yarn, giving you the perfect opportunity to shop your stash!
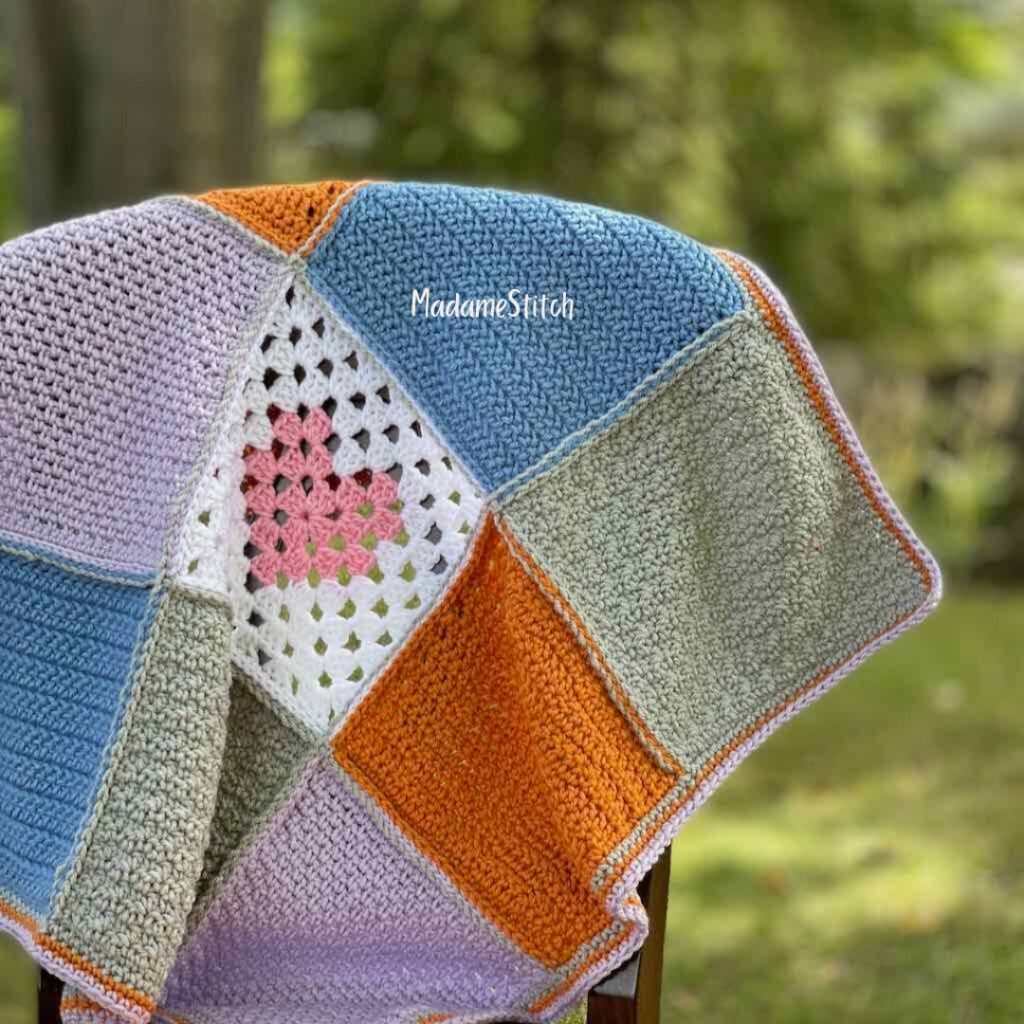
I chose to sew the squares together using a slip stitch seam. If you know how to slip stitch, you’ll love this seam for its simplicity and the beautiful texture it creates on the surface of the blanket. Or, you can use the seaming method of your choice. The whole blanket is then finished off with a 3-round single crochet border.
This blanket can be easily customized to your personal taste, from choosing the colors, arranging the squares, to changing the border. All of the squares can be worked in the same color or in a palette of related colors. Or, go wild with fun color combinations to brighten up the dog’s personal space.
About the yarn for the Raleigh dog blanket crochet pattern
Any worsted weight yarn will do. Choose an acrylic yarn for easy care and to avoid any possibility of an allergic reaction. Acrylic yarn is durable and inexpensive. I used Hobby Lobby “I Love This Yarn” because it’s what I had in my stash!
Why buy the PDF
Yes, the pattern is free here on the blog. But, there are definitely benefits to having the PDF instead.
- Ad-free, clean print copy, clutter free and beautifully formatted
- Crochet charts for all the stitches
- Detailed notes and written instructions
Pattern Instructions for the Raleigh Dog Blanket
Thank you for staying on this post and reading my patterns right here on the blog, without copy/pasting. When you stay here to follow the free version of my pattern, I am compensated for my time and energy. This is a great, free way to support a designer. If you would like to save this for later, bookmark the page to save it in your mobile browser.
Yarn
Hobby Lobby “I Love This Yarn” 100% acrylic worsted weight (7oz/355yd; 199g/325m) Each square takes approximately 1.2oz.
Colors used in the sample:
- Square 1 – Color 290 (Orchid)
- Square 2 – Color 120 (Medium Blue)
- Square 3 – Color 200 (Gray Mist)
- Square 4 – Color 356 (Desert Glaze)
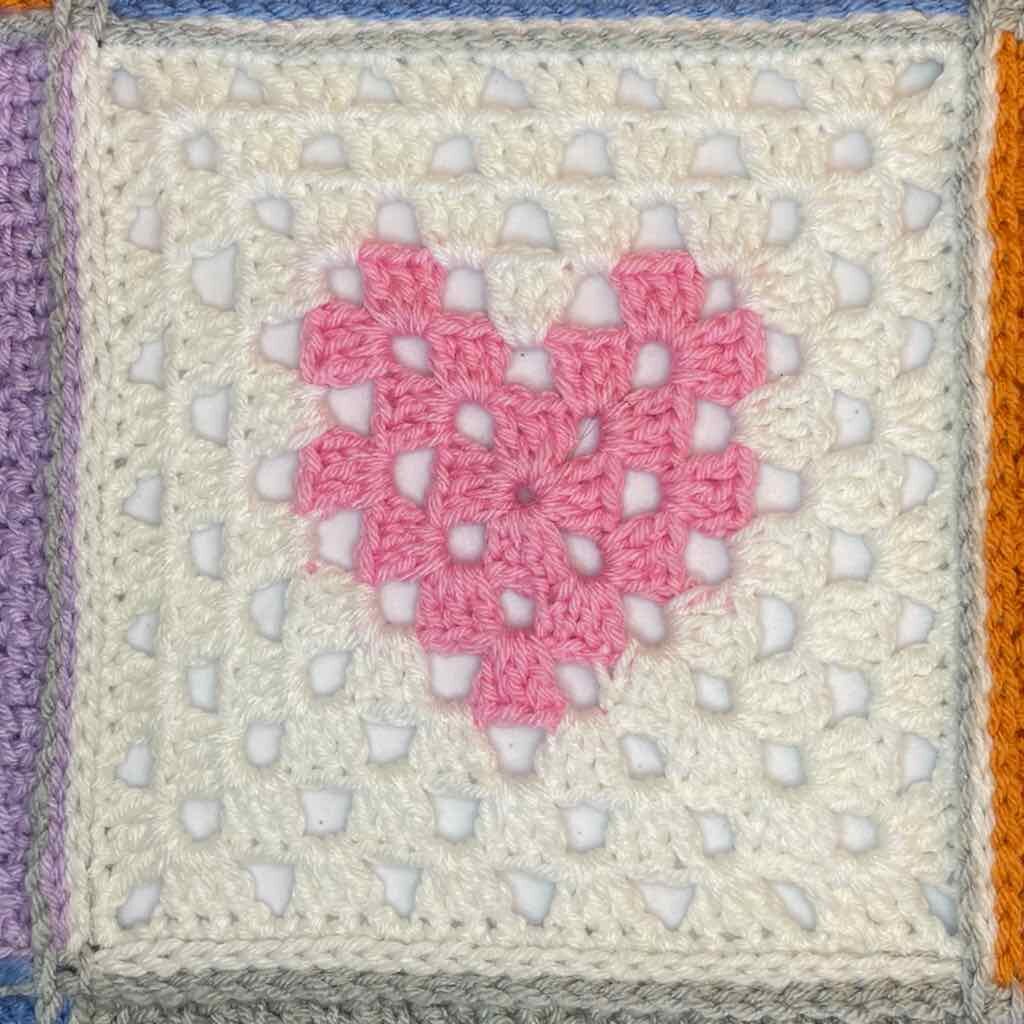
- Center Square – Color A (for the heart) – 102 (Soft Pink) , Color B (for the background) – 10 (White)
Hook: US size I-9 (5.5mm)
Written in English using US crochet terminology
Skill level: Advanced beginner/Intermediate because of multiple stitches, finishing techniques
Finished size of blanket: Approx. 27” square
Finished size of each square: Approx. 8″ square
Materials + Tools
- Removable stitch markers for seaming
- Tapestry needle for weaving in ends
Abbreviations
- beg – beginning
- ch – chain
- dc – double crochet
- hdc – half double crochet
- rnd(s) – round(s)
- sc – single crochet
- sk – skip
- sp – space
- st(s) – stitch(es)
- YO – yarn over
Special Stitches
Herringbone half double crochet (Hhdc) – YO, insert hook in indicated st, Yo, draw up a loop and continue to pull yarn through 1st loop on hook, YO, pull through both loops on hook.

Stacked single crochet (STsc) – (This stitch is used at the beginning of a row or round to replace the traditional turning ch-3. It has the appearance of a dc.) – Insert hook in same st as loop, YO, draw up loop, YO, pull through 2 loops (bottom sc made), insert hook in left vertical bar of bottom sc, YO, draw up loop, YO, pull through 2 loops (top sc made).

Pattern Notes
- Each square is finished off with one round of sc to provide a clean edge for sewing the squares together. The number of sc along each side doesn’t need to be the same for each square. The measurement of the finished square is more important.
- Although the number of sts worked along the side edges can be different for each square, try to stay within a range of 23-28.
- A ‘ch 3’ may be substituted for any STsc. Doing so will not affect the overall look or construction.
- A ‘ch 1’ at the beginning of any row or round does not count as a st.
- Squares 1-4 feature a repeating row pattern. That means you can stop when you reach 7.5” from the beginning even if you haven’t completed all the rows called for. The square edging will add approx. 1/2” to the width.
Written Instructions
Square 1 – Wide Checkers (#50 in Crochet Stitch Dictionary by Sarah Hazell) – Make 2
Ch 26.
Row 1: Sc in 2nd ch from hook and in each ch across, turn. (25 sc)
Row 2: Ch 1, sc in same st and in next 4 sts, (dc in next 5 sts, sc in next 5 sts) twice, turn. (15 sc, 10 dc)
Row 3: STsc, dc in next 4 sts, (sc in next 5 sts, dc in next 5 sts) twice, turn. (15 dc, 10 sc)
Rows 4-19: Rep Rows 2-3 8 times.
Row 20: Rep Row 2.
Note: If you reach 7.5″ before Row 20, be sure to work the Final Row to complete the square.
Final Row: Ch 1, sc in same st and in each st across. (25 sc)
At the end of Final Row, do not turn and do not fasten off. Proceed to Edging for the Squares below.

Square 2 – Herringbone half double crochet (Hhdc) – Make 2
Ch 25.
Row 1: Hhdc in 2nd ch from hook and in each ch across, turn. (24 Hhdc)
Row 2: Ch 1, Hhdc in same st and in each st across, turn. (24 Hhdc)
Rows 3-20: Rep Row 2.
At the end of Row 20, do not turn and do not fasten off. Proceed to Edging for the Squares below.

Find the blog post for the Herringbone half double crochet HERE.
Thank you for staying on this post and reading my patterns right here on the blog, without copy/pasting. When you stay here to follow the free version of my pattern, I am compensated for my time and energy. This is a great, free way to support a designer. If you would like to save this for later, bookmark the page to save it in your mobile browser.
Square 3 – Seed stitch (Also called Moss Stitch) – Make 2
Ch 25.
Row 1: Sc in 3rd ch from hook (counts as dc + sc), [dc in next ch, sc in next ch] across, turn. (12 dc, 12 sc)
Row 2: STsc, sc in next st, (dc in next st, sc in next st) across, working final sc in the top of the skipped ch from Row 1, turn. (12 dc, 12 sc)
Row 3: STsc, sc in next st, (dc in next st, sc in next st) across, turn. (12 dc, 12 sc)
Rows 4-22: Rep Row 3.
At the end of Row 22, do not turn and do not fasten off. Proceed to Edging for the Squares below.
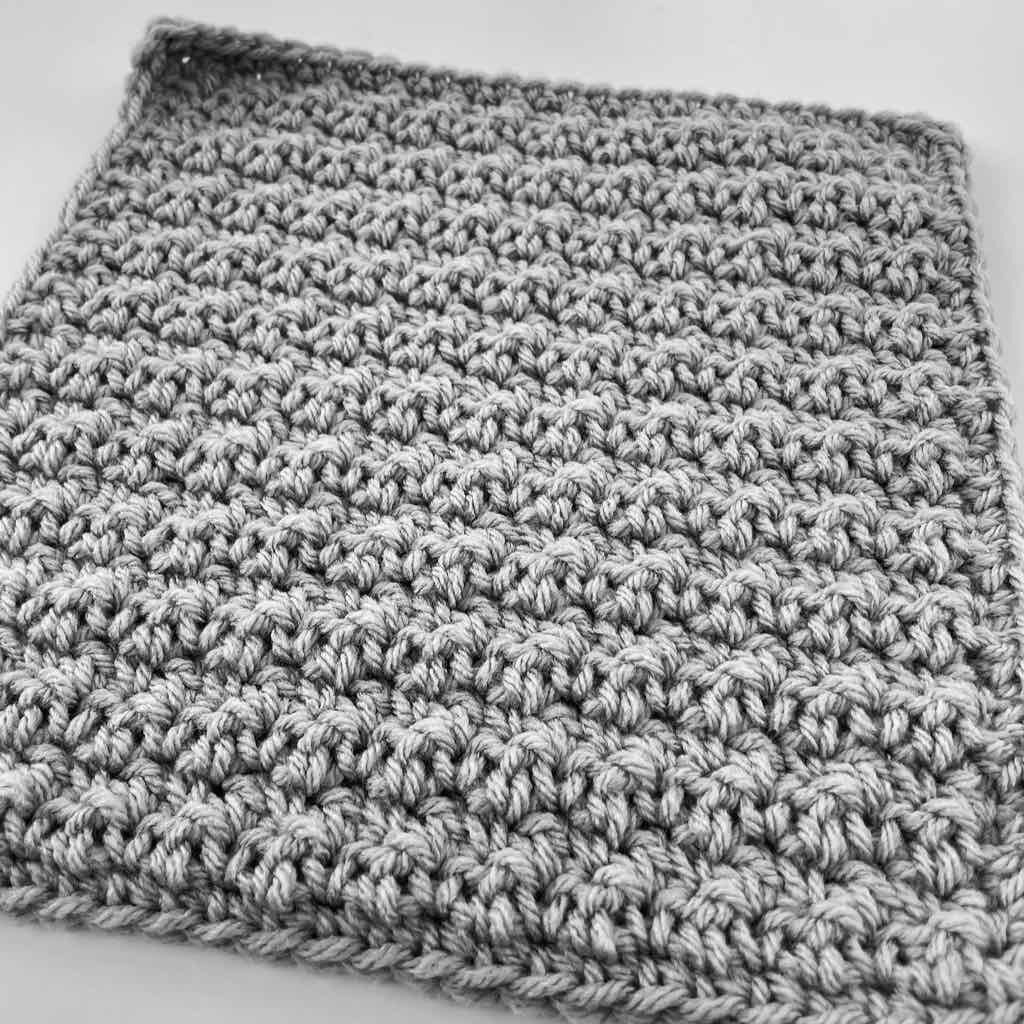
Find the Seed Stitch blog post HERE.
Square 4 – Linen Stitch (also known as Woven Stitch) – Make 2
Ch 30.
Row 1: Sc in 2nd ch from hook and in each ch across, turn. (29 sc)
Row 2: Ch 1, sc in same st, (ch 1, sk 1 st, sc in next st) across, turn. (15 sc, 14 ch-1 sp)
Row 3: Ch 1, sc in same st and in next ch-1 sp, (ch 1, sc in next ch-1 sp) across to last st, sc in last st, turn. (16 sc, 13 ch-1 sp)
Row 4: Ch 1, sc in same st, (ch 1, sc in next ch-1 sp) across working the final sc in last st, turn. (15 sc, 14 ch-1 sp)
Rows 5-28: Rep Row 3-4 12 times.
Row 29: Rep Row 3.
Note: If you reach 7.5″ before Row 29, be sure to work the Final Row to complete the square.
Final Row: Ch 1, sc in same st and in each st and ch-1 sp across. (29 sc)
At the end of Final Row, do not turn and do not fasten off. Proceed to Edging for the Squares below.
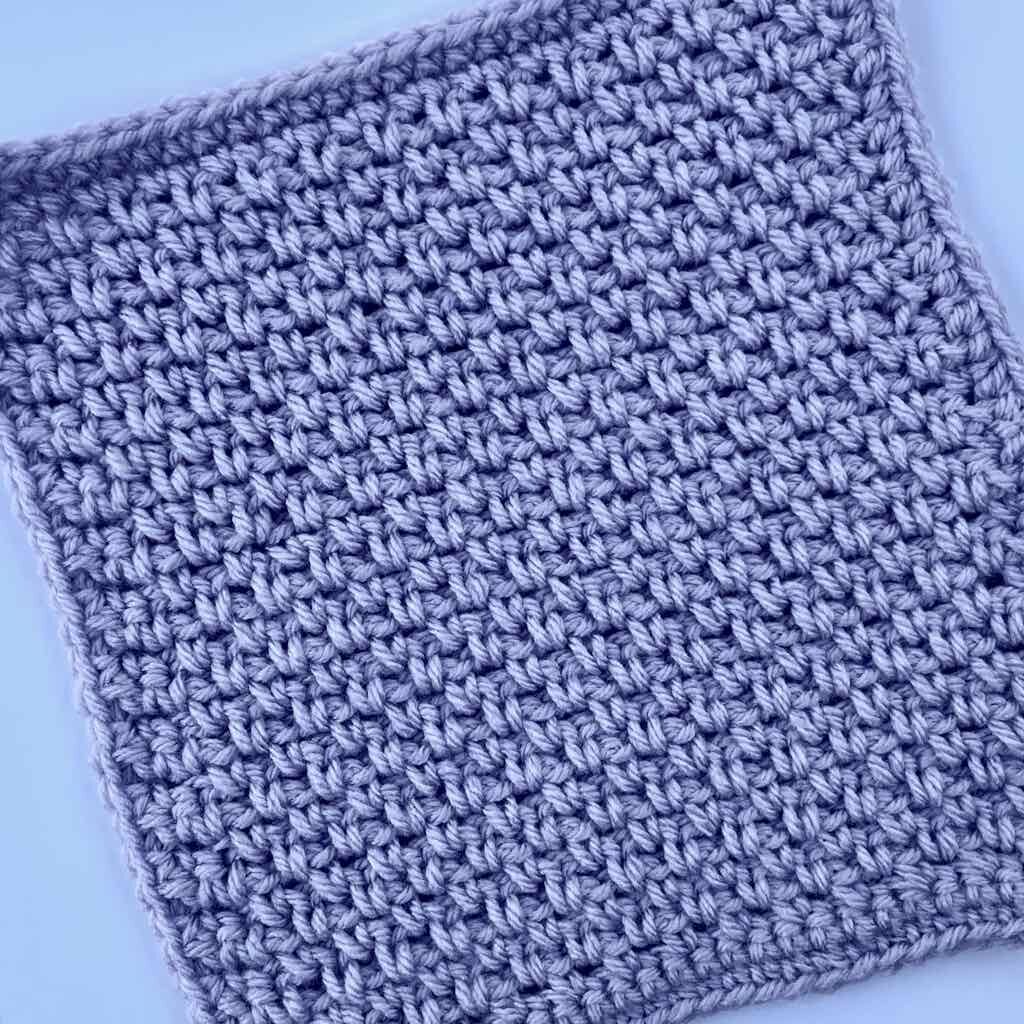
Find the Linen Stitch blog post HERE.
Edging for Squares 1-4
Note: Work 23-28 sc evenly spaced along the side edges. The exact number of sc isn’t important because this will be hidden once the squares are sewn together. Reminder: You have not fastened off at the completion of each square.
Ch 1, 2 sc in the corner st just completed (partial first corner), [sc evenly across the side edge, 3 sc in the next corner st, sc in each st across, 3 sc in the next corner st] twice, ending with 1 sc in the same st as the beg 2 sc to complete the first corner.
Fasten off and weave in ends.
Center square – Heart granny square – Make 1
Notes
- Do not turn after any round.
- In Rnd 3, cut the yarn after each color change. Tie the ends together to keep the yarn from pulling out as you work. Weave them in when the square is complete.
With Color A, ch 4, join with slip st to form ring (or use a magic ring).
Rnd 1: STsc, 2 dc in ring, ch 3, (3 dc in ring, ch 3) 3 times, join with slip st to top of beg st.
Rnd 2: Slip st to corner sp, (STsc, 2 dc, ch 3, 3 dc) in corner sp, ch 1, [(3 dc, ch 3, 3 dc) in next corner sp, ch 1)] 3 times, join with slip st to top of beg st.
Rnd 3: Slip st to corner sp, with Color B, (STsc, 2 dc, ch 3, 3 dc) in corner sp, with Color A, ch 1, 3 dc in ch-1 sp, ch 1, (3 dc, ch 3, 3 dc) in next corner sp, with Color B, ch 1, 3 dc in ch-1 sp, with Color A, ch 1, (3 dc, ch 3, 3 dc) in next corner sp, ch 1, 3 dc in next ch-1 sp, with Color B, ch 1, (3 dc, ch 3, 3 dc) in next corner sp, with Color A, ch 1, 3 dc in next ch-1 sp, with Color B, ch 1, join with slip st to top of beg st.
Rnd 4: Slip st to corner sp, (STsc, 2 dc, ch 3, 3 dc) in corner sp, ch 1, [(3 dc in next ch-1 sp, ch 1) across to corner sp, (3 dc, ch 3, 3 dc) in next corner sp, ch 1] 3 times, (3 dc in next ch-1 sp, ch 1) across to corner sp, join with slip st to top of beg st.
Rnds 5-6: Rep Rnd 4. At the end of Rnd 6, do not fasten off. Proceed to Edging for Center Square below.
Edging for Center Square only
Ch 1, sc in same st, in each st and ch-1 sp around, working 3 sc in each corner sp.
Fasten off and weave in ends.
Block all squares before seaming.
Seaming
Assembly grid for the Raleigh Dog Blanket Pattern
Notes
- The sample is seamed using a slip stitch seam which creates a raised texture on one side of the blanket and an invisible seam on the other. I chose to make the textured seam the right side of the fabric. However, you may choose whatever you prefer.
- If you prefer another seaming method, you may use that method to sew the squares together.
- Because each square has a different number of stitches and rows, the stitches may not line up exactly. Use a locking removable stitch marker to mark the center of each side to ensure the squares are stitched together evenly.
- I chose the Gray Mist for the seam because of its neutral color.
To slip stitch seam on the right side of the blanket
Horizontal seam 1: Begin with Squares 1 & 3 on the right side of the assembly grid. Hold the squares wrong sides facing each other with Square 1 on top. Attach the yarn of your choice to the upper right hand corner of both squares. Ch 1, insert hook through both loops of both squares, YO and pull through all loops to make the first slip stitch. Continue across the squares to the next corner.
Without fastening off, pick up the next 2 squares in the grid (Squares 2 and center), making sure to have wrong sides facing each other. Continue slip stitching across to next corner.
Without fastening off, pick up the last 2 squares in the grid (Squares 1 & 4), making sure to have wrong sides facing each other. At the end of the 3rd set of squares, fasten off securely. Seam 1 is complete.
Horizontal seam 2: Attach the 3 squares at the bottom of the grid in the same manner.
Next, slip stitch vertical seams 3 & 4 to finish assembly.
To slip stitch seam on the wrong side of the blanket
Follow the directions above, but be sure to hold right sides facing when slip stitching the squares together.
Weave in all seaming ends and proceed to Blanket Border.
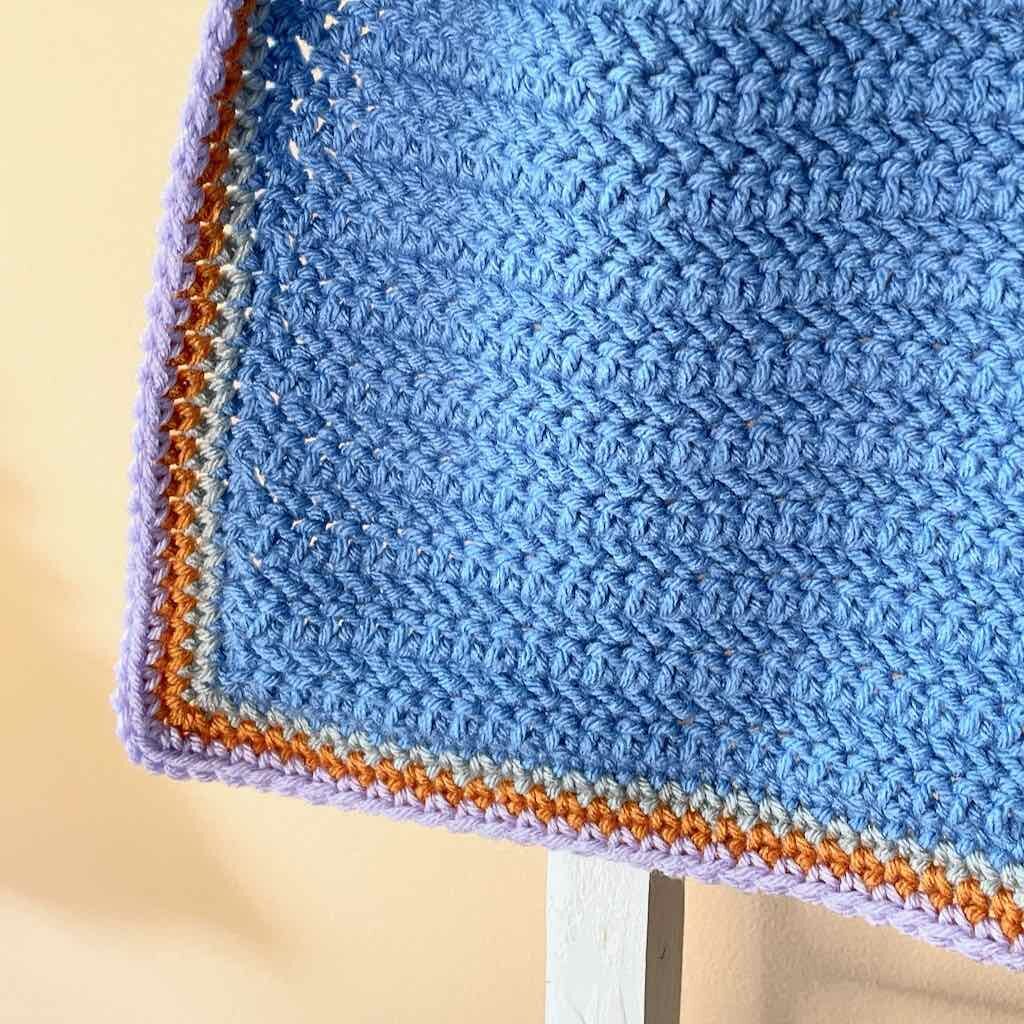
Blanket Border
Rnd 1: Attach Gray Mist to any middle st at one corner, ch 1, 3 sc in the same st, (sc across to next corner, 3 sc in the middle st of corner) 3 times, sc across to corner, drop Gray Mist, pick up Desert Glaze, join with slip st to beg st.
Rnd 2: Slip st into middle st of corner, ch 1, 3 sc in the same st, (sc across to next corner, 3 sc in the middle st of corner) 3 times, sc across to corner, drop Desert Glaze, pick up Orchid, join with slip st to beg st.
Rnd 3: Slip st into middle st of corner, ch 1, 3 sc in the same st, (sc across to next corner, 3 sc in the middle st of corner) 3 times, sc across to corner, join with slip st to beg st.
Fasten off and weave in all ends.
All done!
Donate to charity or your local dog shelter.
If you love making for charity and to crochet for those in need, this dog blanket crochet pattern is perfect for donation.
A blanket can provide comfort for a rescue dog and be a piece they can call all their own when they finally find a forever home. The Raleigh Dog Blanket can be a comforting gift for a small or medium sized dog, something they can call their own. It’s perfect for lounging on or adding to the dog bed.
Here’s one of my favorite organizations: The Eleventh Hour Rescue.
Try another dog blanket in the MadameStitch collection.
The Puppy Love Blanket, a C2C crochet project, is available in all my shops.
[mailerlite_form form_id=3]

2 Comments