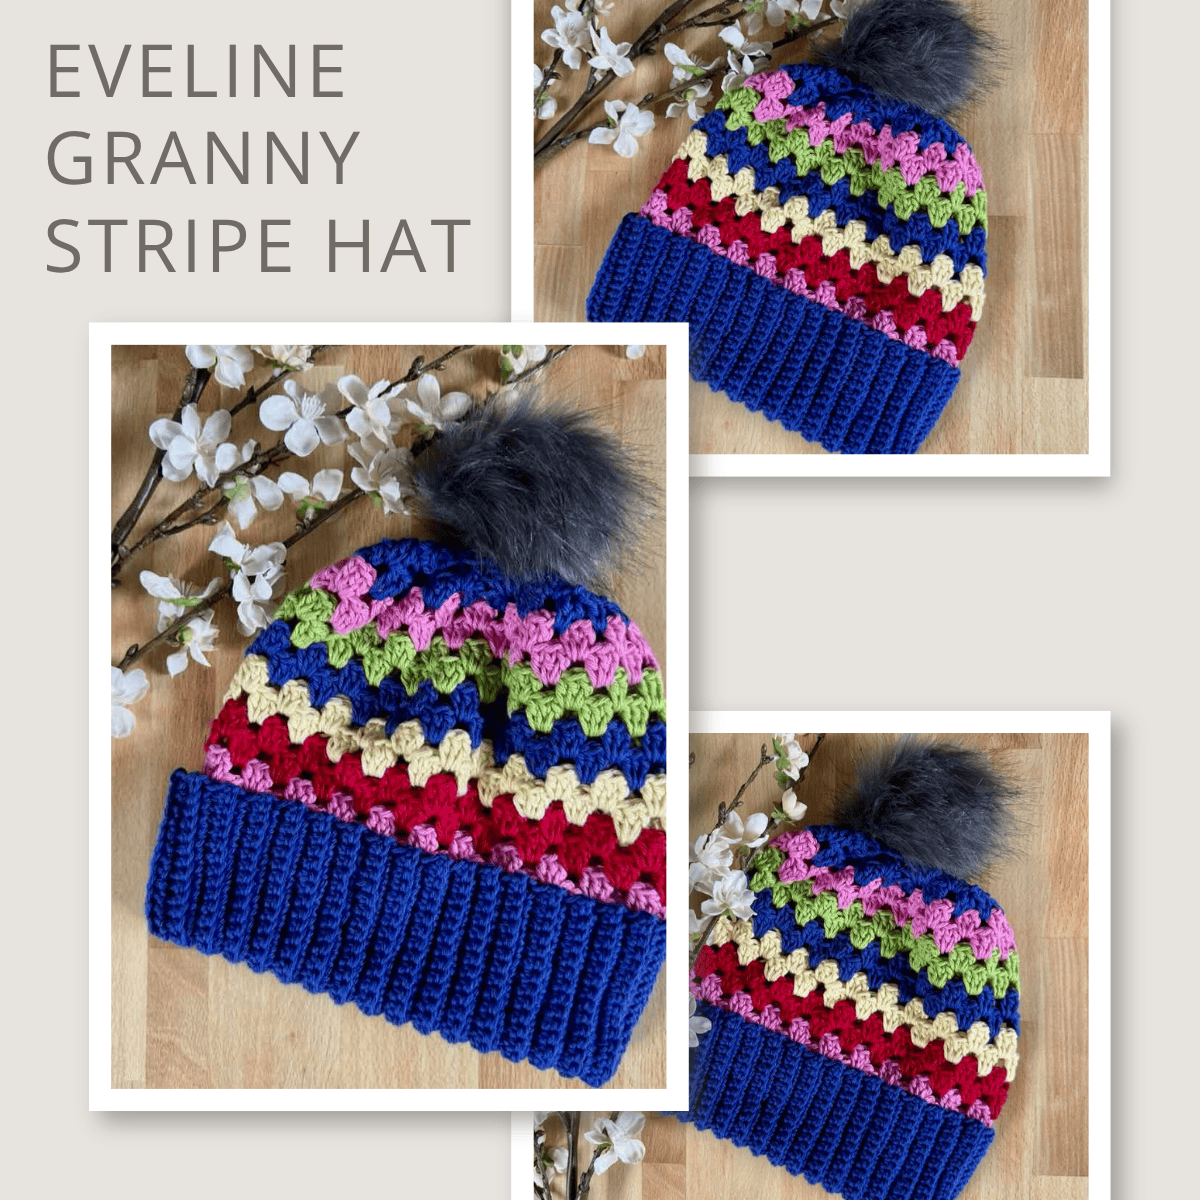
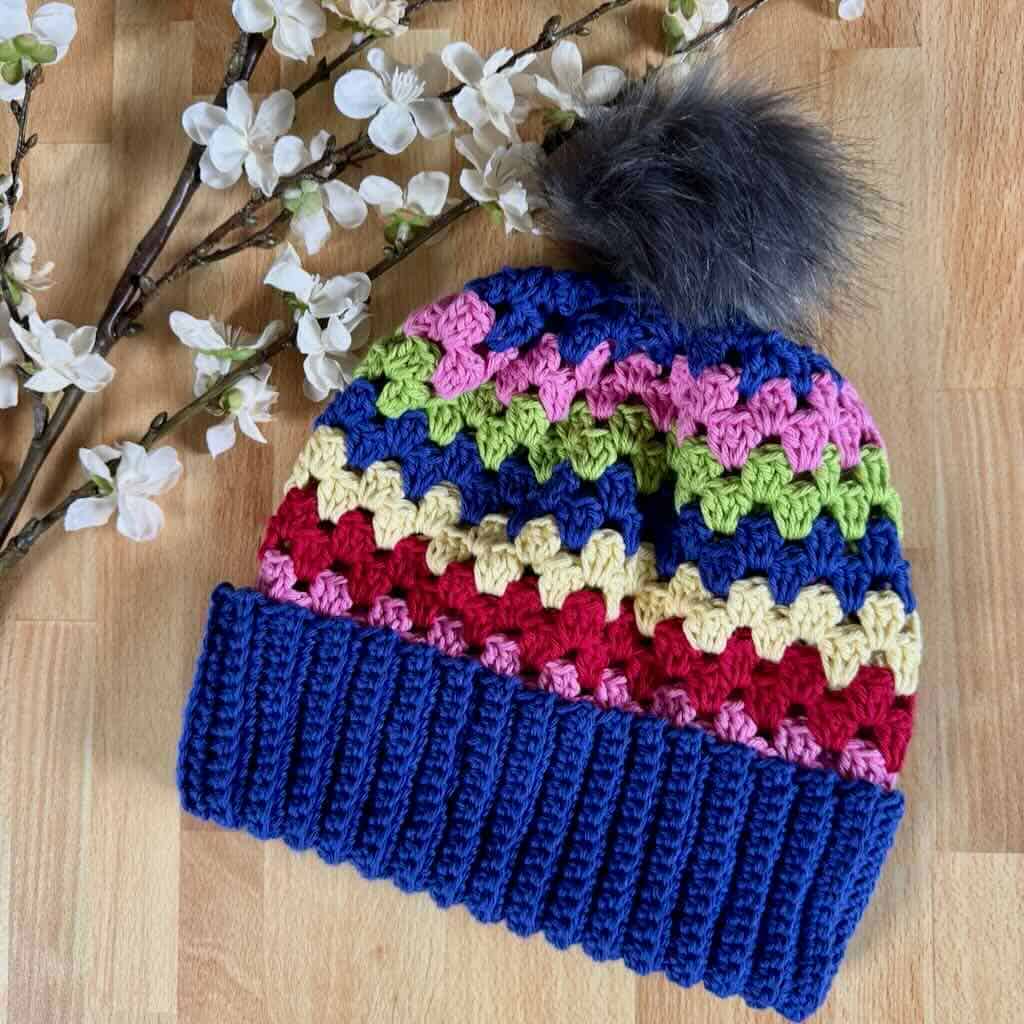
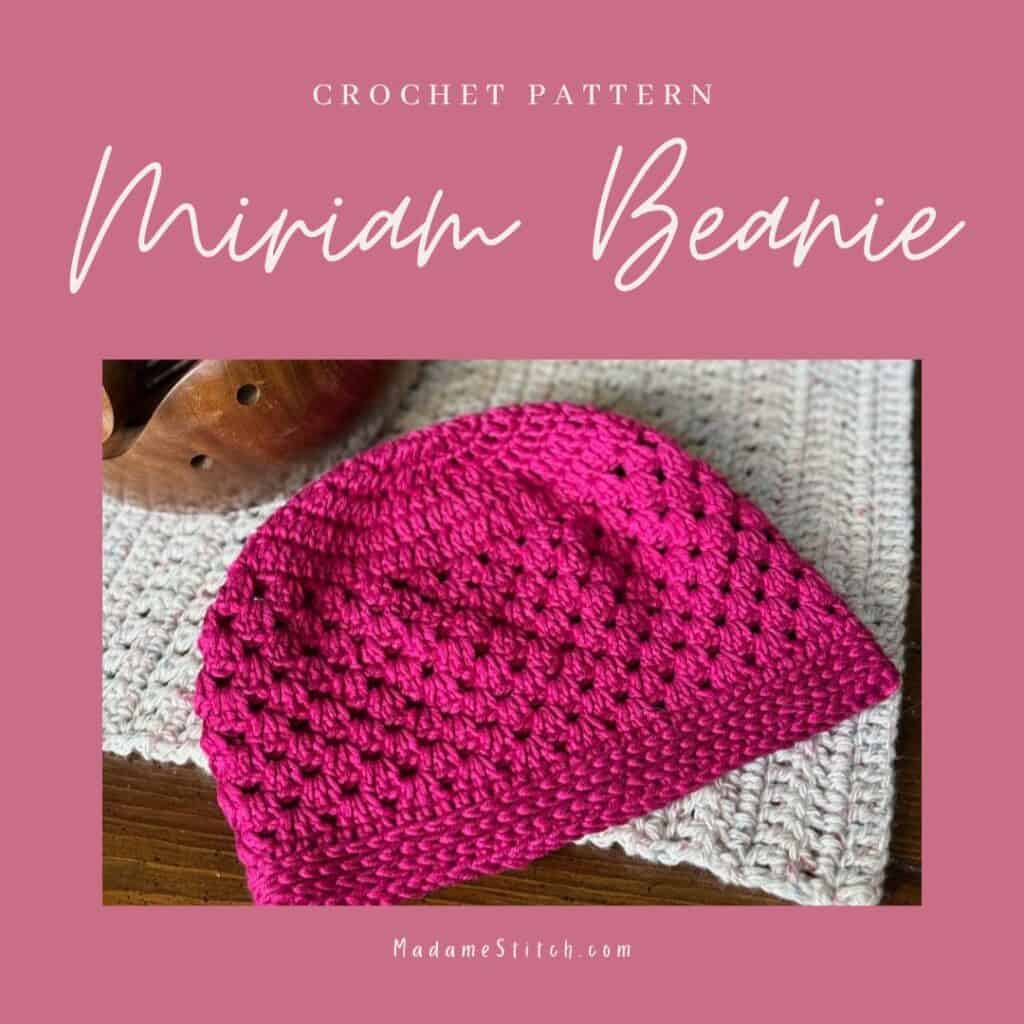
The Bright, Hopeful Eveline Granny Stripe Hat Brings Comfort and Color
The Eveline Granny Stripe Hat is a colorful, cozy crochet design that radiates hope and comfort. It’s perfect for cancer patients or anyone who loves a fun, vintage-inspired look for chilly winter days.
The Eveline Granny Stripe Hat
I’ll be the first to admit—I’m not great about getting to the doctor. It’s always been something I put off. But in 2024, I finally decided it was time to take care of myself and schedule that long-overdue checkup.
During the visit, my doctor reminded me about getting my colon checked. I wasn’t eager for a colonoscopy, so I opted for the at-home test instead. When it came back positive, I suddenly found myself in that uneasy space of waiting, wondering what the next steps would bring.
Thankfully, my story has a happy ending. But that experience reminded me how powerful preventive care can be and how deeply we all feel the uncertainty that comes with waiting for answers.
The Eveline Granny Stripe Hat was designed as a celebration of early screening, resilience, and the joy of a positive outcome. It’s not only a symbol of cancer awareness, it’s for anyone who wants to wrap themselves in a little extra hope and comfort.
Design + Construction
Designed with comfort in mind, this granny stripe hat is perfect for cancer patients or anyone who loves a fun, vintage-inspired look for chilly winter days.
The Eveline Granny Stripe Hat features a simple bottom-up construction with no seams to sew, just easy, satisfying crochet from start to finish.
The hat begins with a cozy back-loop-only ribbing that’s wide enough to flip up for extra warmth. After seaming the ribbing with slip stitches, you’ll move right into the body without fastening off, a smooth transition into cheerful granny stripes worked in the round.
The top of the granny stripe hat is gently cinched closed, and a playful pompom (fur or handmade!) completes the look.
This granny stripe hat is perfect for crocheters of all skill levels and a delightful addition to any handmade hat collection.
The Yarn
Because cancer can be such a life-changing experience, I chose bright, hopeful colors for my Granny Stripe Hat. Sometimes a pop of color is exactly what you need to lift your spirits.
I first fell in love with Premier Yarns Cotton Sprout while designing the Little Sprouts Baby Blanket. The DK version is the softest cotton yarn I’ve ever worked with – smooth and gentle, never stiff or scratchy.
The Cotton Sprout Worsted version is just as lovely, making it perfect for sensitive skin, especially for those going through cancer treatment, but also for anyone who simply wants a cozy, comfortable hat.
The openwork of the granny stitch gives the hat beautiful breathability while still keeping you warm. And with such a wide range of colors to choose from, you’re sure to find the perfect combination for everyone.
If you’re making this hat for someone with cancer-induced hair loss, you’ll want to choose a yarn that’s gentle against the skin. Christine of Sweet Potato 3 has a wonderful blog post all about choosing an appropriate yarn for sensitive skin.
For a more detailed discussion about appropriate yarns, visit Christine’s blog here.
Yarn Substitution
Want to find a close substitute for Cotton Sprout Worsted? Use my handy Yarn Substitution worksheet.

Or, click here to find some suggestions that are closely related.
The 2025 Cancer Crochet Challenge
The Eveline Granny Stripe Hat was originally scheduled to release during the 2025 Cancer Crochet Challenge hosted by Christine of Sweet Potato 3. But, because of a family emergency, I had to drop out of the event.
All is now well here at the MadameStitch homestead. Because I believe in this cause and want to contribute, I’ve released the hat pattern here free on the blog.
The free download is no longer available. But, be sure to check out all the wonderful hats on Christine’s blog and the free pattern in this post below.
Previous Cancer Challenge Hats
These 2 beanies are free on the blog.

Where to Get the PDF for the Eveline Granny Stripe Hat
The Eveline Granny Stripe Hat is a free-to-view crochet pattern in this blog post. Scroll down to view the free version.
Upgrade to the premium PDF and you’ll get a printer friendly, downloadable version of the pattern, I recommend you purchase it from one of my shops.
The premium PDF can be uploaded to your favorite mobile device so you can take your Eveline Granny Stripe Hat project with you to work on whenever you’re out and about.
The PDF is easy to read and beautifully formatted without ads for a great experience.
Get your copy today!


The Eveline Granny Stripe Hat Free Pattern
General Information
Yarn
Premier Yarns “Cotton Sprout Worsted” 100% worsted weight cotton (180yds/3.5oz; 165m/100g)
- Main color (MC) – Ultramarine (125yd)
- Color A (CA) – Lime (30yd)
- Color B (CB) – Bright Pink (30yd)
- Color C (CC) – Red (15yd)
- Color D (CC) – Yellow (20yd)
Any comparable worsted weight yarn can be used for the hat.
Hook
US size H-8 (5mm)
Tools
- Removable stitch markers
- Tapestry needle
Gauge
Ribbing: 15 rows x 18 sc BLO = Approx. 4″
Skill Level: Advanced Beginner
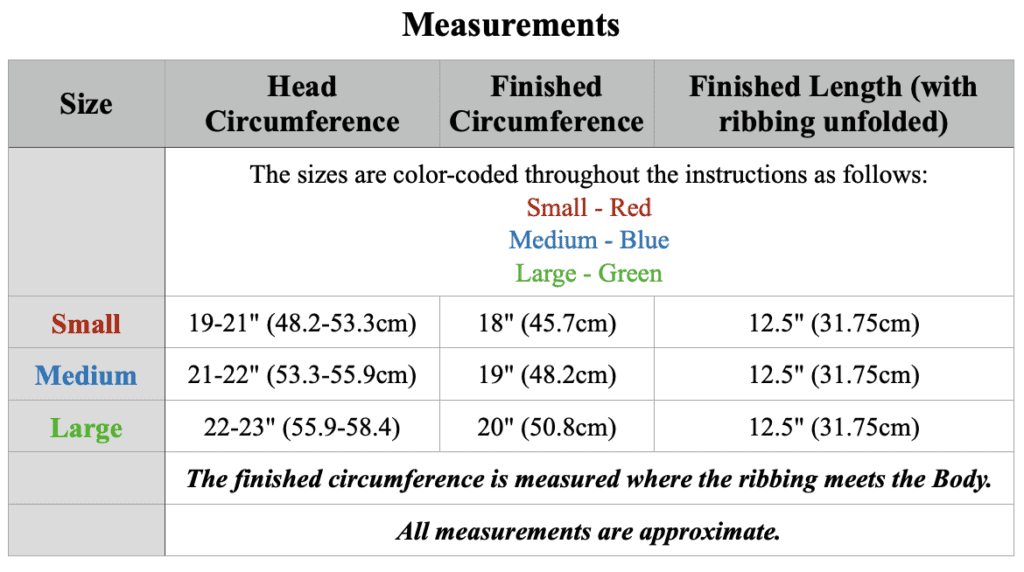
Sizes and Measurements
Abbreviations – US crochet terminology
- beg – beginning
- BLO – back loop only
- ch – chain
- dc – double crochet
- rep – repeat
- rnd(s) – round(s)
- sc – single crochet
- sk – skip
- sp – space
- st(s) – stitch(es)
- RS – right side
- WS – wrong side
- YO – yarn over
Repeats
- (…) – Work everything within the parentheses in the same st or sp.
- […] – Repeat everything within the brackets the indicated number of times.
Special Stitches
Foundation single crochet (Fsc) – To start the row, ch 2, insert hook in the 2nd ch from the hook, YO, pull up a loop, YO, pull through 1 loop (this forms the chain along the bottom), YO, pull through both loops on the hook (sc made).
All other Fsc in the row: Insert hook under both loops of the chain at the bottom of the previous st, YO, pull up a loop, YO, pull through 1 loop (this forms the chain along the bottom), YO, pull through both loops on the hook (sc made).
Granny stitch (GS) – 3 dc in the same st or sp
Granny stitch decrease (GS dec) – Dc in the indicated sp, YO, insert hook in the same sp, YO, pull up a loop, YO, pull through 2 loops (2 loops on the hook), YO, insert hook in the next sp, YO, pull up a loop, YO, pull through 2 loops (3 loops on the hook), YO, pull through all loops on the hook, dc in the same sp to complete the GS.
Single crochet two together (sc2tog) – Insert hook in the indicated st, YO, pull up a loop, insert hook in the next st, YO, pull up a loop, YO, pull through all 3 loops o the hook.
Note: A standing stitch replaces attaching the yarn and working a series of chains to begin a round. All standing sts begin with a slip knot held firmly against the hook to avoid slipping, then the st is worked as it normally would be.
Standing double crochet (Standing dc) – Make a slip knot, hold the slip knot firmly against the hook with the forefinger of the same hand, YO, insert hook in the indicated st, YO, pull up a loop, [YO, pull through 2 loops] twice.
Stacked single crochet (STsc) – (This stitch is used at the beginning of a round to replace the traditional turning ch-3. It has the appearance of a dc.) – Insert hook in the same st as the loop, YO, pull up a loop, YO, pull through 2 loops (bottom sc made), insert hook through the left vertical bar of the bottom sc, YO, pull up a loop, YO, pull through 2 loops (top sc made).
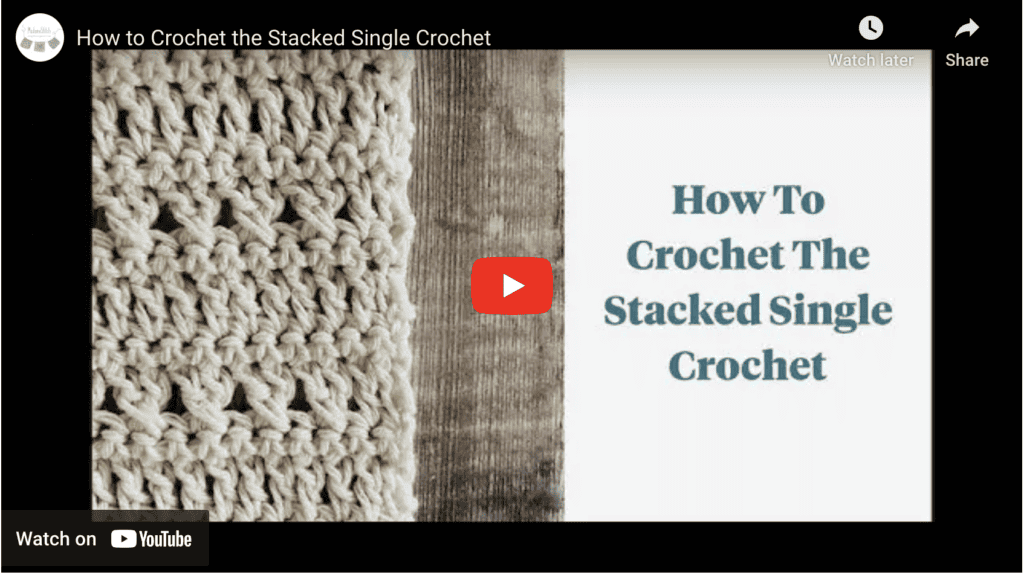
Video Tutorial
A full tutorial for the Eveline Granny Stripe Hat is coming soon. When it’s posted to YouTube, the link will be added here.
Pattern Notes
- A “ch-1” at the beg of a rnd does not count as a st.
- A “ch-2” or “ch-3” may be substituted for the STsc at any time without adversely altering the construction of the H at.
- Do not turn after any rnd.
- In the Body, the GS is worked in the sp where a ch-1 would normally be.
Pattern Instructions
Ribbing
Note: The Ribbing is extra wide in order for it to be flipped up when wearing the Hat.
Tip: While working the Ribbing, place a marker every 20 rows to aid in counting. Leave them in to work Rnd 1 of the Body to assist in counting.
Row 1: With MC, Fsc 18 OR, ch 19, sc in the 2nd ch from the hook and in each ch across, turn. < 18 sc >
Row 2: Ch 1, sc BLO in the same st and in each st across, turn. < 18 sc BLO >
Rows 3-63 (66, 69): Rep Row 2. At the end of Row 63 (66, 69), do not fasten off.
The Ribbing should measure approx. 4″ wide x 16.8 (17.6, 18.4)” long. The sc BLO is stretchy and should easily expand to fit your head comfortably. However, you may want to try it on to see if you need to make any adjustments (the number of rows should be a multiple of 3).
Slip Stitch Seam
At the end of Row 63 (66, 69): Bring the ends together with Row 1 behind, being careful not to twist. Ch 1, then slip st the ends together, working through the unworked loop of the beg ch of Row 1 and the back loop of Row 63 (66, 69). At the end of the seam, do not fasten off. Turn the Ribbing so the seam is on the WS before beginning the Body.
Body
Rotate to work in the ends of the Ribbing rows.
Rnd 1 (RS): Continuing with MC, ch 1, sc in the same row end and in each row end around, join with slip st to beg st. < 63 (66, 69) sc >
Rnd 2 (RS): (STsc, 2 dc) in the same st (counts as 1st GS here), sk 2 sts, [GS in the next st, sk 2 sts] around, join with slip st to beg st, fasten off. < 21 (22, 23) GS >
Rnd 3: With CA, (Standing dc, 2 dc) in any sp (counts as 1st GS here and throughout), GS in the next sp and in each sp around, join with slip st to beg st.
Rnd 4: STsc in the sp to the right of the hook, GS in the next sp and in each sp around, ending with 2 dc in the sp with the STsc to finish the 1st GS, join with slip st to beg st, fasten off.
Rnds 5-6: With CB, rep Rnds 3-4.
Rnds 7-8: With CC, rep Rnds 3-4.
Rnds 9-10: With CD, rep Rnds 3-4.
Rnds 11-12: With MC, rep Rnds 3-4.
Rnds 13-14: With CA, rep Rnds 3-4.
Rnds 15-16: With CB, rep Rnds 3-4.
Continue to the Decrease Rnds. (Find the instructions for your size)
Decrease Rnds
For Small
Rnd 17: With MC, (Standing dc, 2 dc) in any sp, [GS dec over the next 2 sp, GS in the next 3 sp] 4 times, join with slip st to the beg st. < 13 GS, 4 GS dec >
Rnd 18: STsc in the sp to the right of the hook, [GS dec over the next 2 sp, GS in the next sp] 4 times, [GS dec over the next 2 sp] twice, 2 dc in the sp with the STsc to complete the 1st GS, join with slip st to beg st. < 5 GS, 6 GS dec >
Rnd 19: Ch 1, sc in the same st, sc2tog around, join with slip st to beg st. < 17 sts >
Fasten off, leaving a tail long enough to gather the top of the Hat.
For Medium
Rnd 17: With MC, (Standing dc, 2 dc) in any sp, GS in the next sp, [GS dec over the next 2 sp, GS in the next 2 sp] 5 times, join with slip st to the beg st. < 12 GS, 5 GS dec >
Rnd 18: STsc in the sp to the right of the hook, [GS dec over the next 2 sp, GS in the next sp] 4 times, [GS dec over the next 2 sp] twice, 2 dc in the sp with the STsc to complete the 1st GS, join with slip st to beg st. < 5 GS, 6 GS dec >
Rnd 19: Ch 1, sc in the same st, sc2tog around, join with slip st to beg st. < 17 sts >
Fasten off, leaving a tail long enough to gather the top of the Hat.
For Large
Rnd 17: With MC, (Standing dc, 2 dc) in any sp, [GS dec over the next 2 sp, GS in the next 2 sp] 5 times, GS dec over the next 2 sp, join with slip st to the beg st. < 11 GS, 6 GS dec >
Rnd 18: STsc in the sp to the right of the hook, [GS dec over the next 2 sp, GS in the next sp] 4 times, [GS dec over the next 2 sp] twice, 2 dc in the sp with the STsc to complete the 1st GS, join with slip st to beg st. < 5 GS, 6 GS dec >
Rnd 19: Ch 1, sc in the same st, sc2tog around, join with slip st to beg st. < 17 sts >
Fasten off, leaving a tail long enough to gather the top of the Hat.
Close the top of the Hat
- Turn the Hat inside out so the WS is facing out.
- Thread the long tail in and out of the top loops of Rnd 19.
- Gather the top of the Hat as you go.
- When you reach the end of the rnd, gather the top of the Hat to close the hole as tightly as possible.
- Sew several times across the hole to close it and secure the tail in place.
- Sew the button centered over the closed hole.
- Turn the Hat RS out. Pull the elastic loop of the pompom through to the WS and attach to the button.
Note: If you prefer, use matching yarn to make your own pompom. You’ll need a pompom maker and extra yarn.