This Christmas crochet baby blanket will wrap your little one in festive warmth
INSIDE: Bring joy and comfort to that special little one with a gorgeous Christmas crochet baby blanket. The free-to-view pattern is available here.
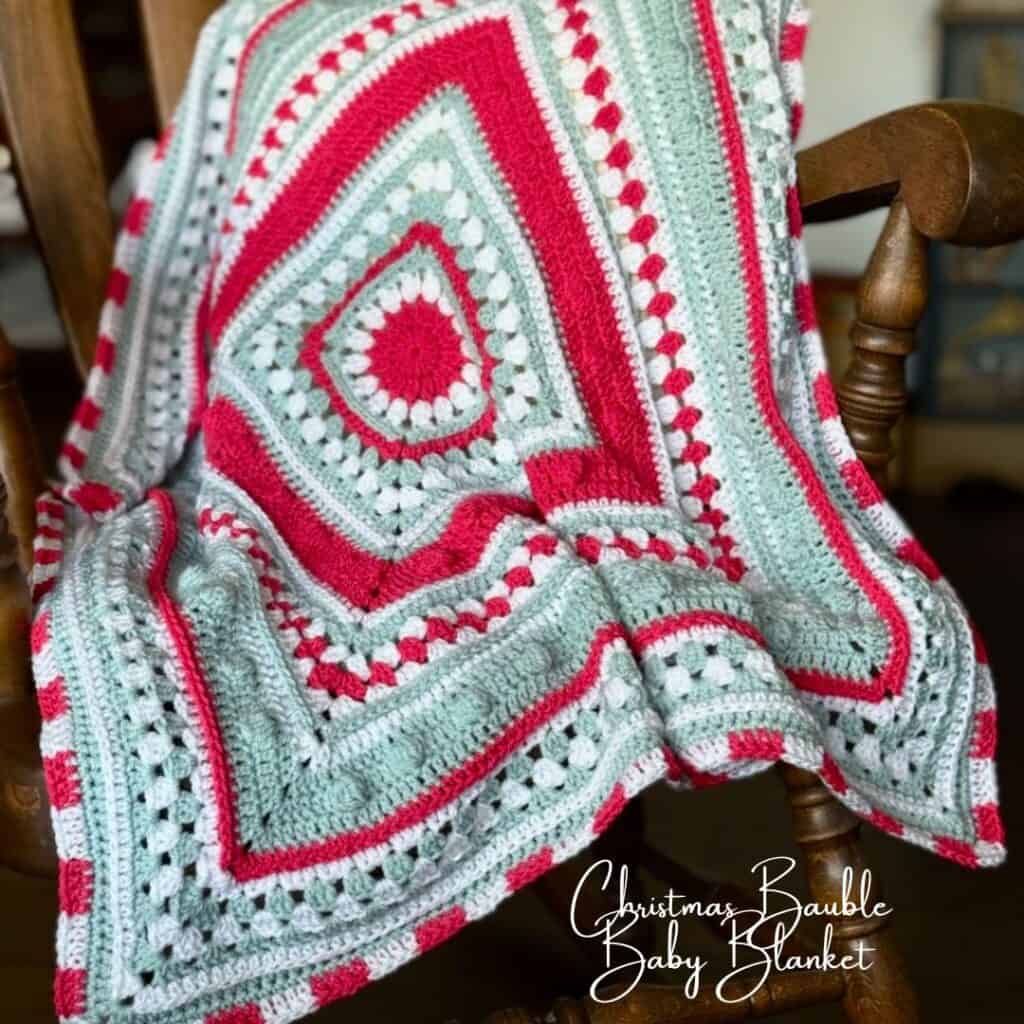
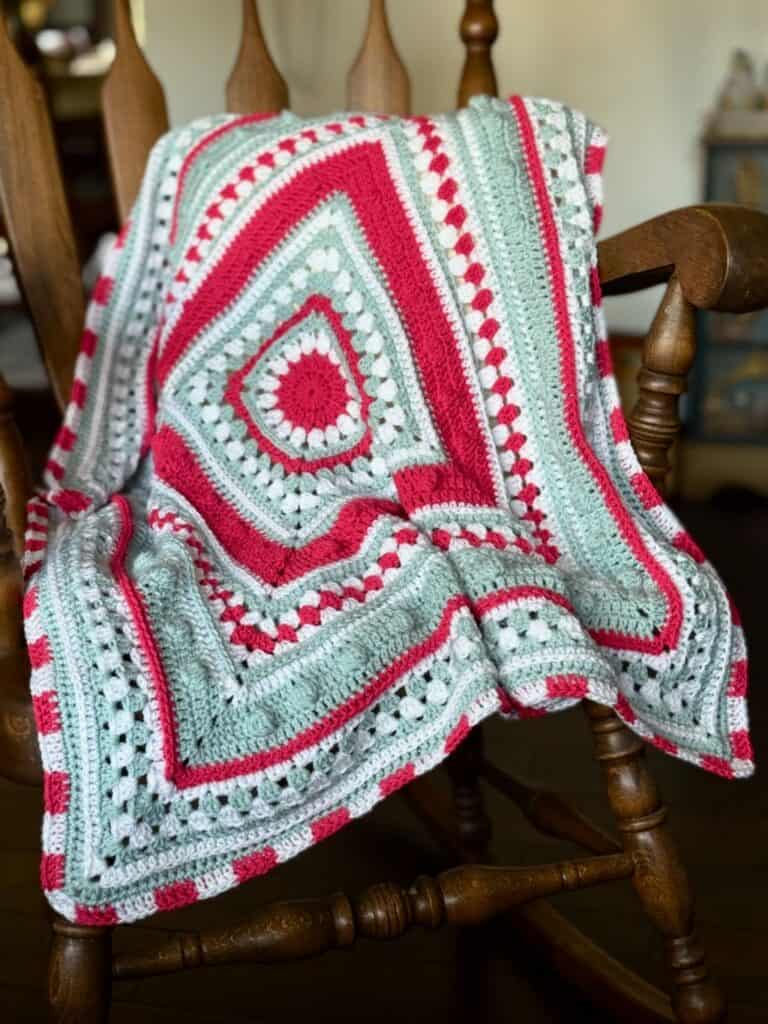
The Christmas Bauble Baby Blanket, a crochet baby blanket design
The holiday season is upon us and most of us are filling out our handmade holiday gift lists. It’s time to get everything crocheted so the gifts are ready for the big day.
I actually create an Excel spreadsheet that includes everyone on my list and gives me space for all my ideas, including stocking stuffers. When I’ve purchased or made a gift on the list, I change the cell color to yellow. Yeah, I’m that organized!
While I don’t have any little ones on my list this year, I wanted to be sure there was something special for babies this Christmas.
The Christmas Bauble Baby Blanket is a gorgeous crochet baby blanket that evokes images of all the beautiful ornaments that hang from the tree. Those ornaments are celebrated in a colorful, cozy crochet baby blanket that’s as comfy as it is eye-catching.
Design + Construction
For this crochet baby blanket, I wanted a design that included various crochet techniques and had more visual interest than my typical crochet baby blanket design. Plus, I wanted something that was obviously Christmas themed using subtle colors.
The theme of the Christmas Bauble Baby Blanket is two-fold and plays off the dual spellings of the word “bauble/bobble”.
Baubles and ornaments are common at Christmastime. And, the bobble stitch is a common crochet stitch and is often used to add a pop of eye-catching texture. They make the perfect pair in this Christmas crochet baby blanket.
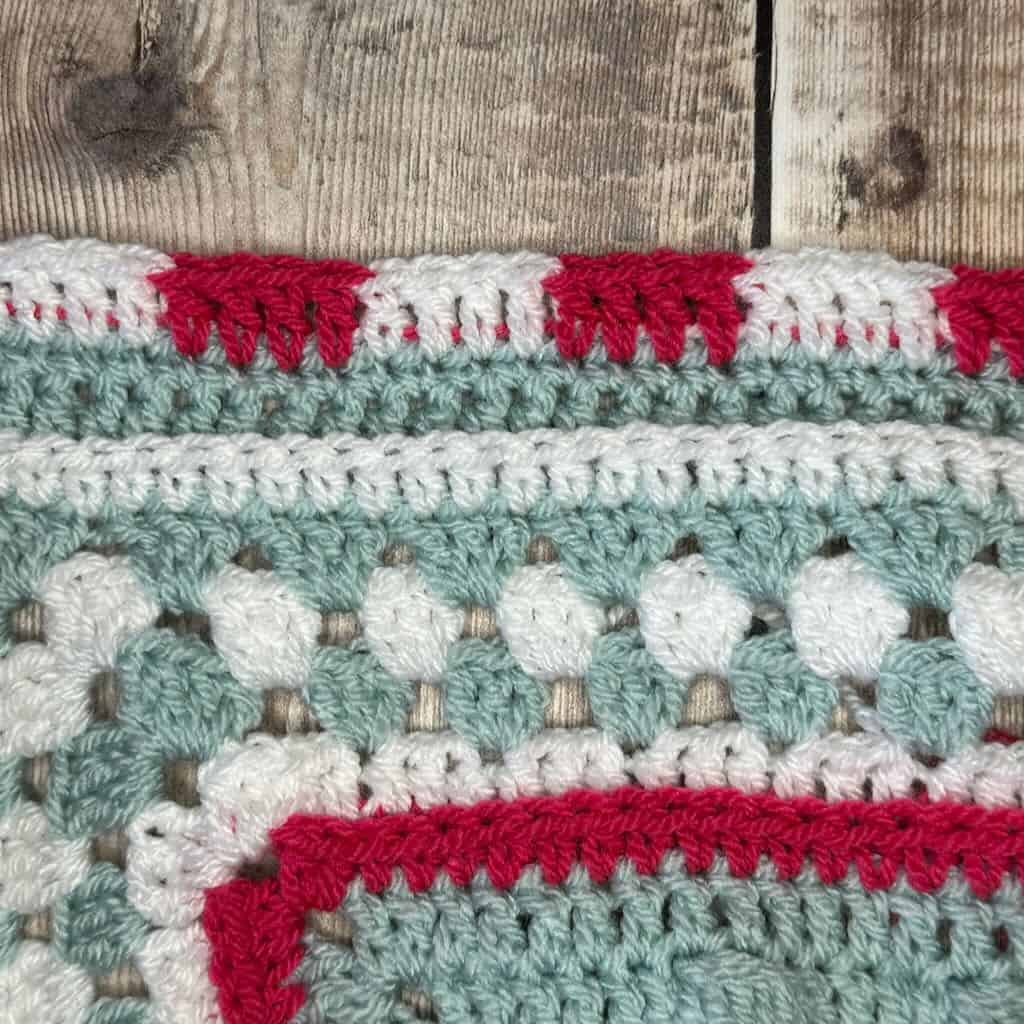
The center of the crochet baby blanket looks like a Christmas bauble, using double crochet cluster stitches to create a circle. The other 2 sections of the blanket are the granny stitch section (of course I included granny stitch!) and the bobble section.
Each section of the crochet baby blanket is separated by 2 rounds of half double crochet worked either in both top loops or in the 3rd loop. These serve as transition rounds and add a bit of subtle texture to the overall look.
The whole crochet baby blanket is finished off with a whimsical candy cane themed border.
Skill Level
I have listed this pattern as an Adventurous Beginner/Intermediate pattern.
- This blanket construction employs a number of crochet techniques like working a flat circle, transitioning from one section to the next, etc.
- Beyond the basic crochet stitches, the maker will work bobble stitches, granny stitches and 3rd loop stitches.
If you truly are a beginner crocheter, this crochet baby blanket will be a challenge because of the variety of stitches and techniques used in one design.
While the pattern has a lengthy number of instructions, it’s really quite predictable and repetitive. To make it easier to read, I’ve divided the instructions into sections.
The Yarn for the Christmas crochet baby blanket
This post contains affiliate links. That means, if you purchase something using the link, I receive a small commission. You don’t pay any extra and your information is safe. Thanks for supporting my small business.
I love to work a crochet baby blanket with DK weight yarn instead of the heavier worsted weight. DK weight gives the finished blanket such a beautiful drape and clear stitch definition. Plus, it’s the perfect weight for any season.
My favorite DK weight yarn is Stylecraft “Special DK”. It’s simply one of the softest acrylic DK weight yarns I’ve used and comes in dozens of beautiful colors. It would be difficult NOT to find the perfect colors for any project with this gorgeous yarn.
You’ll find Stylecraft “Special DK” online through the Wool Warehouse. I love ordering from them because their service is fast, shipping is relatively inexpensive, and orders to the US are received in a reasonable amount of time.

Here are some beautiful alternatives. Be sure to check yardages so you have enough yarn to complete the blanket.
Purchase the PDF
Sometimes it can be difficult to keep a browser open long enough to get the instructions you need to complete even a line of instruction in a free pattern. And, because the pattern for this Christmas crochet baby blanket is so long, you might want to consider purchasing a copy.
Getting a copy of the PDF ensures you’ll have an ad-free, easy-to-read pattern that can be downloaded to any mobile device that fits your needs.
Plus, the pattern PDF includes a chart to plan your colors, photos to help with working the hdc 3lp in the hidden stitch, and photos of the various stages of blanket construction.


The free pattern for the Christmas Bauble Baby Blanket starts here.
Thank you for staying on this post and reading my patterns right here on the blog, without copy/pasting. When you stay here to follow the free version of my pattern, I am compensated for my time and energy. This is a great, free way to support a designer. If you would like to save this for later, bookmark the page to save it in your mobile browser.
General Information
Yarn
Stylecraft “Special DK” 100% premium acrylic DK weight (3.5oz/322yd; 100g/295m)
- Color 1 (C1) – Pomegranate – 1 skein
- Color 2 (C2) – White 425yd – 1 skein
- Color 3 (C3) – Duck Egg – 1.5 skeins
The blanket takes a total of approx. 10.5-11oz/966-1004yd of yarn to make. While that’s about 3 skeins total, you’ll need more than 1 skein of Color 3 to crochet the blanket exactly as the sample and slightly less of Colors 1 & 2. To be safe, it’s recommended you have 2 skeins of each color on hand to ensure you don’t run out of yarn.
Any DK weight yarn appropriate for baby blankets will work for this project. This blanket makes a great stash buster.
Hook
US size H-8 (5mm)
Finished Size
Approx. 33” square
Gauge
Rnds 1-5 = approx. 5” across before blocking
Gauge is somewhat important but not critical. More yarn will be needed if the blanket is significantly larger than the size listed.
Abbreviations – US crochet terminology
- beg – beginning
- ch – chain
- dc – double crochet
- hdc – half double crochet
- rep – repeat
- rnd(s) – round(s)
- sc – single crochet
- sk – skip
- sp – space
- st(s) – stitch(es)
- YO – yarn over
How to read the repeats
- (…) – Work everything within the parentheses in the same st or sp
- […] – Repeat everything within the brackets the indicated number of times
- {…} – Repeat everything within the braces the indicated number of times
Special Stitches
2 double crochet cluster (2dc cl) – YO, insert hook in indicated st, YO, pull up loop, YO, pull through 2 loops, YO, insert hook in same st, YO, pull up loop, YO, pull through 2 loops, YO, pull through all 3 loops on hook.
3 double crochet cluster (3dc cl) – YO, insert hook in indicated sp, YO, pull up loop, YO, pull through 2 loops, [YO, insert hook in same sp, YO, pull up loop, YO, pull through 2 loops] twice, YO, pull through all 4 loops on hook.
Bobble (BO) – YO, insert hook in indicated st, YO, pull up loop, YO, pull through 2 loops, [YO, insert hook in indicated st, YO, pull up loop, YO, pull through 2 loops] 4 more times, YO, pull through all 6 loops on hook.
Granny stitch (GS) – 3 dc in the same sp or st.
Half double crochet in the 3rd loop (hdc 3lp) – Instead of working the hdc in the loops that sit on top of the st, this hdc is worked in the loop that sits on the back side just below the top loops.

A note about the hidden stitch
What is the hidden stitch in crochet? It’s the 1st st that follows each corner when working in the round. Oftentimes, because of the stitches worked in the corner space, that 1st stitch can be hidden and tucked underneath those stitches. In this pattern, the hidden stitch is included in a stitch count unless instructed to skip it.
The hidden stitch is worked into in the hdc 3lp rounds as well. This blog post has pictures that will help you see the 3rd loop of the hidden stitch.
Written Instructions
Pattern Notes
- Ch 1 at the beginning of a rnd does not count as a st.
- Pay close attention to when the hidden st is worked into and when it’s skipped.
- Do not turn after any rnd.
- A ch-3 may be substituted for the STsc at any time.
- Always attach a new color in a different corner from where you just fastened off to avoid bunching up in one place all the ends that need to be woven in.
- At each fasten off, weave in the ends to avoid having a lot to do at the end.
Pattern Instructions
With C1, ch 4, join with slip st to form ring. (Or, you may use a magic ring instead. Close the ring at the end of Rnd 1.)
Rnd 1: STsc, 15 dc in the ring, join with slip st to beg st. (16 dc) Do not fasten off.
Rnd 2: (Ch 2, dc) in the same st (counts as the 1st 2dc cl), [ch 1, 2dc cl in next st] 15 times, ch 1, join with slip st to beg 2dc cl. (16 2dc cl, 16 ch-1 sp) Fasten off.
Rnd 3: Attach C2 to any ch-1 sp, (ch 2, 2dc cl) in the same sp (counts as the 1st 3dc cl), [ch 2, 3dc cl in the next ch-1 sp] 15 times, ch 2, join with slip st to beg 3dc cl. (16 3dc cl, 16 ch-2 sp) Fasten off.
Transition
Rnd 4: Attach C3 to any ch-2 sp, ch 1, (2 hdc, ch 2, 2 hdc) in the same sp, {[hdc in top of 3dc cl, 2 hdc in the ch-2 sp] 3 times, hdc in the top of the 3dc cl, (2 hdc, ch 2, 2 hdc) in the next ch-2 sp} 3 times, [hdc in top of 3dc cl, 2 hdc in the ch-2 sp] 3 times, hdc in the top of the 3dc cl, join with slip st to beg st. (56 hdc, 4 ch-2 sp) Fasten off.
Note for Rnd 5: Be sure to work a hdc 3lp in the hidden st (the 1st st) after each corner.
Rnd 5: Attach C1 to any corner sp, ch 1, (2 hdc, ch 2, 2 hdc) in the same sp, [hdc 3lp in each st across to next corner sp, (2 hdc, ch 2, 2 hdc) in corner] 3 times, hdc 3lp in each st across to 1st corner, join with slip st to beg st. (16 hdc, 56 hdc 3lp, 4 ch-2 sp) Fasten off.
GS Section
Rnd 6: Attach C3 to any corner, (STsc, 2 dc, ch 2, GS) in the same corner, sk 3 sts, {[GS in the next st, sk 2 sts] 5 times, (GS, ch 2, GS) in the next corner} 3 times, sk 3 sts, [GS in the next st, sk 2 sts] 5 times, join with slip st to beg st. (28 GS, 4 ch-2 sp) Fasten off.
Note: For Rnds 7 & 8 (and for Rnds 17-18 & 27-28), the GS is worked between GS of the previous rnd where the ch-1 sp would typically be.
Rnd 7: Attach C2 to any corner, (STsc, 2 dc, ch 2, GS) in the same corner, [GS in each sp to next corner sp, (GS, ch 2, GS) in corner] 3 times, GS in each sp across to 1st corner sp, join with slip st to beg st. (32 GS, 4 ch-2 sp) Fasten off.
Rnd 8: Attach C3 to any corner, rep Rnd 7. (36 GS, 4 ch-2 sp) Fasten off.
Transition
Beg with Rnd 9, the st count lists the number of sts across one side for ease of counting. For example, 31 hdc x 4 means 31 hdc are worked along each side for a total of 124 hdc.
Rnd 9: Attach C2 to any corner, (2 hdc, ch 2, 2 hdc) in the same corner, [hdc in each st across to next corner, (2 hdc, ch 2, 2 hdc) in the next corner] 3 times, hdc in each st across to 1st corner, join with slip st to beg st. (31 hdc x 4, 4 ch-2 sp) Fasten off.
Rnd 10: Attach C3 to any corner, rep Rnd 5. (16 hdc, 31 hdc 3lp x 4, 4 ch-2 sp) Fasten off.
Bobble Section
Rnd 11: Attach C1 to any corner, (STsc, dc, ch 2, 2 dc) in the same corner, [dc in each st across to next corner, (2 dc, ch 2, 2 dc) in the next corner] 3 times, dc in each st across to 1st corner, join with slip st to beg st. (39 dc x 4, 4 ch-2 sp) Do not fasten off.
Rnd 12: STsc, dc in the next st, (2 dc, ch 2, 2 dc) in the same corner, {dc in the next 4 sts, BO in the next st, [dc in the next 5 sts, BO in the next st] 5 times, dc in the next 4 sts, (2 dc, ch 2, 2 dc) in the next corner} 3 times, dc in the next 4 sts, BO in the next st, [dc in the next 5 sts, BO in the next st] 5 times, dc in the next 2 sts, join with slip st to beg st. (6 BO x 4, 37 dc x 4, 4 ch-2 sp) Do not fasten off.
Rnd 13: STsc, dc in the next 3 sts, [(2 dc, ch 2, 2 dc) in the corner, dc in each st across to next corner] 3 times, (2 dc, ch 2, 2 dc) in the corner, dc across to beg st, join with slip st to beg st. (47 dc x 4, 4 ch-2 sp) Fasten off.
Transition
Rnd 14: Attach C2 to any corner, rep Rnd 9. (51 hdc x 4, 4 ch-2 sp) Fasten off.
Rnd 15: Attach C3 to any corner, rep Rnd 10. (16 hdc, 51 hdc 3lp x 4, 4 ch-2 sp) Fasten off.
GS Section
Rnd 16: Attach C2 to any corner, (STsc, 2 dc, ch 2, GS) in the same corner, {sk 3 sts, GS in the next st, [sk 2 sts, GS in the next st] 16 times, sk 3 sts, (GS, ch 2, GS) in the next corner} 3 times, sk 3 sts, GS in the next st, [sk 2 sts, GS in the next st] 16 times, sk 3 sts, join with slip st to beg st. (19 GS x 4, 4 ch-2 sp) Fasten off.
Rnd 17: Attach C1 to any corner, (STsc, 2 dc, ch 2, GS) in the same corner, [GS in next sp and in each sp across, (GS, ch 2, GS) in the next corner] 3 times, GS in the next sp and in each sp across to 1st corner, join with slip st to beg st. (20 GS x 4, 4 ch-2 sp) Fasten off.
Rnd 18: Attach C2 to any corner, rep Rnd 17. (21 GS x 4, 4 ch-2 sp) Fasten off.
Transition
Rnd 19: Attach C3 to any corner, rep Rnd 9. (67 hdc x 4, 4 ch-2 sp) Fasten off.
Rnd 20: Attach C2 to any corner, rep Rnd 10. (16 hdc, 67 hdc 3lp x 4, 4 ch-2 sp) Fasten off.
Bobble Section
Rnd 21: Attach C3 to any corner, rep Rnd 11. (75 dc x 4, 4 ch-2 sp) Do not fasten off.
Rnd 22: STsc, dc in next st, (2 dc, ch 2, 2 dc) in the next corner, {dc in the next 4 sts, BO in the next st, [dc in the next 5 sts, BO in the next st] 11 times, dc in the next 4 sts, (2 dc, ch 2, 2 dc) in the next corner}3 times, dc in the next 4 sts, BO in the next st, [dc in the next 5 sts, BO in the next st] 11 times, dc in the next 2 sts, join with slip st to beg st. (12 BO x 4, 67 dc x 4, 4 ch-2 sp) Do not fasten off.
Rnd 23: Rep Rnd 13. (83 dc x 4, 4 ch-2 sp) Fasten off.
Transition
Rnd 24: Attach C1 to any corner, rep Rnd 9. (87 hdc x 4, 4 ch-2 sp) Fasten off.
Rnd 25: Attach C2 to any corner, rep Rnd 10. (16 hdc, 87 hdc 3lp x 4, 4 ch-2 sp) Fasten off.
At this point, if you’re running out of yarn, sk to the Border. Your blanket will measure approx. 30.5” square once the border is added and the blanket blocked.
GS Section
Rnd 26: Attach C3 to any corner, (STsc, 2 dc, ch 2, GS) in the same corner, {sk 3 sts, GS in the next st, [sk 2 sts, GS in the next st] 28 times, sk 3 sts, (GS, ch 2, GS) in the next corner} 3 times, sk 3 sts, GS in the next st, [sk 2 sts, GS in the next st] 28 times, sk 3 sts, join with slip st to beg st. (31 GS x 4, 4 ch-2 sp) Fasten off.
Rnd 27: Attach C2 to any corner, rep Rnd 17. (32 GS x 4, 4 ch-2 sp) Fasten off.
Rnd 28: Attach C3 to any corner, rep Rnd 18. (33 GS x 4, 4 ch-2 sp) Fasten off.
Transition
Rnd 29: Attach C2 to any corner, rep Rnd 9. (103 hdc x 4, 4 ch-2 sp) Fasten off.
Rnd 30: Attach C3 to any corner, rep Rnd 10. (16 hdc, 103 hdc 3lp x 4, 4 ch-2 sp) Do not fasten off; continue to Border.
Border
Note: In Rnd 1, sk the hidden st after each corner.
Rnd 1: Continuing with C3, ch 1, sc in the same st and in the next st, (sc, ch 2, sc) in the corner, [sk hidden st , sc in next st and in each st across to the next corner, (sc, ch 2, sc) in the corner] 3 times, sk hidden st, sc in next st and in each st across, join with slip st to beg st. (108 sc x 4, 4 ch-2 sp) Fasten off.
Note: In Rnd 2, change colors by finishing the final step of the last st with the new color. Carry the non-working yarn and pull it flat under the sts being worked.
Rnd 2: Attach C2 to any corner, (STsc, 3 dc) in same corner, {[with C1 dc in the next 4 sts, with C2 dc in the next 4 sts] 13 times, with C1 dc in the next 4 sts, with C2 4 dc in the corner sp} 3 times, [with C1 dc in the next 4 sts, with C2 dc in the next 4 sts] 13 times, with C1 dc in the next 4 sts, change back to C2 in the final step of the last st to join to the beg st. (56 x 4 in C1, 52 x 4 in C2, 4 x 4 in C2 at the corners)
Fasten off and weave in all ends.
Blocking
Blocking is required to get a square shape because the sides of the crochet baby blanket pull in toward the center without it. Use your favorite blocking method and the one that best suits your yarn’s fiber content.
Your beautiful Christmas Bauble Baby Blanket is finished!


3 Comments