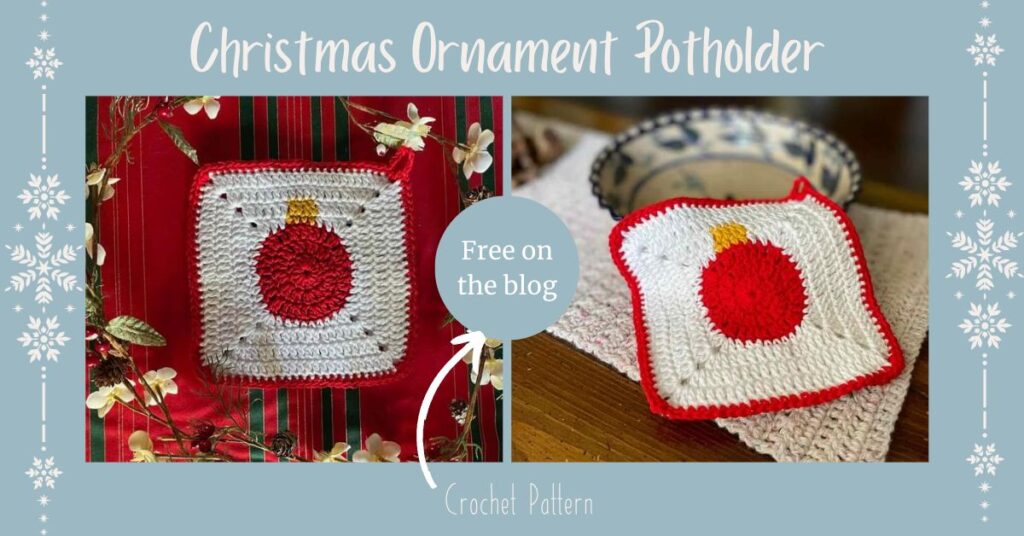
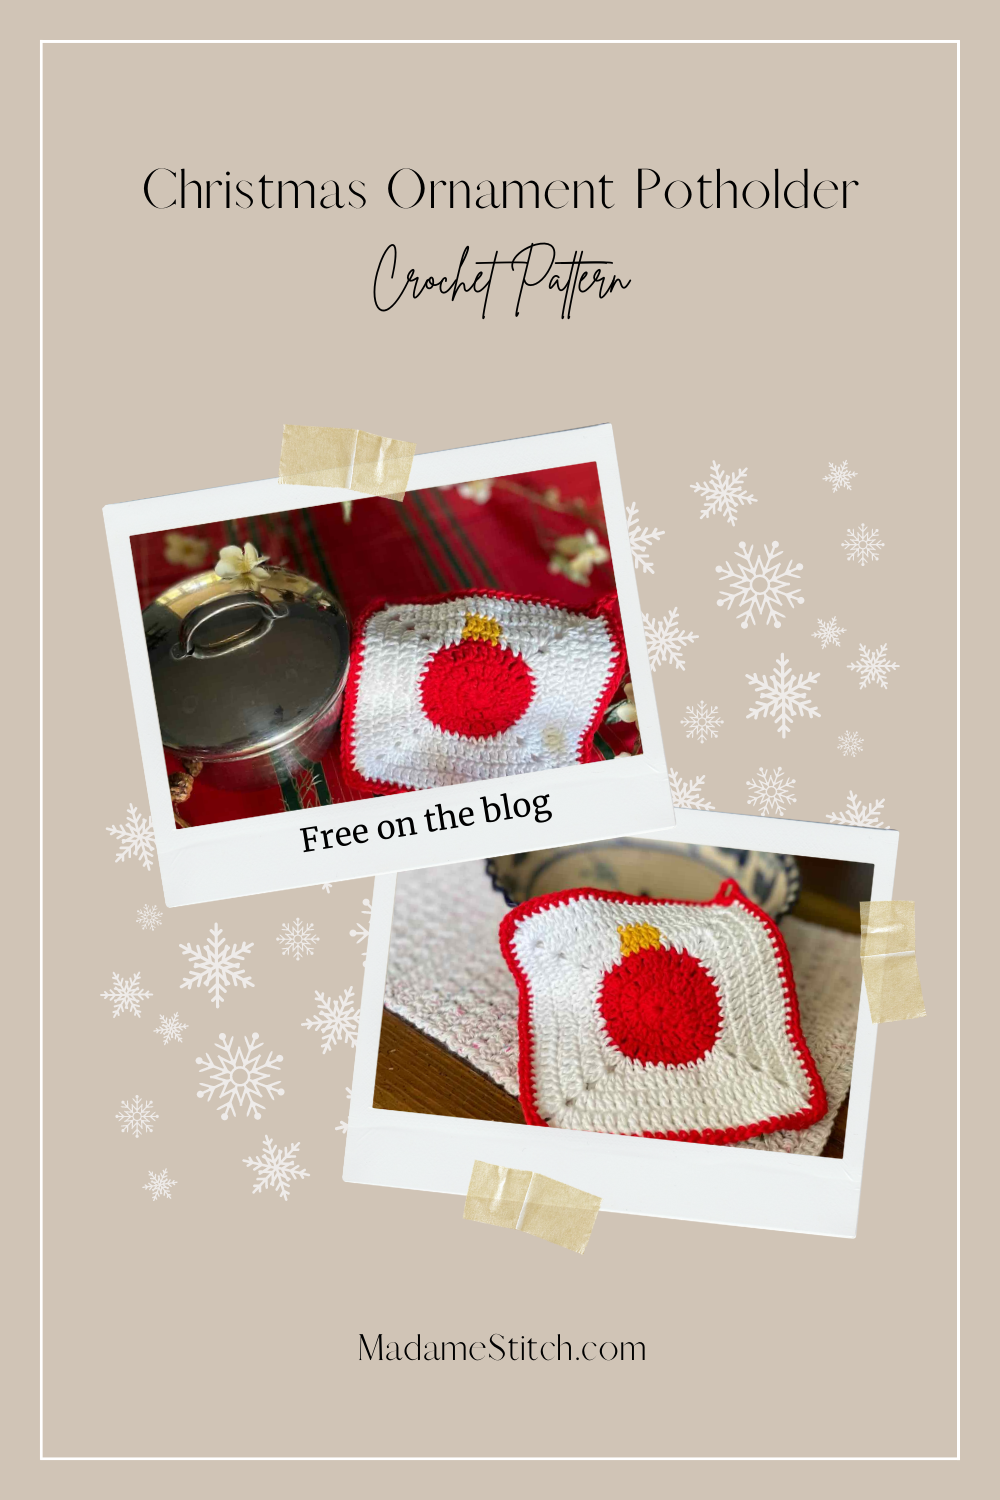
A beautiful ornament adorns this crochet Christmas potholder
Decorate your kitchen with this crochet Christmas potholder that features a beautiful ornament. Make one for yourself or gift it to someone who loves to cook.
This post contains affiliate links. That means, if you purchase something using the link, I receive a small commission. You don’t pay any extra and your information is safe. Thanks for supporting my small business.
I love to decorate the house for Christmas. I don’t go crazy with every room adorned with stuff. But, we have some family traditions that I just can’t wait for every year.
For instance, we have ornaments collected from all over the world that get carefully placed on our tree. My mother cross stitched a stocking for everyone in the family, including the dog. Those get hung on the mantle. And, my husband has a ceramic village complete with skating rink that occupies a special place on the bedroom level of the house.
I love to deck out the dining room, too. I have a number of commercially produced Christmas potholders that I put out on the dining room table along with the other decorations. This year, though, I wanted add a bit more handmade to the room. That’s how this crochet Christmas potholder came to be.
Design + Construction of the crochet Christmas potholder
If the potholder is to be useful and completely effective, it needs to have ample thickness to protect against the heat. I designed the crochet Christmas potholder with 2 squares for that very reason. The double thickness means complete protection from the heat of a hot handle or lid.
Each square begins with a 3-round flat circle in the ornament color of your choice (mine is red). The yarn for the square (in this case the white) is then attached to the circle to begin creating a solid granny square. Changing colors in the 1st and 2nd rounds means your ornament’s top is included in the construction rather than being added later.

The 2 squares are joined together with a simple single crochet border. An optional loop means you can hang and display the crochet Christmas potholder when it isn’t in use.
The Yarn
I chose mercerized cotton for this crochet Christmas potholder because I wanted a durable, easy care yarn for something that will get a fair bit of hard use. Mercerized cotton doesn’t stretch, keeping the structure of the potholder stable. Any worsted weight cotton will work but I prefer something that doesn’t have a lot of ‘give’.
Worsted weight is the perfect weight yarn for any potholder and especially for this crochet Christmas potholder.
Paintbox Yarns “Cotton Aran” is perfect for the above reasons and also because I just loved the colors. Each square takes just under an ounce of yarn and a bit extra for the single crochet joining round.
Suggestions for alternatives for the crochet Christmas potholder:
Why should I buy the PDF when it’s free here?
- Detailed written instructions in an easy to read format
- You’ll have a copy for your pattern library forever.
- You won’t have to scroll through ads or bookmark this page (although you should).
What you need to know to make this crochet Christmas potholder
Thank you for staying on this post and reading my patterns right here on the blog, without copy/pasting. When you stay here to follow the free version of my pattern, I am compensated for my time and energy. This is a great, free way to support a designer. If you would like to save this for later, bookmark the page to save it in your mobile browser.
Yarn
Paintbox Yarns “Cotton Aran” 100% cotton worsted weight #4 (93yd/1.7oz; 85m/50g)
Color A (CA) – Rose Red #614 – 1 skein
Color B (CB) – Paper White #601 – 1 skein
Color C (CC) – Mustard Yellow #624 – small amount
Hook
US size H-8 (5mm)
Finished size: Approx. 8″ square
Gauge
Rnds 1-3 of the center circle = 3.5” across
Skill level: Confident beginner
Abbreviations – US crochet terminology
- beg – beginning
- ch – chain
- dc – double crochet
- rnd(s) – round(s)
- sc – single crochet
- sp – space
- st(s) – stitch(es)
- YO – yarn over
Special Stitches + Techniques


Pattern Notes
- Do not turn after any rnd.
- A ‘ch 3’ may be substituted for the STsc throughout without changing the appearance or construction of the square.
- Each square of the potholder is made in 2 parts. First, the round center (which is the ornament) is made separately. Then, the yarn is attached to the circle to work the square portion (which includes the top of the ornament).
- When changing colors in the square portion, work the last st of the working color to the last step of the st, finishing the st with the new color.
- Because the back of each panel is hidden, you may carry the yellow and white during color changes instead of cutting the yarn. That creates less ends to weave in.
Pattern Instructions for the Christmas Ornament Potholder
Thank you for staying on this post and reading my patterns right here on the blog, without copy/pasting. When you stay here to follow the free version of my pattern, I am compensated for my time and energy. This is a great, free way to support a designer. If you would like to save this for later, bookmark the page to save it in your mobile browser.
Squares – Make 2
Circle section
With CA, ch 4, slip st to form ring. (Or, use a magic ring.)
Rnd 1: STsc, 11 dc in ring, join with slip st to beg st. (12 dc)
Rnd 2: STsc, dc in same st, 2 dc in each st around, join with slip st to beg st. (24 dc)
Rnd 3: STsc, 2 dc in next st, [dc in next st, 2 dc in next st] around. Use an invisible join to fasten off. (36 dc)
Weave in ends.
Square Section
Attach CB to any stitch along the outside of the circle.
Rnd 1: Ch 1, sc in same st, hdc in the next 2 sts, dc in the next st, [(2 dc, ch 2, 2 dc) in the next st, dc in next st, hdc in next 2 sts, sc in next 2 sts, hdc in next 2 sts, dc in next st] twice, (2 dc, ch 2, 2 dc) in next st, dc in next st, hdc in next st, with CC hdc in next st, sc in next 2 sts, hdc in next st, with CB, hdc in next st, dc in next st, (2 dc, ch 2, 2 dc) in next st, dc in next st, hdc in next 2 sts, sc in next st, join with slip st to beg st. (8 sc, 16 hdc, 24 dc, 4 ch-2 sp)
Rnd 2: STsc, dc in the next st and in each st across to corner sp, [(2 dc, ch 2, 2 dc) in corner, dc in next st and in each st across to next corner sp] twice, (2 dc, ch 2, 2 dc) in corner, dc in next 4 sts, with CC dc in next 4 sts, with CB dc across to next corner sp, (2 dc, ch 2, 2 dc) in corner, dc in the next st and in each st across to beg st, join with slip st to beg st. (64 dc, 4 ch-2 sp)
Rnd 3: STsc, [dc in next st and in each st to next corner sp, (2 dc, ch 2, 2 dc) in corner] 4 times, dc in next st and in each st across to beg st, join with slip st to beg st. (80 dc, 4 ch-2 sp)
Rnd 4: Rep Rnd 3, use an invisible join to fasten off. (96 dc, 4 ch-2 sp)
Weave in all ends.
Border – Crocheting the squares together
Notes
- Be sure all ends are woven in before crocheting the squares together.
- Work the sc through both loops of both squares around the entire edge.
- The loop hanger is optional. If you don’t want a loop on your potholder, skip the loop instructions [in brackets and bold font] and continue with joining.
Hold squares together with right sides out and wrong sides held together. Line the squares up so that the top of the ornament is oriented the same direction on both squares. Attach CA to any corner sp, ch 1, sc in the same corner, sc in next st and in each st across to next corner sp, 3 sc in corner, [sc in next st and in each st across to next corner sp, 3 sc in corner] twice, sc in next st and in each st across to next corner sp, 2 sc in beg corner, [for the loop – ch 8], join with slip st to beg sc.
Fasten off and weave in ends.
More Christmas decor from MadameStitch


Quick Christmas Makes blog hop
I’m thrilled to be one of the featured designers in the Quick Christmas Makes blog hop hosted by Fosbas Designs!
On Thursday, Nov. 10th, the Christmas Ornament Potholder pattern will be available as a free PDF download for that day only. Click on the graphic below to find out how you can get your free copy of the pattern for this crochet Christmas potholder.

When you arrive back here, click on the graphic below to get your free PDF download.

Have you missed some of the free designs? Do you love a great bargain? All 32 featured designs are available in one beautiful inexpensive bundle. It’s only available until Nov. 22nd so hurry to get your copy today!

4 Comments