A Crochet Christmas Tree Skirt That’s Vintage-Inspired
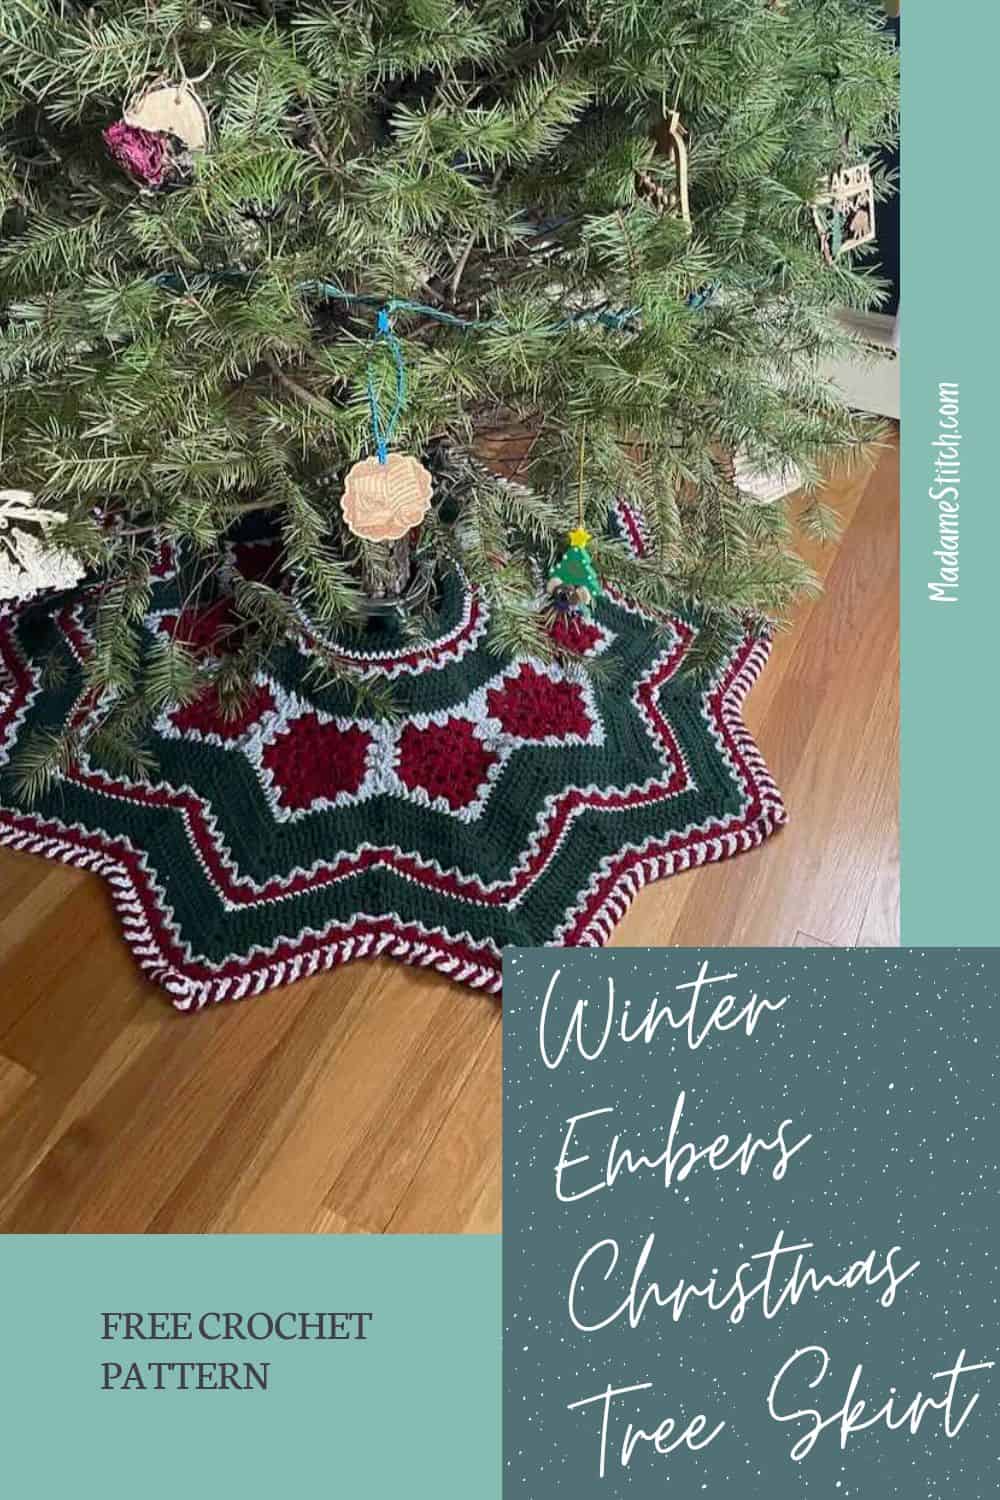
A Christmas tree skirt crochet pattern, free on the blog. Made with worsted weight yarn, features granny pentagons and a variety of stitches.
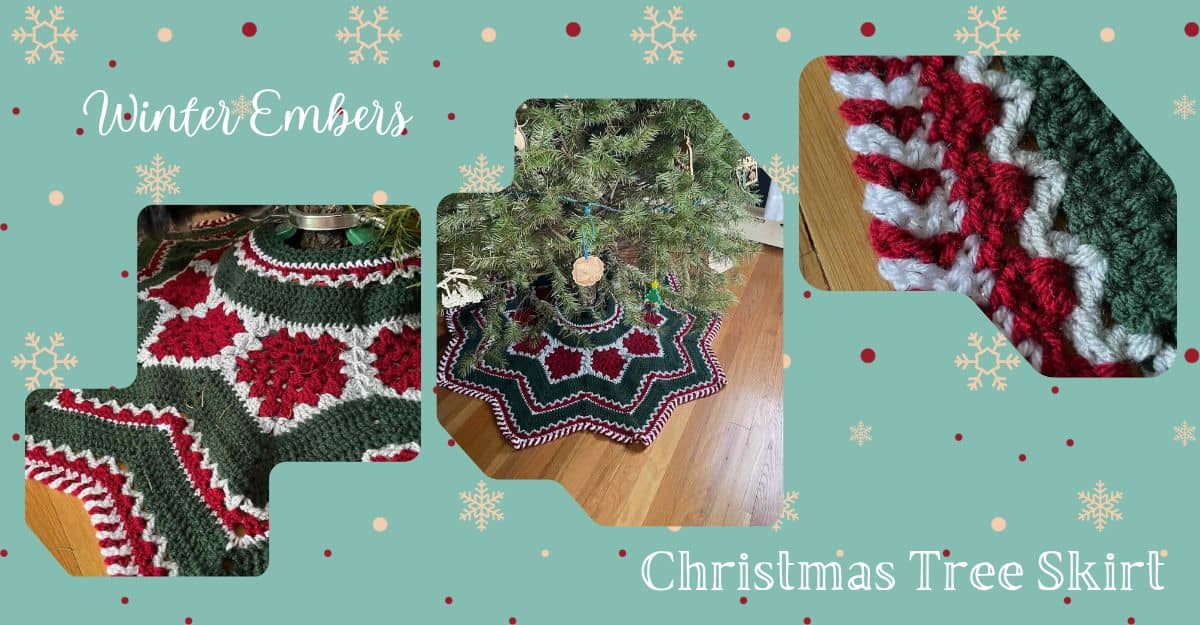
Some things just get better with time, and a handmade tree skirt is one of them — more familiar and more loved with every Christmas it sees.
The Winter Embers Christmas Tree Skirt has that vintage quality built right in, the sense that you’re not just making a decoration but starting an heirloom, something that will be pulled from storage every winter like a small ritual.
The tree skirt looks more complicated than it is. The design appears intricate at a glance, but the stitching itself settles into a steady, mindful rhythm — the kind of crochet that leaves room to simply indulge in the moment while your hands do the work.
And when it’s finished, it transforms the base of the tree from everyday to elegant, the kind of detail that makes a room feel intentional rather than simply decorated.
That’s the sentiment behind the Winter Embers Christmas Tree Skirt.

The Winter Embers Christmas Tree Skirt
Pattern at a Glance
- Skill level: Advanced Beginner/Intermediate
- Yarn: Premier Yarns “Basix” 100% acrylic worsted weight
- Yardage: Approx. 1000-1350 yds in 4 colors, depending on size
- Hook: US size I-9 (5.5mm)
- Finished Sizes: Small – 21″ in depth; Large – 24″ in depth
- Originally published July 2, 2026
The Story Behind the Tree Skirt
A couple of years ago, my daughter bought her first home, and she asked me to design a Christmas tree skirt to spruce up her tree.
We worked on the design elements together, so it would feel like hers from start to finish — she chose a vintage take on traditional Christmas colors and added a shimmery yarn for a bit of sparkle.
It perfectly captures her personal style, and we’re both looking forward to seeing the Winter Ember Tree Skirt take its place under the tree this year.
Design + Construction
The tree skirt is worked from the center ring out in both directions.
First, granny pentagons are joined in a ring using the slip stitch join-as-you-go method, an easy way to connect them without loads of ends to weave in.
Once the ring is formed, construction moves inward toward the trunk of the tree, with most of that section worked in rows of double crochet and accented with V-stitches and granny stitches.
From there, construction continues outward, using those same stitches and patterns to complete the circle. And while the tree skirt is a ring, it’s worked in back-and-forth rows rather than in the round, so the circle stays open and can wrap easily around the base of the tree.
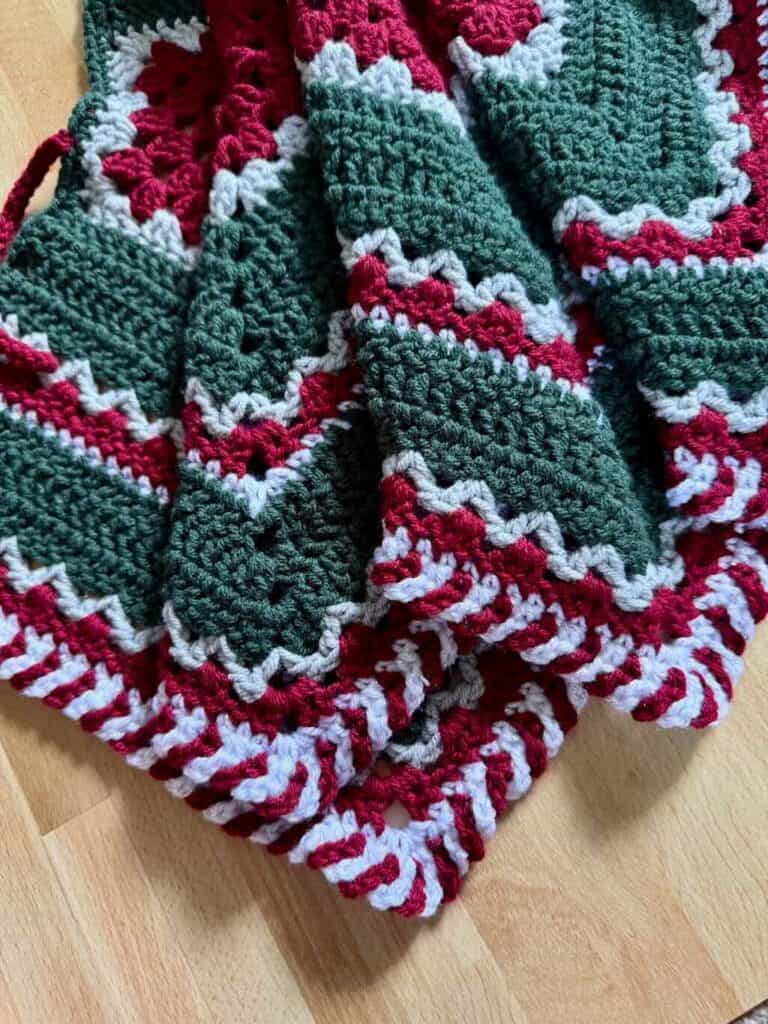
My favorite part of the whole design is the candy cane border, a fun, beautiful finish to the piece.
This is the project you won’t want to put down. It’s ideal for mindful crochet, the kind where the beauty of the piece slowly emerges, and by the time you’re done, your Christmas decorating will have a much-loved tradition all its own.
The Yarn
A Christmas tree skirt requires durability and easy care to be used year after year.
That’s why I chose Premier “Basix”, a 100% acrylic worsted weight yarn with tremendous body and sturdiness. It can be easily laundered, although any handmade item should be treated with care.
It’s a high quality, economical choice for a tree skirt project that requires a fair amount of yarn.
Free
Crochet Progress Tracker
Never lose track of another crochet project.
The Crochet Progress Tracker is the perfect solution when you have multiple projects on your hook. Keep track of every crochet project with this free download.
Yarn Substitute
Don’t want to use Premier “Basix” for your Christmas tree skirt? No problem!
There are a vast number of worsted weight yarns that would be great for this project.
If you’re looking to use something from your yarn stash, find out if it’s a good match with my free download “Yarn Substitution Worksheet”.
You’ll be able to work out whether the yarn you want or have is a great substitute.

Or, check out YarnSub for some great suggestions.

How to take care of your Christmas tree skirt
Your tree skirt should last for years to come. After all, it’s destined to become a family heirloom.
Crochet and handmade items require special care, even if the yarn is
You can assume that your tree skirt will get dirty under the tree. Be sure the yarn you choose is durable and easy care.
If you choose to machine wash your tree skirt, put it in a mesh laundry bag first. Wash on gentle cycle in cold water, then lay flat to dry.
Carefully store your tree skirt in a place free of drastic temperature changes, moisture and gnawing creatures.
Here’s what to love about the pattern
- JAYGO that’s actually approachable — The granny pentagon ring is a low-stakes first try at join-as-you-go.
- Basic stitches, beautiful result — mostly double crochet rows means your hands stay relaxed while the design does the heavy lifting visually
- The candy cane border — a fun, satisfying finish that feels like a reward at the end
- Color play with vintage charm — The traditional palette leaves room for personal interpretation.
- A summertime mindful make — repetitive, meditative construction that’s perfect for warmer months
Frequently Asked Questions
If I’m a beginner crocheter, will I have trouble making this tree skirt?
While the pattern is long and seems complicated, you’ll find the stitches and structure easy to do. The more experience you have with basic stitches – double crochet and single crochet – the easier it will be. However, even beginners can make this tree skirt.
What’s a granny pentagon?
It’s a 5-sided granny square. In the 1st round, you’ll create 5 corners instead of just 4. After that, the construction is basically the same as a traditional granny square.
Does this make a good travel crochet project?
It actually does! You’ll need a bigger project bag but the straightforward construction means you won’t need to puzzle over the instructions while you’re out and about.
Where to get the PDF for the Winter Embers Christmas Tree Skirt
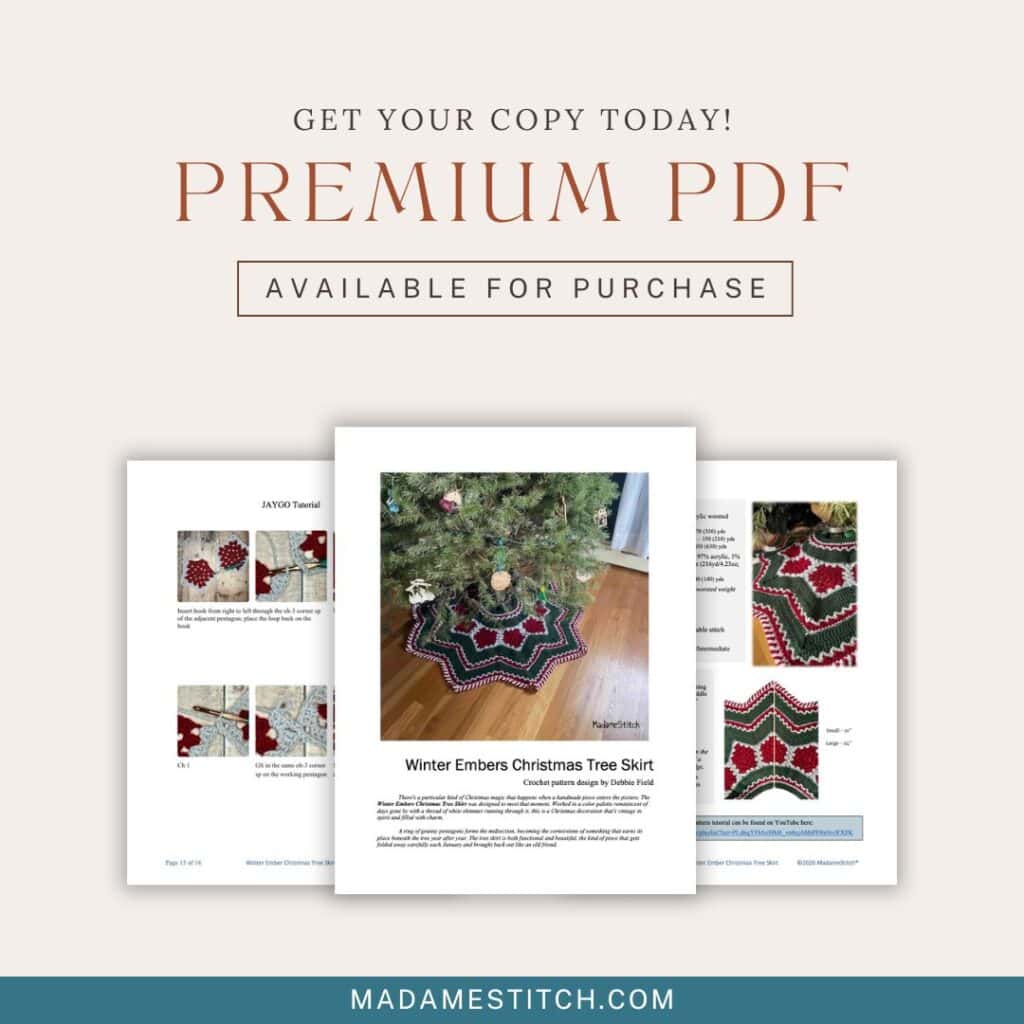
The Winter Embers Christmas Tree Skirt is a free crochet granny pentagon pattern in this blog post. The free version will release in segments during the month of July, then remain forever free thereafter.
Upgrade to the premium PDF for a printer friendly, downloadable version, available for purchase from one of my shops.
The premium PDF can be uploaded to your favorite mobile device so you can take your Winter Embers Christmas Tree Skirt project with you to work on whenever you’re out and about.
The PDF is easy to read and beautifully formatted without ads for a great experience.
Get your copy today!



The Free Pattern Starts Here!
General Information
Yarn
Premier Yarns “Basix” 100% acrylic worsted weight (359yd/7oz; 328m/200g)
- Color A (CA) – Garnet – 270 (350) yds
- Color B (CB) – Light Gray – 150 (210) yds
- Color C (CC) – Juniper – 450 (630) yds
Premier Yarns “Basix Shimmer” 97% acrylic, 3% metallic polyester worsted weight (216yd/4.23oz; 198m/120g)
- Color D (CD) – White – 100 (140) yds
Any durable, easy-to-care-for worsted weight yarn will work
Hook
US size I-9 (5.5mm)
Tools
- Measuring tape
- Removable stitch markers
- Tapestry needle for weaving in ends
Finished Sizes
- Small: Approx. 21″ in depth
- Large: Approx. 24″ in depth
To measure the depth: Line the measuring tape up with a peak on the outer edge, through the center of a pentagon, then on to the inner edge.
The finished pentagon measures approx. 6.5” across from a peak to the opposite side.
Gauge
Rnds 1-3 of the pentagon, measuring from a corner sp across to the middle of the opposite side, is approx. 5”
Skill Level: Advanced Beginner/Intermediate
Abbreviations – US crochet terminology
- beg – beginning
- ch – chain
- dc – double crochet
- rep – repeat
- rnd(s) – round(s)
- sc – single crochet
- sk – skip
- sp – space
- st(s) – stitch(es)
- RS – right side
- WS – wrong side
- YO – yarn over
Repeats
- (…) – Work everything within the parentheses in the same st or sp.
- […] – Repeat everything within the brackets the indicated number of times.
- {…} – Repeat everything within the braces the indicated number of times.
Special Stitches
Chain-3 corner space (ch-3 corner sp) – The number denotes the number of chains made in a corner space.
Double crochet 2 together (dc2tog) – [YO, insert hook in the next st, YO, pull up loop, YO, pull through 2 loops] twice, YO, pull through all loops on the hook.
Granny stitch (GS) – 3 dc in the same st or sp.
Granny stitch decrease (GS dec) – Dc in the indicated sp, YO, insert hook in the same sp, YO, pull up a loop, YO, pull through 2 loops (2 loops on the hook), YO, insert hook in the next sp, YO, pull up a loop, YO, pull through 2 loops (3 loops on the hook), YO, pull through all loops on the hook, dc in the same sp to complete the GS.
Single crochet 2 together (sc2tog) – [Insert hook in the next st, YO, pull up a loop] twice, YO, pull through all 3 loops on the hook.
Standing double crochet (Standing dc) – Make a slip knot, hold the slip knot firmly against the hook with the forefinger of the same hand, YO, insert hook in the indicated st, YO, pull up a loop, [YO, pull through 2 loops] twice.
Stacked single crochet (STsc) – (This stitch is used at the beginning of a round to replace the traditional turning ch-3. It has the appearance of a dc.) – Insert hook in the same st as the loop, YO, pull up a loop, YO, pull through 2 loops (bottom sc made), insert hook through the left vertical bar of the bottom sc, YO, pull up a loop, YO, pull through 2 loops (top sc made).
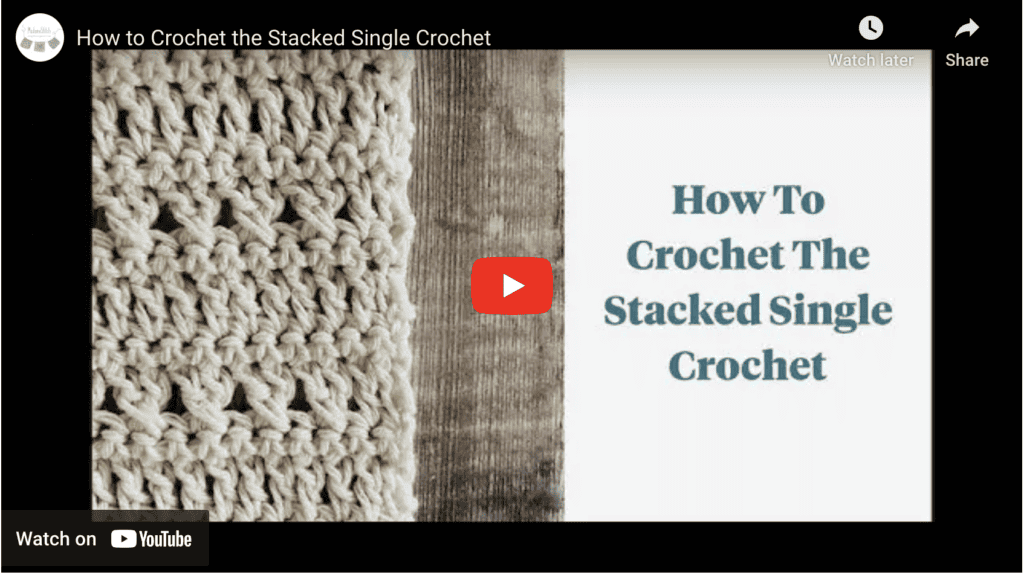
V-stitch (V-st) – (dc, ch 1, dc) in the same st
Join As You Go (JAYGO)
The ring of pentagons is joined using the slip stitch JAYGO method, meaning the spaces between granny stitches and one chain in the corner space (along the side being joined) are replaced with a slip stitch connecting the working pentagon to the adjacent pentagon. However, a whip stitch join would work as well.
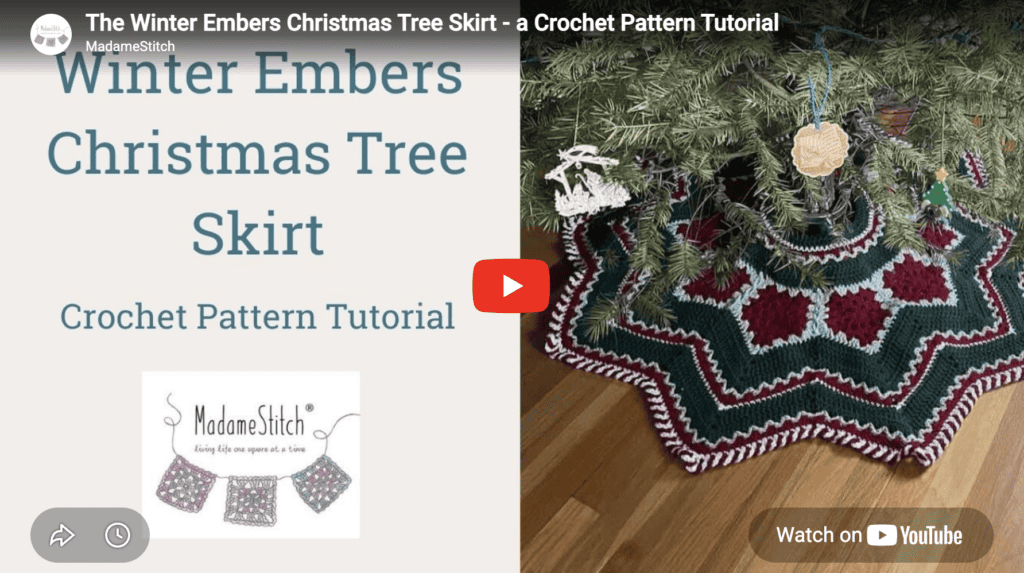
Video Tutorial
Pattern Instructions
The instructions for the tree skirt will be released in sections beginning Monday, July 6. Check back here then.
Monday, July 6th
Pentagon (Both Sizes)
Make 9 (10)
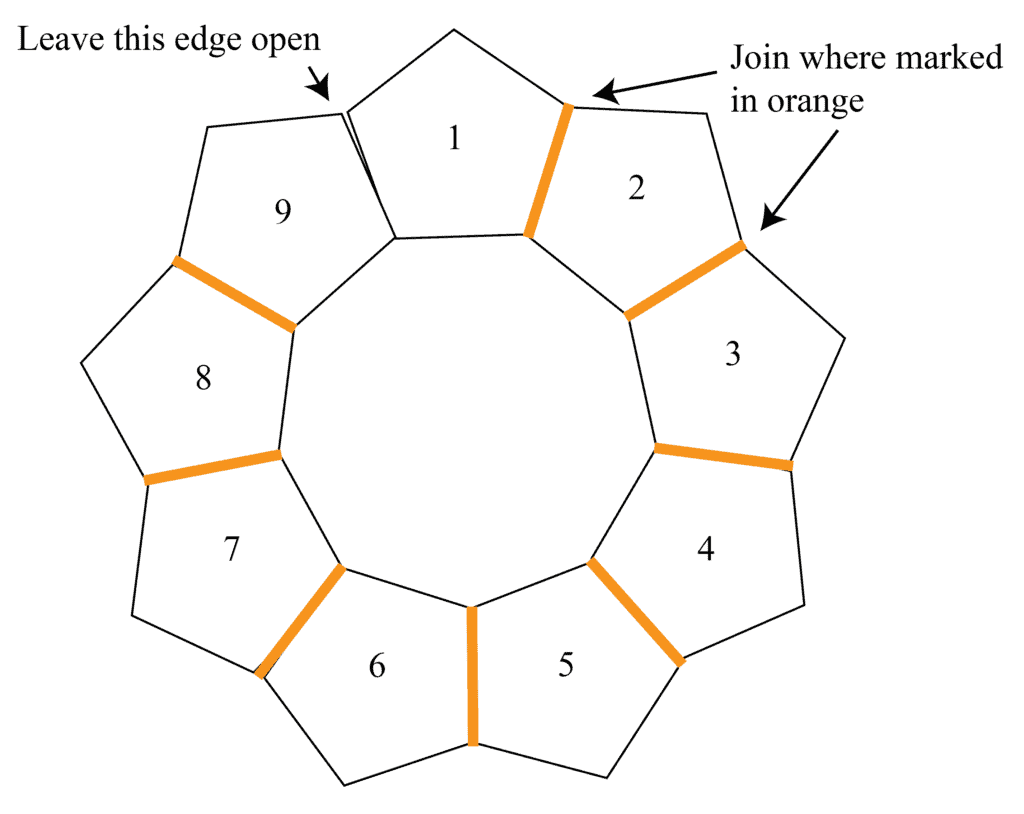
The ring of pentagons is joined as you go to form an open ring that becomes the centerpiece of the tree skirt.
Make the 1st pentagon as written. Subsequent pentagons are joined to the ring in Rnd 4.
Notes
- Do not turn after any rnd.
- The GS are worked in the sp where a ch-1 would normally be.
- A ch-2 or ch-3 may be substituted for the STsc at any time.
1st Pentagon
With CA, ch 5, join with slip st to beg ch to form a ring.
Rnd 1 (RS): (STsc, 2 dc) in the ring, ch 3, [(GS in the ring, ch 3] 4 times, join with slip st to beg st. < 5 GS, 5 ch-3 corner sp >
Rnd 2 (RS): STsc in the sp to the right of the hook, [(GS, ch 3, GS) in the next ch-3 corner sp] 4 times, (GS, ch 3, 2 dc) in the same sp as the beg STsc, join with slip st to beg st. < 10 GS, 5 ch-3 corner sp >
Rnd 3: Slip st in the next sp, (STsc, 2 dc) in the same sp, [(GS, ch 3, GS) in the next ch-3 corner sp, GS in the next sp] 4 times, (GS, ch 3, GS) in the next ch-3 corner sp, join with slip st to beg st. Fasten off CA. < 15 GS, 5 ch-3 corner sp >
Rnd 4: With CB, (Standing dc, 2 dc, ch 3, GS) in any ch-3 corner sp, GS in the next 2 sp, [(GS, ch 3, GS) in the next ch-3 corner sp, GS in the next 2 sp] 4 times, join with slip st to beg st. Fasten off. < 20 GS, 5 ch-3 corner sp >
Pentagons 2-9 (10)
Notes
- When making the remainder of the pentagons, each will be joined along one side of the pentagon to the right side of the strip, forming an open ring.
- To keep the join flat: Remove loop from the hook, insert hook from right to left through the space between GS or the ch-3 corner space of the adjacent pentagon, put the loop back on the hook, slip stitch as instructed. (See photo tutorial on pg. 14)
- In this rnd, “adjacent pentagon” refers to the pentagon at the end of the strip you’re joining to. “Working pentagon” refers to the one you’re currently making.
Work Rnds 1-3 of the 1st pentagon.
Rnd 4:
With CB, (Standing dc, 2 dc, ch 3, GS) in any ch-3 corner sp, GS in the next 2 sp, [(GS, ch 3, GS) in the next ch-3 corner sp, GS in the next 2 sp] twice, GS in the next ch-3 corner sp, ch 1,
(JAYGO begins) slip st in the ch-3 corner sp of the adjacent pentagon, ch 1, GS in the same ch-3 corner sp of the working pentagon, [slip st in the next sp of the adjacent pentagon, GS in the next sp of the working pentagon] twice, slip st in the next sp of the adjacent pentagon, GS in the next ch-3 corner sp of the working pentagon, ch 1, slip st in the ch-3 corner sp of the adjacent pentagon,
(JAYGO ends), ch 1, GS in the same ch-3 corner sp of the working pentagon, GS in the next 2 sp, join with slip st to beg st. Fasten off.
Thursday, July 9th
Inner Ring
Notes
- From this point forward, work in turned rows.
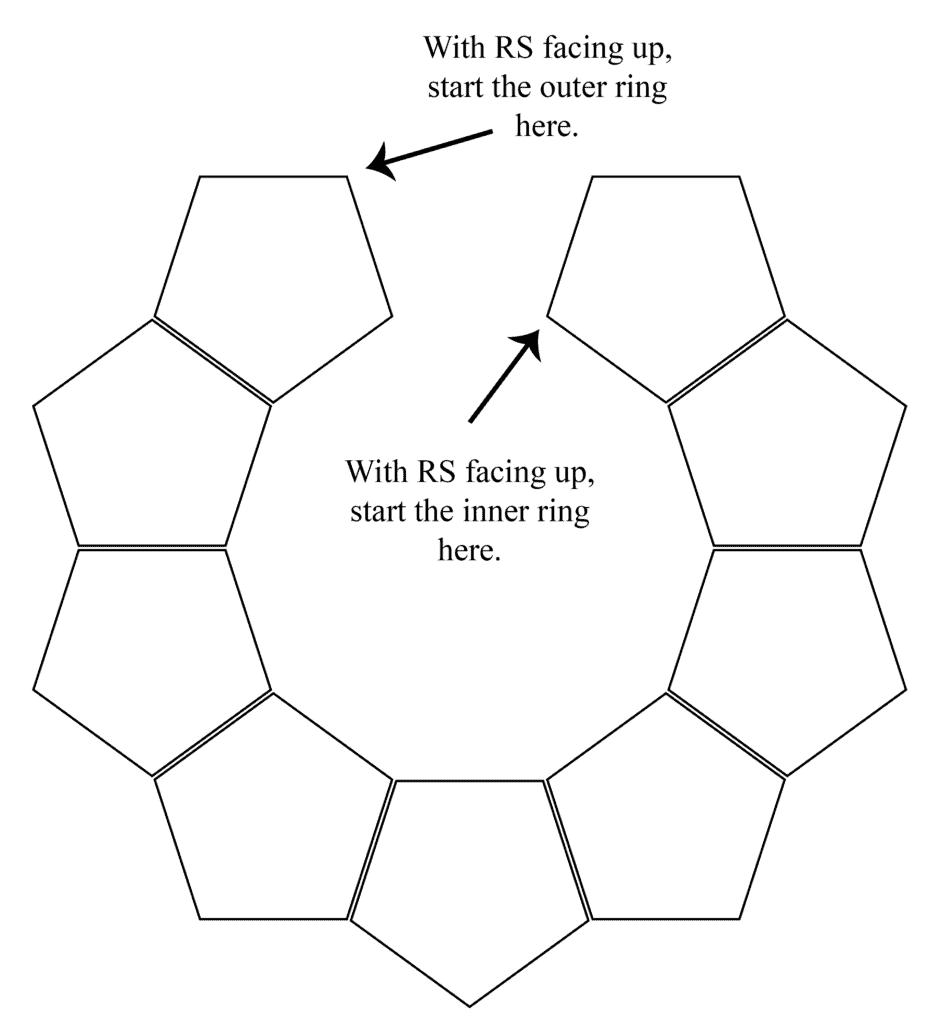
- Begin with the RS of the pentagon ring facing up.
- The inner section is worked along the smooth inner edge of the ring of pentagons.
- To change colors, complete the last st of the row to the final YO, drop the working yarn and complete the last st with the new color. Fasten off the old color and continue.
- A ch-1 at the beg of a row does not count as a st.
- Place a stitch marker in the 1st stitch of each row. This will show you where to work the last stitch of the next row.
Size Small Inner Ring Starts Here
Note for Row 1: The inner edge of the pentagon ring contains a total of 126 sts/ch-sp. In Row 1, you will make 6 decreases for a final st count of 120 dc.
Row 1 (RS): With CC, Standing dc in the ch-3 corner sp of the 1st pentagon (see diagram above), dc in each st and corner sp across to the last ch-3 corner sp along the inner edge of the pentagon circle, working a dc2tog along the 1st, 3rd, 5th, 6th, 7th, 9th pentagon, dc in the last ch-3 corner sp, turn. < 120 dc >
Row 2 (WS): STsc, dc in the next 3 sts, [dc2tog over the next 2 sts, dc in the next 8 sts] 11 times, dc2tog over the next 2 sts, dc in the last 4 sts, turn. < 108 dc >
Row 3: STsc, dc in the next 2 sts, [dc2tog over the next 2 sts, dc in the next 7 sts] 11 times, dc2tog over the next 2 sts, dc in the last 4 sts, turn. < 96 dc >
Row 4: With CB, STsc, dc in the next 2 sts, sk 1 st, V-st in the next st, sk 3 sts, [V-st in the next st, sk 2 sts, V-st in the next st, sk 3 sts] 11 times, [V-st in the next st, sk 2 sts] twice, V-st in the next st, sk 1 st, dc in the last 3 sts, turn. < 6 dc, 26 V-sts >
Row 5: With CA, STsc, dc in the next 2 sts, GS in the next 3 V-sts, [GS dec over the next 2 V-sts, GS in the next 4 V-sts] 3 times, GS dec over the next 2 V-sts, GS in the next 3 V-sts, dc in the last 3 sts, turn. < 18 GS, 4 GS dec, 6 dc >
Row 6: With CD, ch 1, sc in the same st and in each st across, turn. < 72 sc >
Row 7: With CC, STsc, dc in the next st, [dc2tog over the next 2 sts, dc in the next 4 sts] 11 times, dc2tog over the next 2 sts, dc in the last 2 sts, turn. < 60 dc >
Row 8: STsc, dc in the next st, [dc2tog over the next 2 sts, dc in the next 3 sts] 11 times, dc2tog over the next 2 sts, dc in the last st, turn. < 48 dc >
Fasten off and weave in ends. Proceed to Size Small Outer Ring.
Size Large Inner Ring Starts Here
Row 1 (RS): With CC, Standing dc in the ch-3 corner sp of the 1st pentagon (see diagram on pg. 6), dc in the next st, [dc2tog over the next 2 sts, dc in the next 15 sts and ch-sp corners at the seams] 8 times, dc in the last dc and ch-3 corner sp, turn. < 132 dc >
Row 2 (WS): STsc, dc in the next 3 sts, [dc2tog over the next 2 sts, dc in the next 9 sts] 11 times, dc2tog over the next 2 sts, dc in the last 5 sts, turn. < 120 dc >
Row 3: STsc, dc in the next 3 sts, [dc2tog over the next 2 sts, dc in the next 8 sts] 11 times, dc2tog over the next 2 sts, dc in the last 4 sts, turn. < 108 dc >
Row 4: STsc, dc in the next 2 sts, [dc2tog over the next 2 sts, dc in the next 7 sts] 11 times, dc2tog over the next 2 sts, dc in the last 4 sts, turn. < 96 dc >
Row 5: With CB, STsc, dc in the next 2 sts, sk 1 st, V-st in the next st, sk 3 sts, [V-st in the next st, sk 2 sts, V-st in the next st, sk 3 sts] 11 times, [V-st in the next st, sk 2 sts] twice, V-st in the next st, sk 1 st, dc in the last 3 sts, turn. < 6 dc, 26 V-sts >
Row 6: With CA, STsc, dc in the next 2 sts, GS in the next 3 V-sts, [GS dec over the next 2 V-sts, GS in the next 4 V-sts] 3 times, GS dec over the next 2 V-sts, GS in the next 3 V-sts, dc in the last 3 sts, turn. < 18 GS, 4 GS dec, 6 dc >
Row 7: With CD, ch 1, sc in the same st and in each st across, turn. < 72 sc >
Row 8: With CC, STsc, dc in the next st, [dc2tog over the next 2 sts, dc in the next 4 sts] 11 times, dc2tog over the next 2 sts, dc in the last 2 sts, turn. < 60 dc >
Row 9: STsc, dc in the next st, [dc2tog over the next 2 sts, dc in the next 3 sts] 11 times, dc2tog over the next 2 sts, dc in the last st, turn. < 48 dc >
Fasten off and weave in ends. Proceed to Size Large Outer Ring.
Monday, July 13th
Outer Ring
Notes
- This section is worked in turned rows and worked along the outer edge of the ring of pentagons.
- The right side of the ring should be facing you to begin Row 1.
- A ch-1 at the beg of a row does not count as a st.
- Count often. It’s important the number of sts between peaks and valleys remains constant.
- To change colors, work the last st of the row to the final YO. Drop the working color, pick up the new color, and complete the last st. Fasten off the old color and continue.
Size Small Outer Ring Starts Here – Part 1
Row 1 (RS): With CC, Standing dc in the ch-3 corner sp (see diagram on pg. 6), dc in the next 12 sts, [(2 dc, ch 2, 2 dc) in the next ch-3 corner sp, dc in the next 12 sts, sk the 2 sp at the seam, dc in the next 12 sts] 8 times, (2 dc, ch 2, 2 dc) in the next ch-3 corner sp, dc in the next 12 sts, dc in the last corner sp, turn.
Row 2 (WS): STsc, dc in the next 14 sts, [(2 dc, ch 2, 2 dc) in the next ch-2 corner sp, dc in the next 13 sts, sk 2 sts, dc in the next 13 sts] 8 times, (2 dc, ch 2, 2 dc) in the next ch-2 corner sp, dc in the last 15 sts, turn.
Row 3: STsc, dc in the next 16 sts, [(2 dc, ch 2, 2 dc) in the next ch-2 corner sp, dc in the next 14 sts, sk 2 sts, dc in the next 14 sts] 8 times, (2 dc, ch 2, 2 dc) in the next ch-2 corner sp, dc in the last 17 sts, turn.
Row 4: STsc, dc in the next 18 sts, [(2 dc, ch 2, 2 dc) in the next ch-2 corner sp, dc in the next 15 sts, sk 2 sts, dc in the next 15 sts] 8 times, (2 dc, ch 2, 2 dc) in the next ch-2 corner sp, dc in the last 19 sts, turn.
Size Large Outer Ring Starts Here – Part 1
Row 1 (RS): With CC, Standing dc in the ch-3 corner sp (see diagram on pg. 6), dc in the next 12 sts, [(2 dc, ch 2, 2 dc) in the next ch-3 corner sp, dc in the next 12 sts, sk the 2 sp at the seam, dc in the next 12 sts] 9 times, (2 dc, ch 2, 2 dc) in the next ch-3 corner sp, dc in the next 12 sts, dc in the last corner sp, turn.
Row 2 (WS): STsc, dc in the next 14 sts, [(2 dc, ch 2, 2 dc) in the next ch-2 corner sp, dc in the next 13 sts, sk 2 sts, dc in the next 13 sts] 9 times, (2 dc, ch 2, 2 dc) in the next ch-2 corner sp, dc in the last 15 sts, turn.
Row 3: STsc, dc in the next 16 sts, [(2 dc, ch 2, 2 dc) in the next ch-2 corner sp, dc in the next 14 sts, sk 2 sts, dc in the next 14 sts] 9 times, (2 dc, ch 2, 2 dc) in the next ch-2 corner sp, dc in the last 17 sts, turn.
Row 4: STsc, dc in the next 18 sts, [(2 dc, ch 2, 2 dc) in the next ch-2 corner sp, dc in the next 15 sts, sk 2 sts, dc in the next 15 sts] 9 times, (2 dc, ch 2, 2 dc) in the next ch-2 corner sp, dc in the last 19 sts, turn.
Row 5: STsc, dc in the next 20 sts, [(2 dc, ch 2, 2 dc) in the next ch-2 corner sp, dc in the next 16 sts, sk 2 sts, dc in the next 16 sts] 9 times, (2 dc, ch 2, 2 dc) in the next ch-2 corner sp, dc in the last 21 sts, turn.
Thursday, July 16th
Size Small Outer Ring – Part 2
Row 5: With CB, STsc, dc in the next st, sk 1 st, [V-st in the next st, sk 2 sts] 6 times, {(dc, ch 2, dc) in the next ch-2 corner sp, [sk 2 sts, V-st in the next st] 5 times, sk 4 sts, [V-st in the next st, sk 2 sts] 5 times} 8 times, (dc, ch 2, dc) in the next ch-2 corner sp, [sk 2 sts, V-st in the next st] 6 times, sk 1 st, dc in the last 2 sts, turn.
Row 6: With CA, STsc, dc in the next st, GS in each V-st across to the ch-2 corner sp, [(2 dc, ch 2, 2 dc) in the ch-2 corner sp, GS in each V-st across to the next ch-2 corner sp] 8 times, (2 dc, ch 2, 2 dc) in the ch-2 corner sp, GS in each V-st across to the last 2 sts, dc in the last 2 sts, turn.
Row 7: With CD, ch 1, sc in the same st and in each st across to the ch-2 corner sp, [(2 sc, ch 2, 2 sc) in the ch-2 corner sp, sc in the next 16 sts, sk 2 sts, sc in the next 16 sts] 8 times, (2 sc, ch 2, 2 sc) in the ch-2 corner sp, sc in the next st and in each st across to the end, turn.
Row 8: With CC, STsc, dc in the next 23 sts, [(dc, ch 2, dc) in the next ch-2 corner sp, dc in the next 17 sts, sk 2 sts, dc in the next 17 sts] 8 times, (dc, ch 2, dc) in the next ch-2 corner sp, dc in the last 24 sts, turn.
Row 9: STsc, dc in the next 24 sts, [(2 dc, ch 2, 2 dc) in the next ch-2 corner sp, dc in the next 17 sts, sk 2 sts, dc in the next 17 sts] 8 times, (2 dc, ch 2, 2 dc) in the next ch-2 corner sp, dc in the last 25 sts, turn.
Row 10: STsc, dc in the next 26 sts, [(2 dc, ch 2, 2 dc) in the next ch-2 corner sp, dc in the next 18 sts, sk 2 sts, dc in the next 18 sts] 8 times, (2 dc, ch 2, 2 dc) in the next ch-2 corner sp, dc in the last 27 sts, turn.
Size Large Outer Ring – Part 2
Row 6: With CB, STsc, dc in the next 4 sts, sk 1 st, [V-st in the next st, sk 2 sts] 5 times, V-st in the next st, sk 1 st, {(dc, ch 2, dc) in the ch-2 corner sp, sk 1 st, [V-st in the next st, sk 2 sts] 11 times, V-st in the next st, sk 1 st} 9 times, (dc, ch 2, dc) in the ch-2 corner sp, sk 1 st, [V-st in the next st, sk 2 sts] 5 times, V-st in the next st, sk 1 st, dc in the last 5 sts, turn.
Row 7: With CA, STsc, dc in the next 4 sts, GS in each V-st across to the ch-2 corner sp, [(2 dc, ch 2, 2 dc) in the ch-2 corner sp, GS in each V-st across to the next ch-2 corner sp] 9 times, (2 dc, ch 2, 2 dc) in the ch-2 corner sp, GS in each V-st across, dc in the last 5 sts, turn.
Row 8: With CD, ch 1, sc in the same st and in each st across to the ch-2 corner sp, [(2 sc, ch 2, 2 sc) in the ch-2 corner sp, sc in the next 19 sts, sk 2 sts, sc in the next 19 sts] 9 times , (2 sc, ch 2, 2 sc) in the ch-2 corner sp, sc in the next st and in each st across to the end, turn.
Row 9: With CC, STsc, dc in the next 26 sts, [(2 dc, ch 2, 2 dc) in the next ch-2 corner sp, dc in the next 20 sts, sk 2 sts, dc in the next 20 sts] 9 times, (2 dc, ch 2, 2 dc) in the next ch-2 corner sp, dc in the last 27 sts, turn.
Row 10: STsc, dc in the next 28 sts, [(2 dc, ch 2, 2 dc) in the next ch-2 corner sp, dc in the next 21 sts, sk 2 sts, dc in the next 21 sts] 9 times, (2 dc, ch 2, 2 dc) in the next ch-2 corner sp, dc in the last 29 sts, turn.
Row 11: STsc, dc in the next 30 sts, [(2 dc, ch 2, 2 dc) in the next ch-2 corner sp, dc in the next 22 sts, sk 2 sts, dc in the next 22 sts] 9 times, (2 dc, ch 2, 2 dc) in the next ch-2 corner sp, dc in the last 31 sts, turn.
Monday, July 20th
Size Small Outer Ring – Part 3
Row 11: With CB, STsc, dc in the next 3 sts, sk 1 st, [V-st in the next st, sk 2 sts] 8 times, {(dc, ch 2, dc) in the next ch-2 corner sp, [sk 2 sts, V-st in the next st] 6 times, sk 4 sts, [V-st in the next st, sk 2 sts] 6 times} 8 times, (dc, ch 2, dc) in the next ch-2 corner sp, [sk 2 sts, V-st in the next st] 8 times, sk 1 st, dc in the last 4 sts, turn.
Row 12: With CA, STsc, dc in the next 3 sts, GS in each V-st across to the next ch-2 corner sp, [(2 dc, ch 2, 2 dc) in the ch-2 corner sp, GS in each V-st across to the next ch-2 corner sp] 8 times, (2 dc, ch 2, 2 dc) in the ch-2 corner sp, GS in each V-st across to the last 4 sts, dc in the last 4 sts, turn.
Row 13: With CD, ch 1, sc in the same st and in each st across to the next ch-2 corner sp, [(2 sc, ch 2, 2 sc) in the ch-2 corner sp, sc in the next 19 sts, sk 2 sts, sc in the next 19 sts] 8 times, (2 sc, ch 2, 2 sc) in the next ch-2 corner sp, sc in the next st and in each st across to the end.
Fasten off and weave in ends. Proceed to Extensions.
Size Large Outer Ring – Part 2
Row 12: With CB, STsc, dc in the next st, sk 1 st, [V-st in the next st, sk 2 sts] 10 times, {(dc, ch 2, dc) in the next ch-2 corner sp, [sk 2 sts, V-st in the next st] 7 times, sk 1 st, V-st in the next st, sk 2 sts, V-st in the next st, sk 1 st, [V-st in the next st, sk 2 sts] 7 times} 9 times, (dc, ch 2, dc) in the next ch-2 corner sp, [sk 2 sts, V-st in the next st] 10 times, sk 1 st, dc in the last 2 sts, turn.
Row 13: With CA, STsc, dc in the next st, GS in each V-st across to the ch-2 corner sp, [(2 dc, ch 2, 2 dc) in the ch-2 corner sp, GS in each V-st across to the next ch-2 corner sp] 9 times, (2 dc, ch 2, 2 dc) in the ch-2 corner sp, GS in each V-st across to the last 2 sts, dc in the last 2 sts, turn.
Row 14: With CD, ch 1, sc in the same st and in each st across to the ch-2 corner sp, [(2 sc, ch 2, 2 sc) in the ch-2 corner sp, sc in the next 23 sts, sc2tog, sk 2 sts, sc2tog, sc in the next 23 sts] 9 times, (2 sc, ch 2, 2 sc) in the ch-2 corner sp, sc in the next st and in each st to the end of the row.
Fasten off and weave in ends. Proceed to Extensions.
Extensions (Both Sizes)
Notes
- These extensions are worked in the row ends along the open edges of the tree skirt’s circle, giving a clean edge for the ties to connect the ends around the base of the tree.
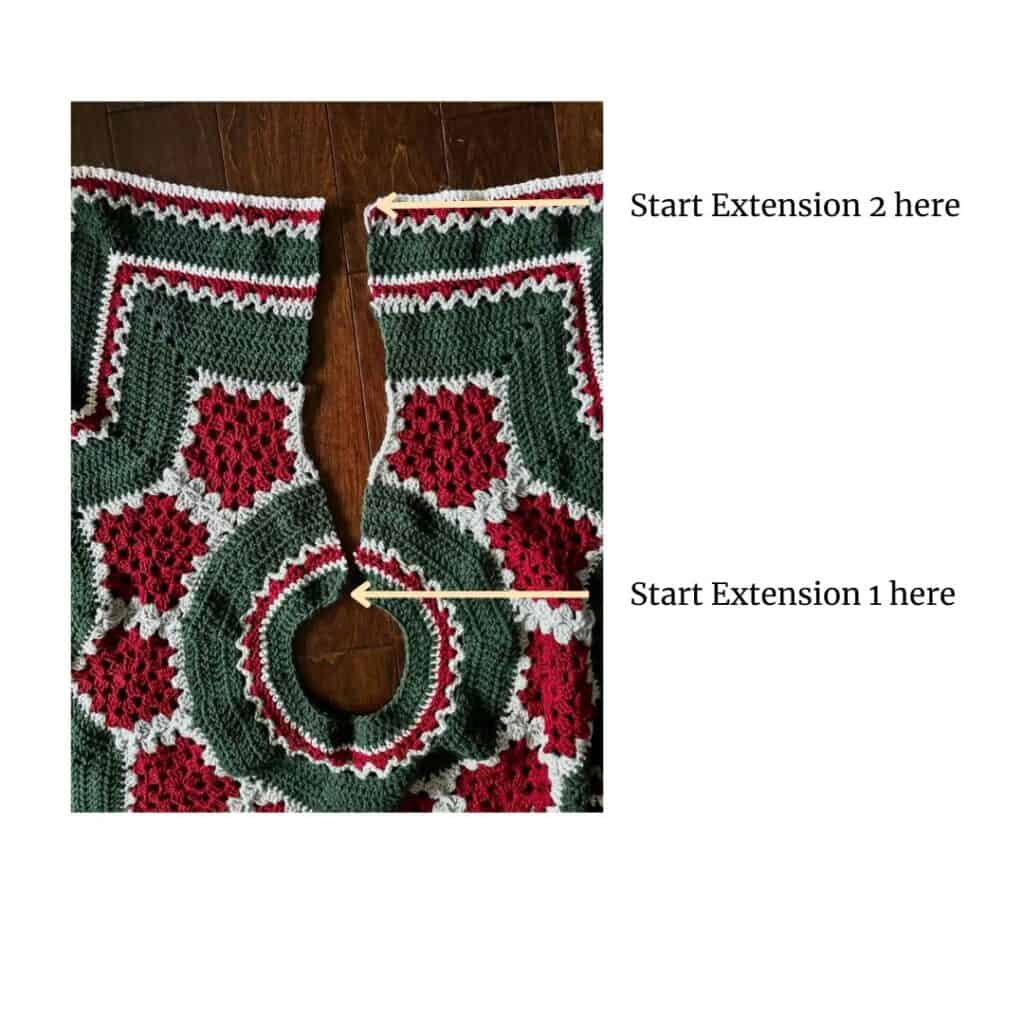
- Looking down on the tree skirt laid with right side up, begin with the left edge.
Extension 1
Row 1 (RS): With RS facing and color CC, Standing dc in the inner most row, dc in the same row end, work 2 dc in each dc row end and 1 dc in each sc row end across, work 1 dc in each corner sp of the pentagon, and 1 dc in each st across the pentagon, turn. < 53 dc >
Row 2 (WS): STsc, dc in the next st and in each st across, turn.
Row 3: Rep Row 2.
Fasten off.
Extension 2
With RS facing, attach color CC to the end of the last row of the Outer Ring, ch 1, sc in the same st and in each row end across, using the same placement as for Row 1 of Extension 1.
Fasten off.
Thursday, July 23rd
Candy Cane Border (Both Sizes)
Notes:
- The candy cane border is worked along the outer edge of the tree skirt, beginning and ending along the row ends of the extensions and continuing in the stitches and corner spaces.
- The skeins (or bobbins) will become tangled because of how the chains cross each other as you work. Be sure to untangle the yarn every so often as you go to avoid a big mess later.
- The instructions here are written for red and white. If you’ve chosen different colors, simply substitute them for what’s included.
Step 1: Attach the red yarn to the end of the final row of Extension 1, ch 4, remove the loop from the hook. Attach the white yarn in the same row end, ch 4, remove the loop from the hook.
Step 2: Put the red loop back on the hook, working in front of the white ch, sc in the next row end, ch 4, remove the loop from the hook. Put the white loop back on the hook, working in front of the red ch, sc in the same row end, ch 4, remove the loop from the hook.
Rep Step 2 in the final row end of the Extension 1.
Step 3: Put the red loop back on the hook, sc in the next open st, ch 4, remove the loop from the hook. Put the white loop back on the hook, sc in the next open st, ch 4, remove the loop from the hook.
Rep Step 3 to the next ch-2 corner sp.
Step 4: In the ch-2 corner sp, work 4 chains, alternating colors in the established pattern.
Continue in the established pattern across the entire outer edge of the tree skirt.
End by working the final sc in the row end of Extension 2.
Fasten off both colors.
Ties (Both Sizes)
Three ties are positioned along the inner edge of Extension 1 (where Row 1 meets the tree skirt) and 3 ties along the outer edge of Extension 2.
Use the photo to place markers at the corners and midpoint of the extensions.
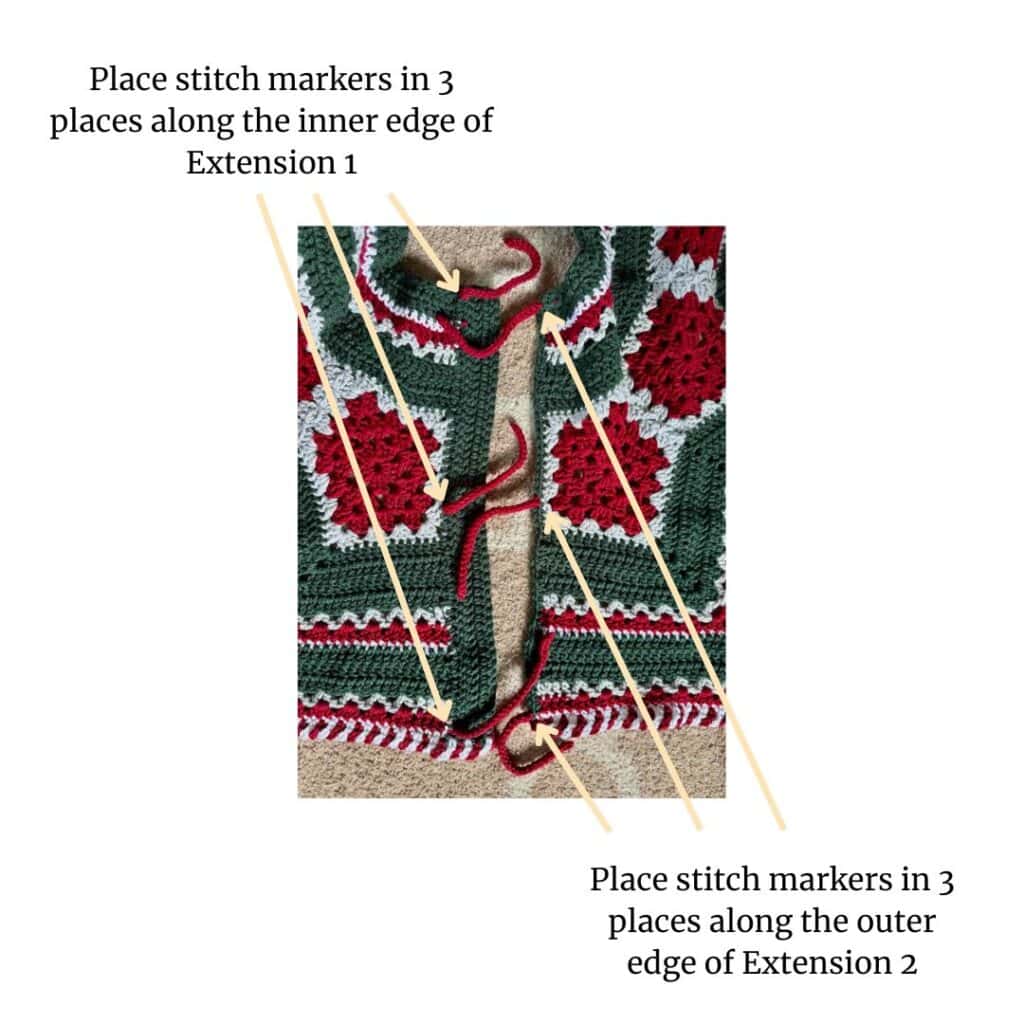
To make a tie: Attach the color of your choice through the st where a marker is placed, pull up a loop and ch 26, sc in the 2nd ch from the hook and in each ch across, slip st in the st with the marker, remove the marker and fasten off.
Repeat for the remaining 5 ties.
Fasten off and weave in all remaining ends.
How to use the tree skirt
With RS facing up, wrap the tree skirt around the base of the tree. With Extension 2 overlapping Extension 1, tie the skirt in place.
More Christmas designs