The perfect crochet granny square scarf pattern for beginners
Make a cozy and stylish scarf with this beginner-friendly crochet granny square scarf pattern. Follow these easy instructions and create your own unique accessory.
A timeless granny square becomes a stylish accessory.
Crochet granny square scarves are a classic and versatile accessory that can add a touch of warmth and style to any outfit. Whether you’re looking for a quick and easy project or a fun way to use up leftover yarn, a crochet granny square scarf is a perfect option.
Not only is it a fun and rewarding project to make, but it’s also a fun accessory to wear, adding a vintage touch to any outfit. So, whether you’re a seasoned crochet pro or just starting out, grab your hook and get ready to create a crochet granny square scarf that’s quick to make and fun to wear!
Design + Construction
I am over the moon about granny squares so I’m always looking for an excuse to make them. Do you love them, too?
I love everything about them – how portable they are, the endless color possibilities, how easy they are to make. They’re absolutely perfect for a crochet granny square scarf like the Keely.
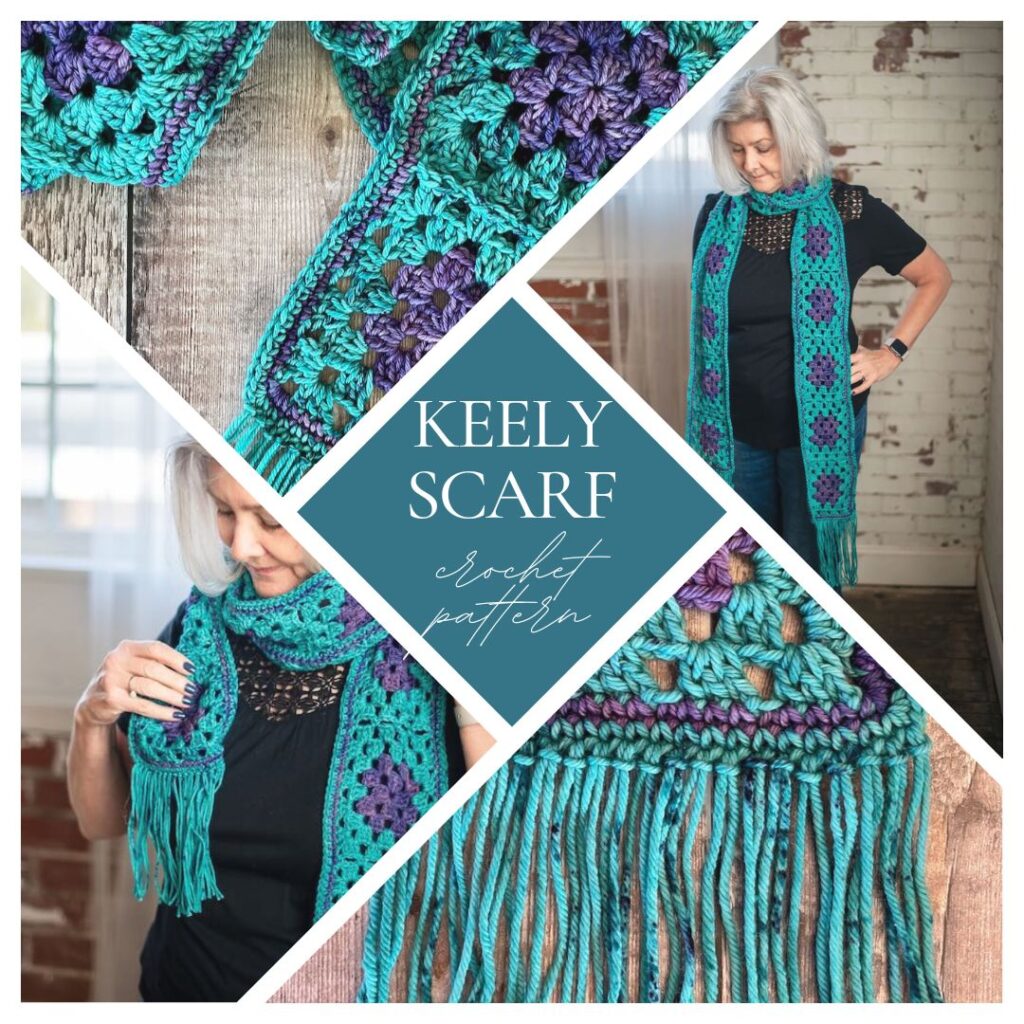
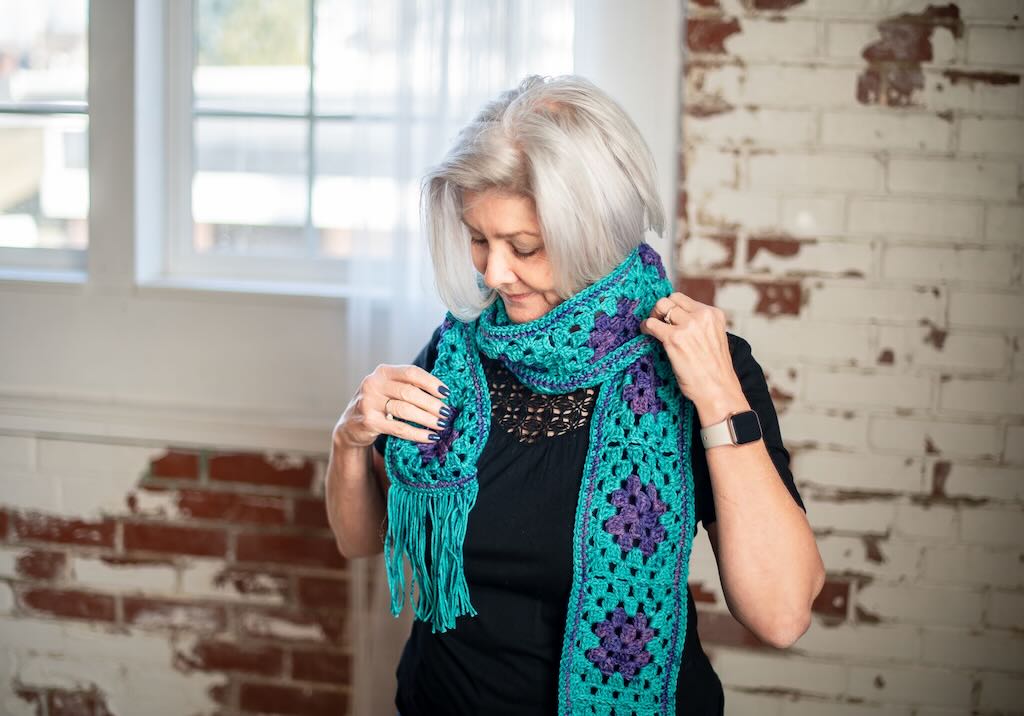
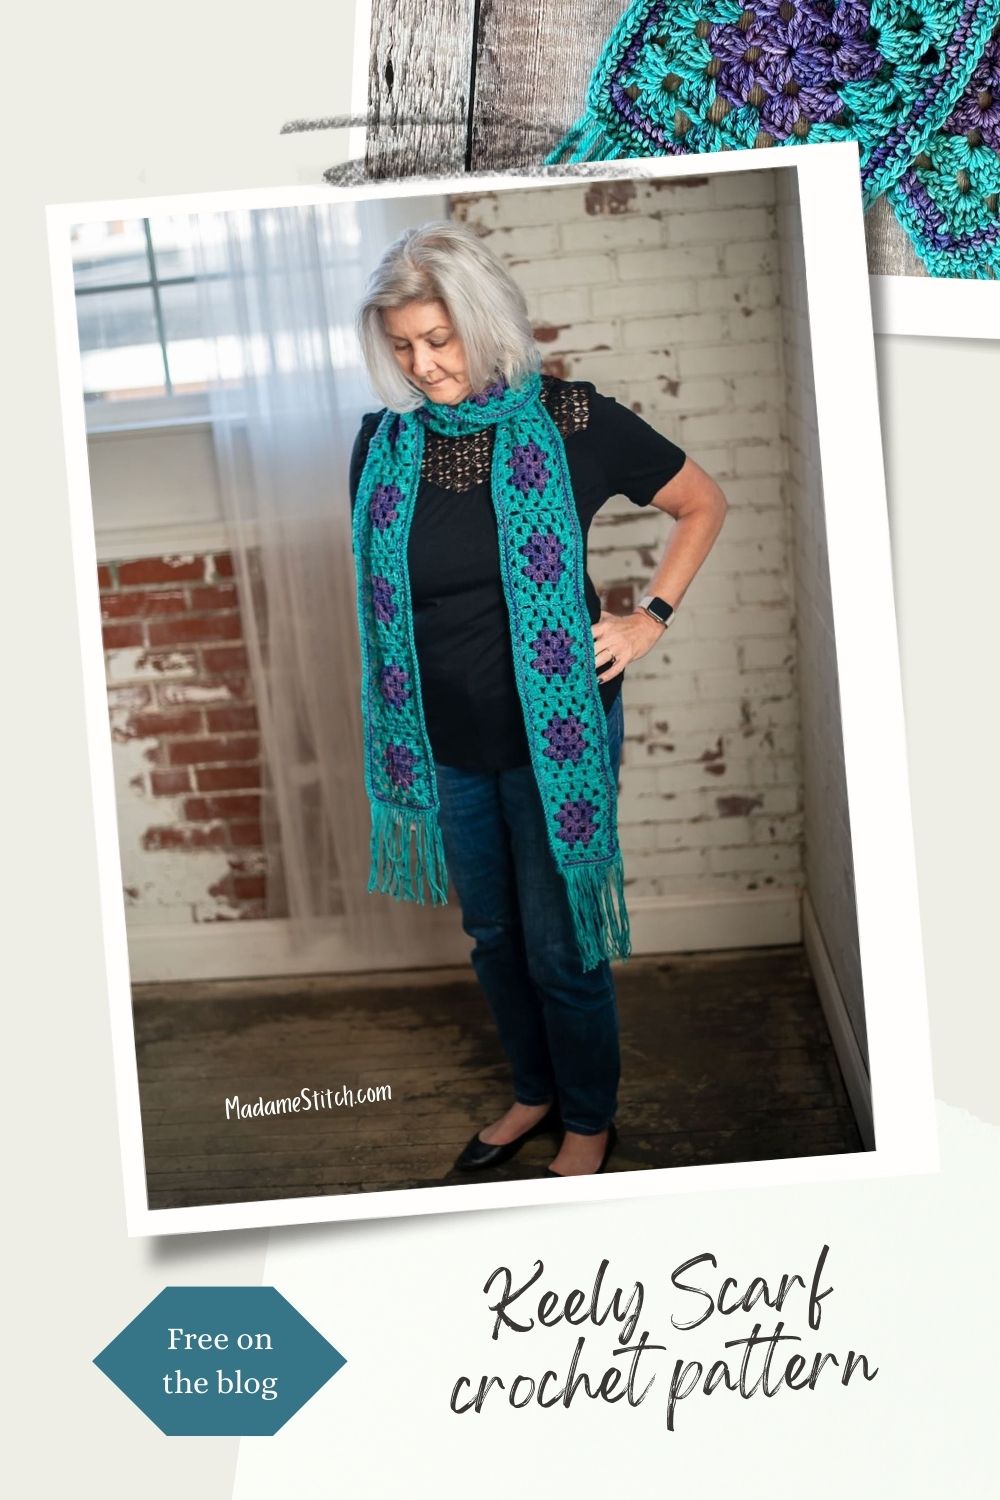
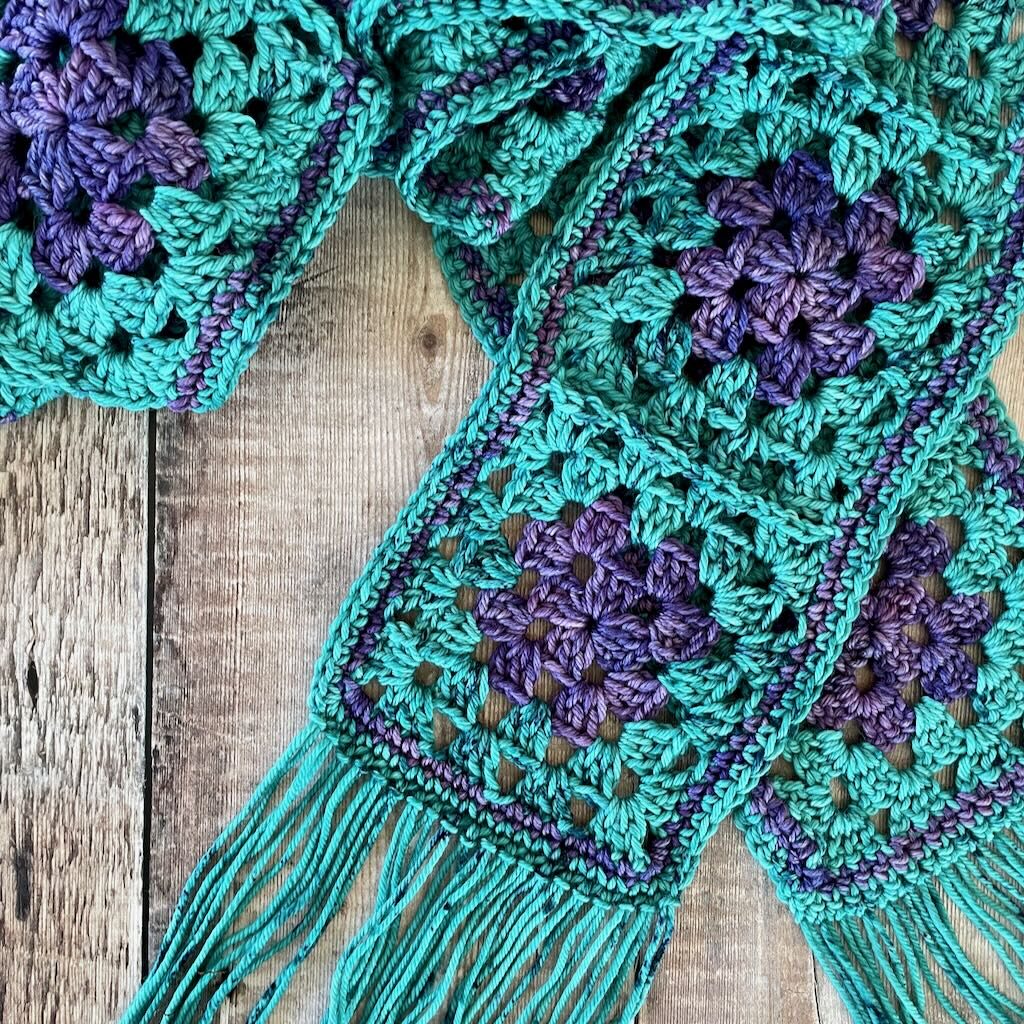
The Keely Scarf is a strip of 16 identical 4-round granny squares. A round of single crochet is worked all around the assembled squares to give the edges a finished look. You could stop there. But, I thought some fringe would add just the right look to my crochet granny square scarf!
With its unique patchwork design, this type of crochet granny square scarf can be customized to match your personal style, and the possibilities for color combinations are endless.
“Crochet is magical. It changes your mind, our attitude, and your mood.”
– Unknown
The Yarn
If you think a crochet granny square scarf is boring, think again! Just look at those gorgeous colors. You could make yours just like mine. Or, you could experiment with different color combinations or even make the whole thing in one striking color.
In my quest to keep reducing my yarn stash, I chose a pair of Neighborhood Fiber Co colors I picked up at the NY Sheep and Wool Festival in Rhinebeck.
I love treating myself to indie dyer yarn, don’t you?! The Studio Worsted I used in this crochet granny square scarf is an organic merino wool that’s simply to die for! The colors are always so vibrant; they just POP.
This yarn is ideal for those projects that need, even beg for, stitch definition. The Keely Scarf flows because the drape is absolutely perfect.
Of course, you can use any worsted weight yarn for your crochet granny square scarf. Yarn at any price point would work very well…it’s really up to you.
Why buy the PDF for the Keely crochet granny square scarf when it’s free here on the blog?
Sometimes you just want to have a PDF to download to your favorite device so you can take the project with you (this one is perfect for that). Or, you might want to print it out so you can make notes. Whatever the reason, here’s what you get in the PDF:
- Detailed written instructions
- Diagram showing how to join as you go (JAYGO)
- You won’t have to scroll through ads or bookmark this page (although you should).
Here’s what you need to make your very own crochet granny square scarf.
Thank you for staying on this post and reading my patterns right here on the blog, without copy/pasting. When you stay here to follow the free version of my pattern, I am compensated for my time and energy. This is a great, free way to support a designer. If you would like to save this for later, bookmark the page to save it in your mobile browser.
Yarn
Neighborhood Fiber Co. “Studio Worsted” 100% organic merino (200yds/4oz)
- Main color (MC) – Lucille Clifton (turquoise) – 2 hanks (special Rhinebeck 2021 color)
- Contrasting color (CC) – Remington (purple) – 1 hank
Hook
US size H-8 (5mm)
Finished size: Approx. 6″ wide x 81″ long without fringe
Gauge: Each square measures 5″ across.
Skill level: Confident beginner
Abbreviations – US crochet terminology
- beg – beginning
- ch – chain
- dc – double crochet
- rnd(s) – round(s)
- sc – single crochet
- sp – space
- st(s) – stitch(es)
Join-as-you-go (JAYGO) Slip Stitch Method
The join-as-you-go (JAYGO) method of connecting the squares makes it possible to add one square at a time to the larger piece through a series of slip stitch joins. Each square, after the first one, is joined to the previous square along one side while working Rnd 4.
Along the joining edge, the ch-1 spaces and the middle ch of both ch-3 corners are replaced by slip stitches that join the working square to the adjacent square. If you aren’t familiar with JAYGO, here’s a great tutorial on the Yarnspirations blog.
Tip: Keep the joining slip st loose enough that the squares lay flat at the seam.
Crochet granny square scarf Assembly
Instead of sewing the squares together, they are joined in one long strip as you complete each square. Make the first square and finish it off after Rnd 4. Starting with the second square (and for each of the remainder of the 16 squares), you’ll join along the 3rd side of the Rnd 4. No seaming necessary!
Written instructions for the Keely scarf
Thank you for staying on this post and reading my patterns right here on the blog, without copy/pasting. When you stay here to follow the free version of my pattern, I am compensated for my time and energy. This is a great, free way to support a designer. If you would like to save this for later, bookmark the page to save it in your mobile browser.
Pattern Notes
- The ch-1 at the beg of a rnd does not count as a st.
- The ch-3 at the beg of a rnd counts as a st.
- Do not turn after any rnd.
- Each rnd starts in the corner. When starting Rnd 3, always attach MC in a corner.
Pattern Instructions (Crochet granny square scarf)
Granny squares – Make 16
Note: Make all 16 CC square centers before moving on to Rnds 3 & 4.
With CC, ch 4, join with slip st to form ring.
Rnd 1: Ch 3, 2 dc in ring, ch 3, [3 dc in ring, ch 3] 3 times, join with slip st to beg ch-3, slip st in each st across to next corner sp and into corner sp to begin next rnd.
Rnd 2: Ch 3, (2 dc, ch 3, 3 dc) in corner sp, ch 1, [(3 dc, ch 3, 3 dc) in next corner sp, ch 1] 3 times, join with slip st to beg ch-3.
Fasten off and weave in ends.
For the first square:
Rnd 3: Attach MC to any corner, ch 3, (2 dc, ch 3, 3 dc) in corner sp, ch 1, 3 dc in ch-1 sp, ch 1, [(3 dc, ch 3, 3 dc) in next corner sp, ch 1, 3 dc in ch-1 sp, ch 1] 3 times, join with slip st to beg ch-3, slip st in each st across to next corner sp and into corner sp to begin next rnd.
Rnd 4: Ch 3, (2 dc, ch 3, 3 dc) in corner sp, (ch 1, 3 dc in ch-1 sp) twice, ch 1, [(3 dc, ch 3, 3 dc) in next corner sp, (ch 1, 3 dc in ch-1 sp) twice, ch 1] 3 times, join with slip st to beg st. Fasten off.
For squares 2-16:
Rnd 3: Attach MC to any corner, ch 3, (2 dc, ch 3, 3 dc) in corner sp, ch 1, 3 dc in ch-1 sp, ch 1, [(3 dc, ch 3, 3 dc) in next corner sp, ch 1, 3 dc in ch-1 sp, ch 1] 3 times, join with slip st to beg ch-3, slip st in each st across to next corner sp and into corner sp to begin next rnd.
Rnd 4: Ch 3, (2 dc, ch 3, 3 dc) in corner sp, (ch 1, 3 dc in ch-1 sp) twice, ch 1, (3 dc, ch 3, 3 dc) in next corner sp, (ch 1, 3 dc in ch-1 sp) twice, ch 1, 3 dc in next corner sp, ch 1.
(JAYGO side begins) slip st in corner sp of Adjacent Square, ch 1, 3 dc in corner sp of Working Square, [slip st in next ch-1 sp of Adjacent Square, 3 dc in ch-1 sp of Working Square] twice, slip st in next ch-1 sp of Adjacent Square, 3 dc in next corner sp of Working Square, ch 1, slip st in corner sp of Adjacent Square (JAYGO side complete).
Ch 1, 3 dc in corner sp of Working Square, (ch 1, 3 dc in next ch-1 sp) twice, ch 1, join with slip st to beg ch-3.
Fasten off and weave in ends.
Border
Note: You may work the Border in one color (if you have enough left over after cutting the fringe) or in 2 colors as in the sample.
To change colors at the end of Rnd 1, drop CC and pick up MC to finish the last step of the final sc. The slip st join will be worked in MC.
With right side facing and at one end of the scarf, attach CC to the left-hand corner sp.
Rnd 1: Ch 1, 3 sc in corner sp, sc in each st, ch-1 sp and seam across to the other end, 3 sc in corner sp, sc in each st and ch-1 sp across end to opposite corner sp, 3 sc in corner sp, sc in each st, ch-1 sp and seam across to the 1st end, 3 sc in corner sp, sc in each st and ch-1 sp across end of scarf, join with slip st to beg st.
Rnd 2: With MC, ch 1, sc in same st, 3 sc in next st (the middle st of the corner), sc in next st and in each st along the side to middle st of next corner, 3 sc in middle st of corner, sc in next st and in each st across end of scarf, 3 sc in middle st of corner, sc in next st and in each st along the side to middle st of next corner, 3 sc in middle st of corner, sc in next st and in each st across end of scarf, join with slip st to beg st.
Fasten off and weave in ends.
Fringe (optional)
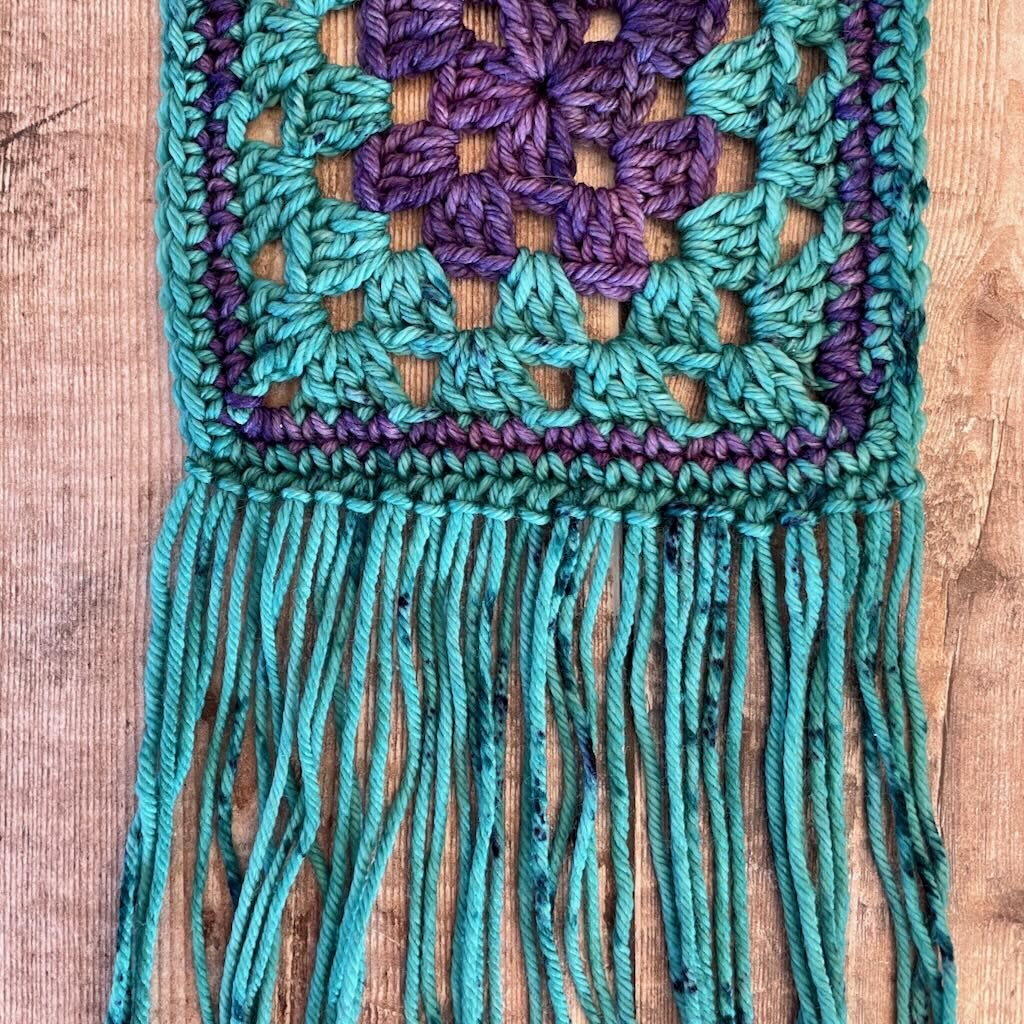
If you wish to put fringe on your scarf, cut 42 12” lengths of yarn. The sample fringe is in the MC. But you can choose either color to finish your scarf.
To attach fringe, take 1 length of yarn, fold it in half and attach it to a st along the end of the scarf. Including each corner at the end of the scarf, attach 21 pieces of fringe to each end of the scarf.
Your crochet granny square scarf is now ready to wear!
More Crochet Granny Square Scarf Patterns from MadameStitch…