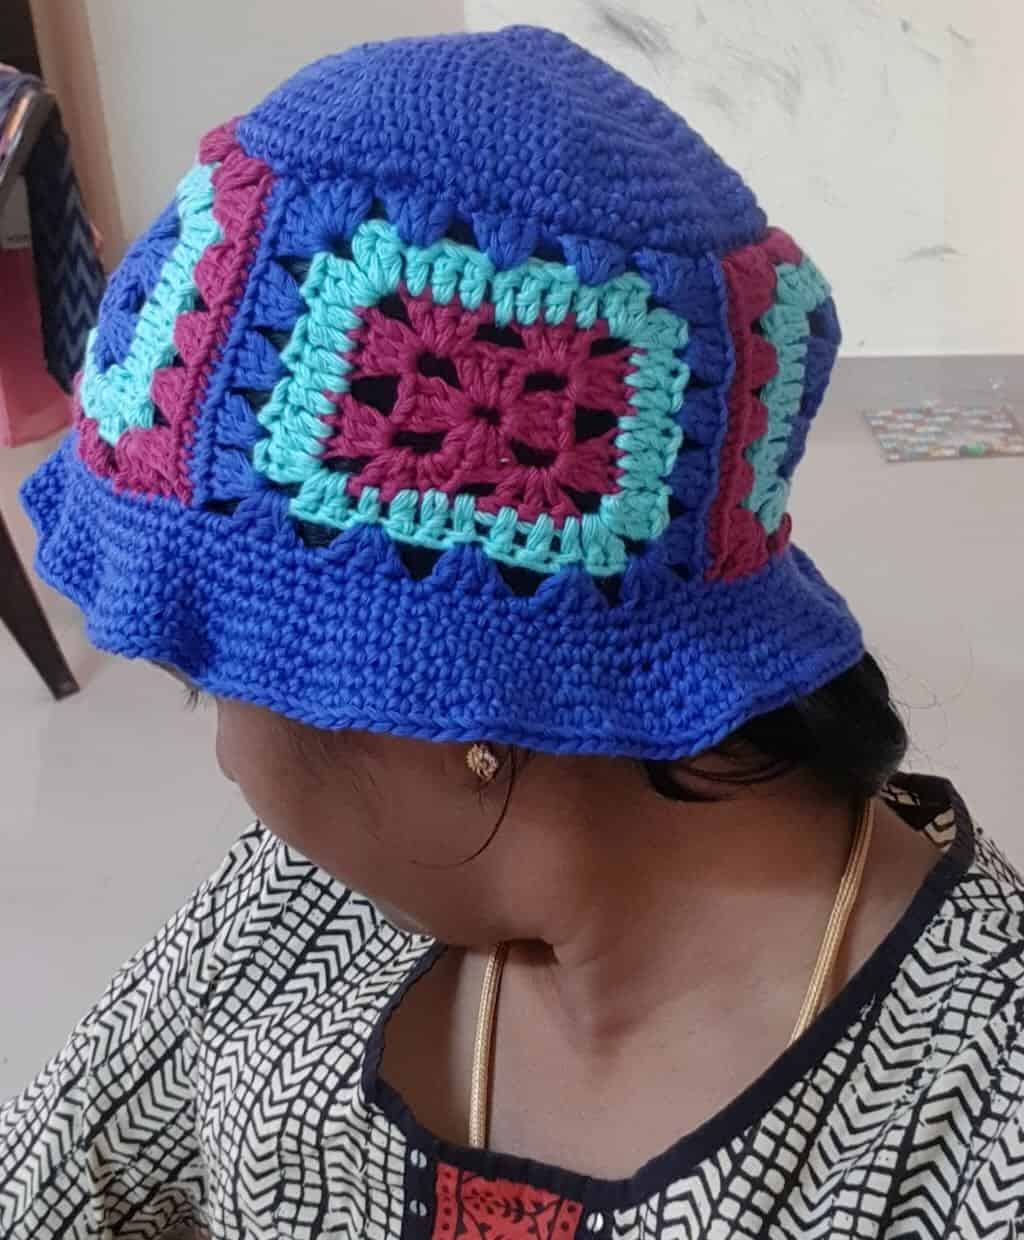
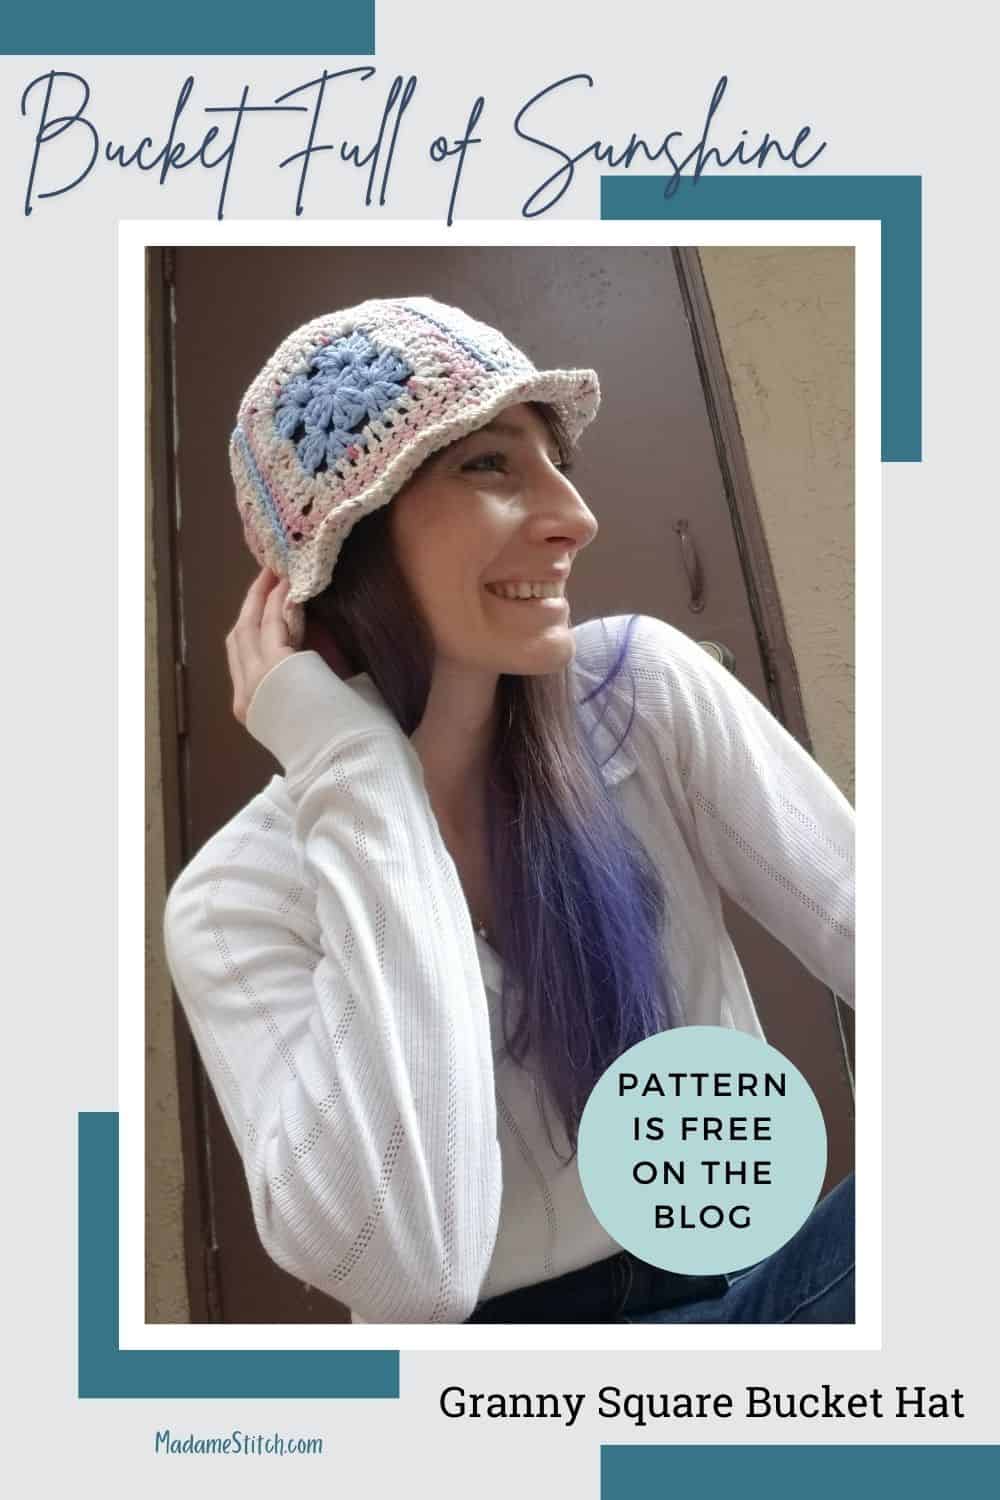
A granny square bucket hat adds whimsy and fun to any outfit
Step out in style wearing this vintage style granny square bucket hat. Its timeless appeal makes this the perfect accessory for any season. Put the Bucket Full of Sunshine Hat on your crochet project wish list.

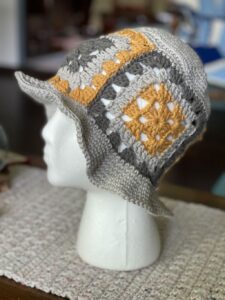
The Bucket Full of Sunshine Granny Square Bucket Hat
The granny square bucket hat is a very popular accessory right now. While it’s most often worn during the summer months against the hot sun, its versatility makes it a fashionable, trendy choice for just about any time of year. Wouldn’t you look fabulous in your very own hat?!
The granny square bucket hat has been around a long time. Popular in the 1970s, it was seen everywhere. Do a Google search for “granny square bucket hat in the 1970s” and you’ll see what I mean!
I’m so excited to share the Bucket Full of Sunshine hat because, not only does it feature my beloved granny squares, it’s such a fun hat to make and wear. Let’s talk about how I put together my version of the granny square bucket hat.
Design + Construction of this granny square bucket hat
While a bucket hat is a standard size and shape, lots of variations in design and construction exist for the granny square bucket hat.
I chose to make the granny squares the star of the show by featuring them in the band that forms the body of the hat. The granny squares are basic construction so, if you’ve made granny squares before, these should be pretty straightforward to crochet.
The top of the hat is a flat circle worked in continuous rounds. The band of granny squares is sewn to the top of the hat.
The granny square bucket hat is finished off with a brim that’s also worked in continuous rounds.

The Yarn
This post contains affiliate links. That means, if you purchase something using the link, I receive a small commission. You don’t pay any extra and your information is safe. Thanks for supporting my small business.
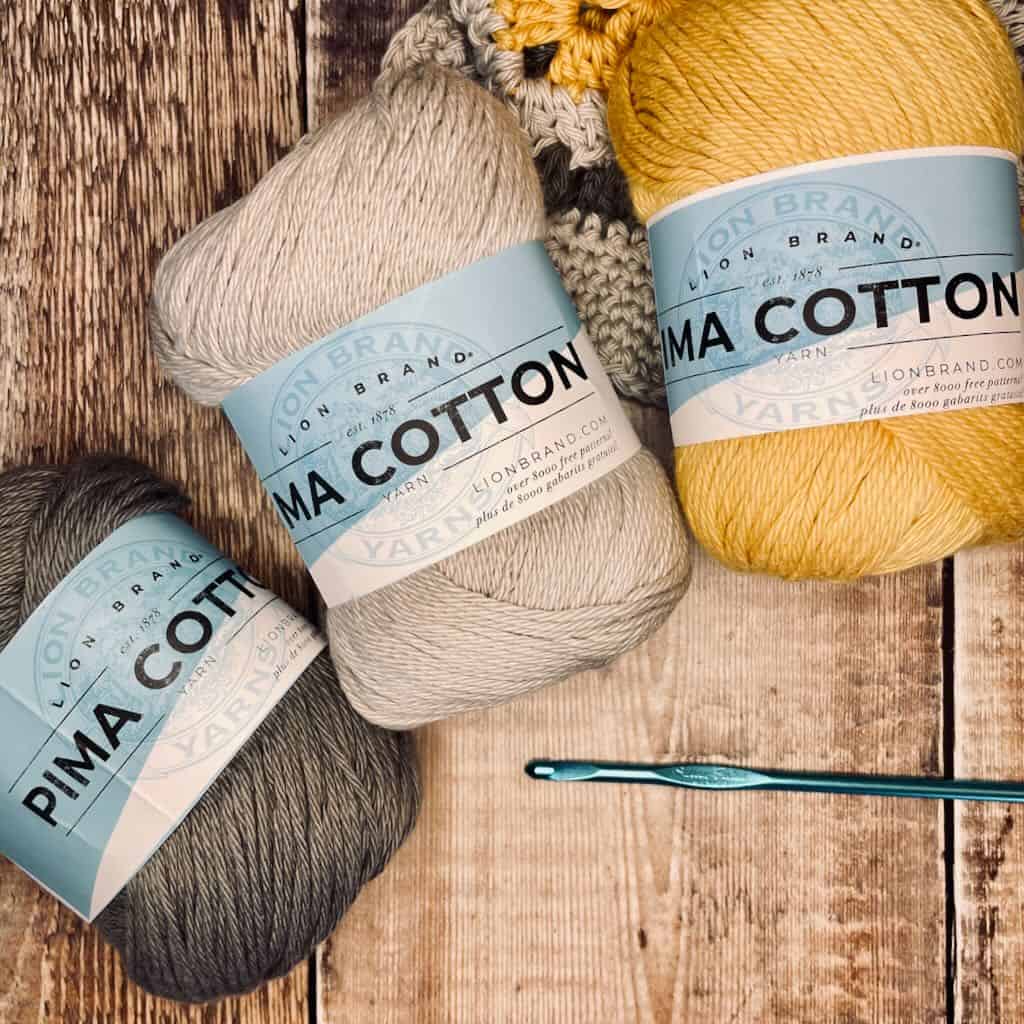
For my granny square bucket hat, I chose Lion Brand’s “Pima Cotton”. It’s wonderfully soft and easy to work with. It doesn’t split and fray, especially important if you need to frog (which you totally won’t!). You’ll need approx. 3.5-4oz total depending upon what size hat you choose to make.
While the hat can be made in just about any worsted weight yarn, I recommend sticking with worsted weight cotton. Substituting other fibers and blends will make it more difficult to achieve gauge and get the granny square bucket hat to fit properly.
The sample is worked in 3 colors – Stone (main color), Mineral Yellow and Pewter. You can choose to combine the colors in any way you like or make your granny square bucket hat in one solid color.
You’ll need 1 skein of each of the 3 colors. Or, for a solid color granny square bucket hat, have approx. 200-300yd (3.5-4oz) on hand depending upon which size you choose to make.
This pattern has been fully tested and vetted by a wonderful group of ladies. You can be sure that the pattern you receive is of the highest quality. Check out their work:

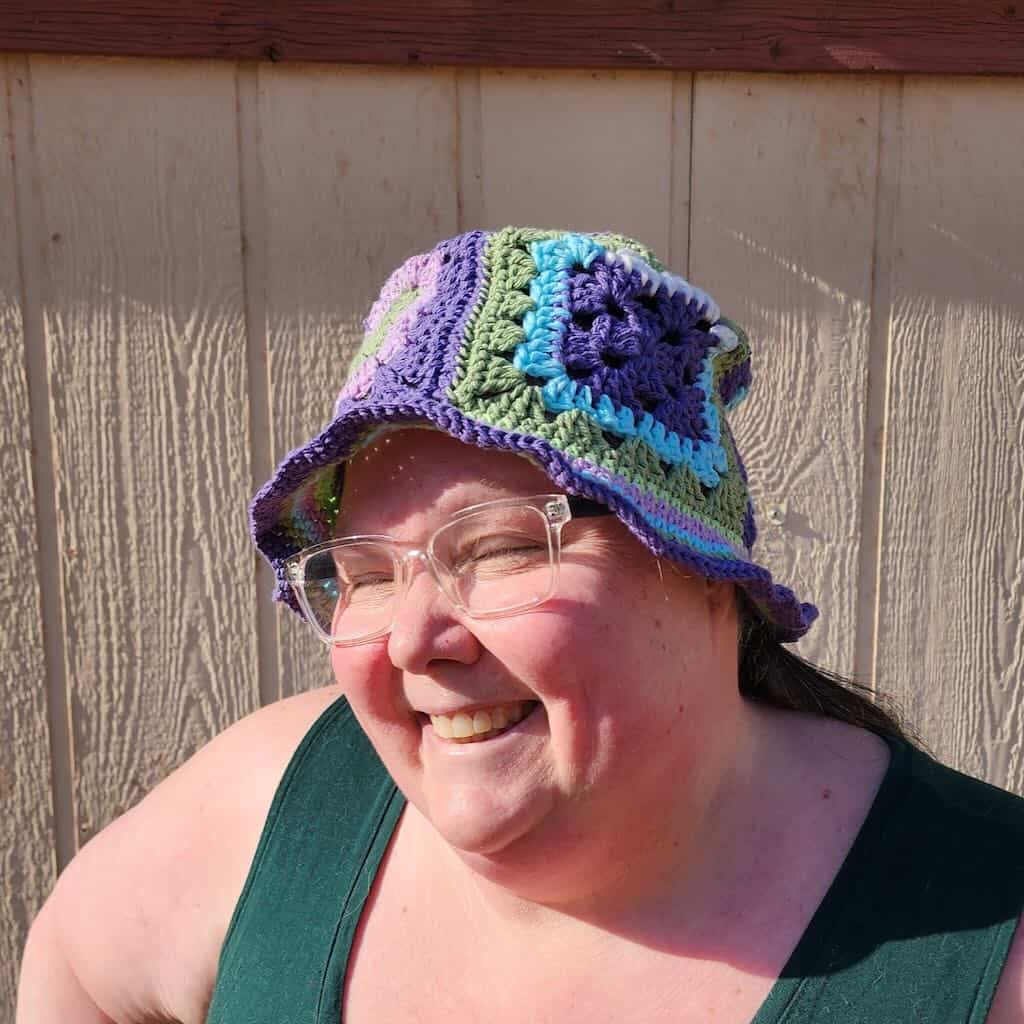


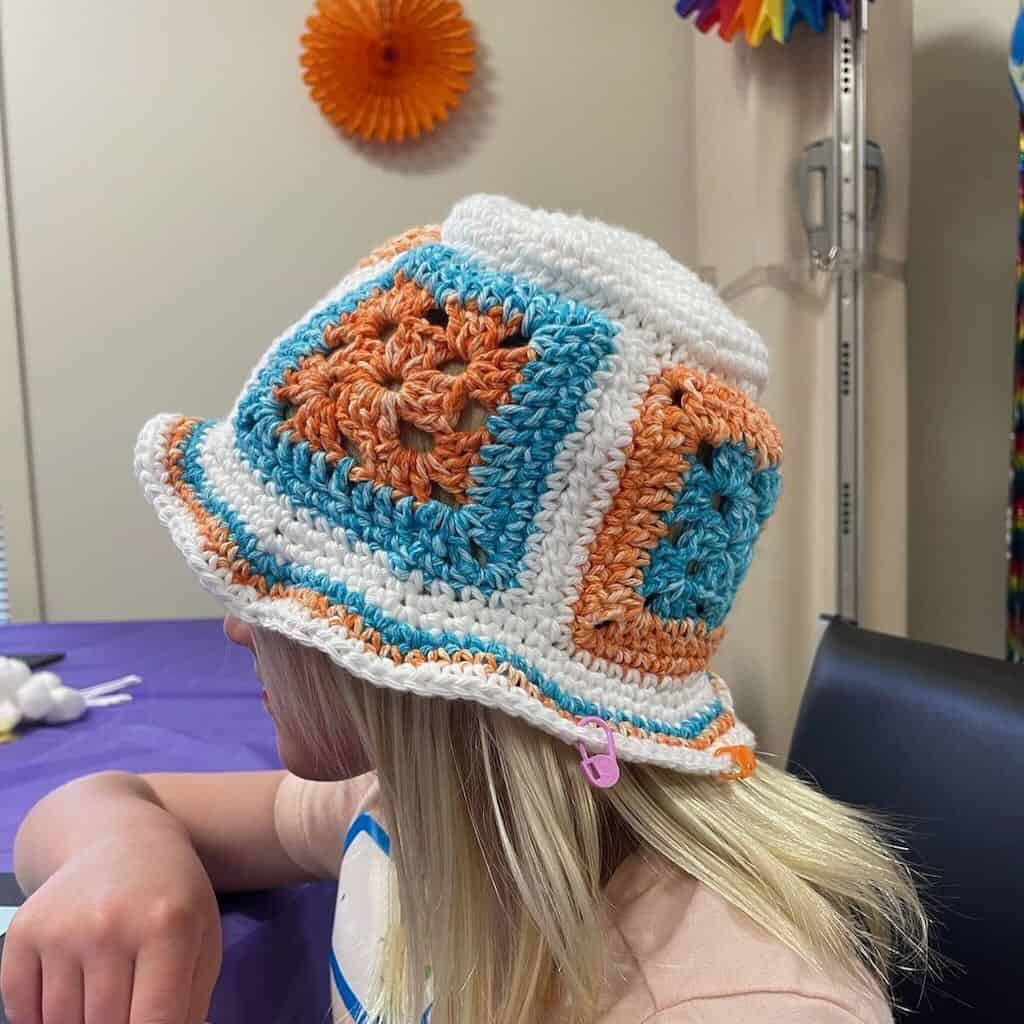
If you love crochet hats, you might also love making these:
The pattern is free here. So, why do I need to buy the PDF?
Every crocheter has her own style of setting up a project. Some are happy just working from the free pattern here on the blog.
But, if you prefer to work from a beautifully formatted, ad-free PDF that you can print out to make notes on or add to your favorite mobile device, purchasing the PDF is the way to go.
As an added bonus, the PDF includes a chart for each square so you can see exactly where the stitches are worked.
It’s available in all my shops. Simply click on the button for your favorite shop and you’re on your way!


The Bucket Full of Sunshine granny square bucket hat pattern
Yarn
Lion Brand “Pima Cotton” 100% cotton worsted weight (3.5oz/186yd; 100g/170m): 1 skein of each color:
- Main color (MC): Stone #149I
- Contrasting color A (CA): Mineral Yellow #159S
- Contracting color B (CB): Pewter #152B
Hook
US size H-8 (5mm)
Tools
- Blocking board and blocking pins
- Removable stitch markers
- Scissors
- Tape measure
- Tapestry needle for sewing seams and weaving in ends
Skill level: Advanced beginner/Intermediate
Abbreviations – US crochet terminology
- beg – beginning
- BLO – back loop only
- ch – chain
- dc – double crochet
- pm – place marker
- rnd(s) – round(s)
- RS – right side
- sc – single crochet
- sc inc – single crochet increase (2 sc in the same st)
- sk – skip
- sp – space
- st(s) – stitch(es)
- YO – yarn over
( ) – Work everything within the parentheses in the same st or sp
[ ] – Repeat everything within the brackets the indicated number of times
{ } – Repeat everything within the brackets the indicated number of times
Special Stitches used in the granny square bucket hat:
Granny stitch (GS) – 3 dc in the same sp
Stacked single crochet (STsc) – (This stitch is used at the beginning of a row or round to replace the traditional turning ch-3. It has the appearance of a dc.) – Insert hook in same st as loop, YO, draw up loop, YO, pull through 2 loops (bottom sc made), insert hook in left vertical bar of bottom sc, YO, draw up loop, YO, pull through 2 loops (top sc made).

Granny Square Bucket Hat Written Instructions
Thank you for staying on this post and reading my patterns right here on the blog, without copy/pasting. When you stay here to follow the free version of my pattern, I am compensated for my time and energy. This is a great, free way to support a designer. If you would like to save this for later, bookmark the page to save it in your mobile browser.
Pattern Notes
- Read through the entire pattern before starting. Mark everything that is specific to your chosen size.
- Where necessary, each size is indicated by a different color: Small, Medium, Large. If the section applies to all 3 sizes, the text will be in black.
- Do not turn after any rnd.
- Ch-1 at the beg of a rnd does not count as a st.
- You may substitute a ch-3 for the STsc used at the beg of the rnd in the granny square without altering the construction. If you do substitute, join at the end of the rnd in the top of the ch-3; the ch-3 will count as a dc.
- Weave in ends as you finish each component of the hat. You’ll thank me later!
Pattern Instructions
Top of hat
Note: Place a stitch marker in the 1st st of each rnd to keep track.
With MC, ch 2.
Rnd 1: 6 sc in the 2nd ch from hook. (6)
Rnd 2: Sc inc in each st around. (12)
Rnd 3: [Sc inc in the next st, sc in the next st] around. (18)
Rnd 4: [Sc inc in the next st, sc in the next 2 sts] around. (24)
Rnd 5: [Sc inc in the next st, sc in the next 3 sts] around. (30)
Rnd 6: [Sc inc in the next st, sc in the next 4 sts] around. (36)
Rnd 7: [Sc inc in the next st, sc in the next 5 sts] around. (42)
Rnd 8: [Sc inc in the next st, sc in the next 6 sts] around. (48)
Rnd 9: [Sc inc in the next st, sc in the next 7 sts] around. (54)
Rnd 10: [Sc inc in the next st, sc in the next 8 sts] around. (60)
For size Small, fasten off, set aside, and proceed to Granny Squares.
Continue here for sizes Medium and Large.
Rnd 11: [Sc inc in the next st, sc in the next 9 sts] around. (66)
Rnd 12: [Sc inc in the next st, sc in the next 10 sts] around. (72)
Rnd 13: [Sc inc in the next st, sc in the next 11 sts] around. (78)
Rnd 14: [Sc inc in the next st, sc in the next 12 sts] around. (84)
For size Medium, fasten off, set aside, and proceed to Granny Squares.
Continue here for Large.
Rnd 15: [Sc inc in the next st, sc in the next 13 sts] around. (90)
For size Large, fasten off, set aside, and proceed to Granny Squares.
Granny Squares
Make 4 total in the following color combinations for your selected size.
Small
- Make 2: Rnds 1 & 2 in CA, Rnds 3 & 4 in CB
- Make 2: Rnds 1 & 2 in CB, Rnds 3 & 4 in CA
Medium
- Make 2: Rnds 1 & 2 in CA, Rnd 3 in MC, Rnd 4 in CB
- Make 2: Rnds 1 & 2 in CB, Rnd 3 in MC, Rnd 4 in CA
Large
- Make 2: Rnds 1 & 2 in CA, Rnd 3 in MC, Rnds 4 & 5 in CB
- Make 2: Rnds 1 & 2 in CB, Rnd 3 in MC, Rnds 4 & 5 in CA
Begin here for all sizes.
Ch 4, join with slip st to form ring.
Rnd 1: (STsc, 2 dc) in the ring, ch 3, (GS, ch 3) 3 times, join with slip st to beg st. (4 GS, 4 ch-3 sp)
Rnd 2: Slip st in each st to corner sp and into corner sp, (STsc, 2 dc, ch 3, 3 dc) in corner sp, ch 1, [(GS, ch 3, GS) in next corner sp, ch 1] 3 times, join with slip st to beg st. (8 GS, 4 ch-1 sp, 4 ch-3 sp) Fasten off.
Continue here for size Small squares.
Rnd 3: Attach next color to any corner sp, (STsc, dc, ch 2, 2 dc) in the same sp, dc in the next st and in each st and ch sp across to next corner sp, [(2 dc, ch 2, 2 dc) in corner sp, dc in the next st and in each st and ch sp across to next corner sp] 3 times, join with slip st to beg st. (44 dc, 4 ch-2 sp)
Rnd 4: Continuing with the same color, ch 1, sc in the same st and each st along each side of the square, working 3 sc in each ch-2 sp, join with slip st to beg st. (56 sc)
Fasten off and proceed to Body of Hat once all 4 granny squares are complete.
Continue here for size Medium squares.
Rnd 3: Attach next color to any corner sp, (STsc, dc, ch 2, 2 dc) in the same sp, dc in the next st and in each st and ch sp across to next corner sp, [(2 dc, ch 2, 2 dc) in corner sp, dc in the next st and in each st and ch sp across to next corner sp] 3 times, join with slip st to beg st. (44 dc, 4 ch-2 sp) Fasten off.
Rnd 4: Attach next color to any corner sp, (STsc, 2 dc, ch 3, GS) in the same corner sp, [ch 1, sk 2 sts, GS in the next st] 3 times, ch 1, {(GS, ch 3, GS) in the next corner sp, [ch 1, sk 2 sts, GS in the next st] 3 times, ch 1} 3 times, join with slip st to beg st. (20 GS, 16 ch-1 sp, 4 ch-3 sp)
Fasten off and proceed to Body of Hat once all 4 granny squares are complete.
Continue here for Large.
Rnd 3: Attach next color to any corner sp, (STsc, dc, ch 2, 2 dc) in the same sp, dc in the next st and in each st and ch sp across to next corner sp, [(2 dc, ch 2, 2 dc) in corner sp, dc in the next st and in each st and ch sp across to next corner sp] 3 times, join with slip st to beg st. (44 dc, 4 ch-2 sp)
Rnd 4: Attach next color to any corner sp, (STsc, 2 dc, ch 3, GS) in the same corner sp, [ch 1, sk 2 sts, GS in the next st] 3 times, ch 1, {(GS, ch 3, GS) in the next corner sp, [ch 1, sk 2 sts, GS in the next st] 3 times, ch 1} 3 times, join with slip st to beg st. (20 GS, 16 ch-1 sp, 4 ch-3 sp)
Rnd 5: Continuing with the same color, ch 1, sc in the same st and in each st and ch-1 sp along each side of the square, working 3 sc in each ch-3 sp, join with slip st to beg st. (88 sc)
Fasten off and proceed to Body of Hat once all 4 granny squares are complete.
Note: You may need to block the granny squares before sewing them together. My preferred method is steam blocking. However, you can use any method you like for the yarn you’ve chosen. To get your chosen finished hat size, be sure your granny squares are the size listed in the chart.
Body of Hat
To form the body of the hat, sew the 4 granny squares end to end in a circle. Sew the seam from middle sc or ch to middle sc or ch at both corners. This will ensure the correct st count when adding the brim.
Step 1: Hold 2 squares with RS together. Whip stitch through BLO. Note: If you whip stitch through both loops, your hat may be slightly smaller around.)
Step 2: Add the 3rd and 4th squares to the strip in the same manner.
Step 3: With RS held together, sew the 1st and 4th squares together to form a ring of granny squares.
Weave in ends left by seaming.
Attaching the squares to top of hat
Step 1: Using stitch markers, mark 4 points around the edge of the top of the hat. The stitch markers should have approximately the same number of sts between them. However, you may have to adjust to get as close to equal distance as possible.
Step 2: With RS held together, line up the markers on the top of the hat with the 4 seams in the circle of granny squares. Use the markers to connect the 2 pieces together at the 4 points.
Step 3: Attach MC through BLO (the stitches on the outer edges of the squares). Using a slip stitch seam, slip st all the way around the seam, joining with a slip st to the beg st to finish the seam.
Note: If you’d like a more invisible seam between the top of the hat and the ring of grannies, slip st the seam through BOTH loops of both pieces. Fasten off and weave in ends.
Brim
Notes
- The brim is worked in continuous rnds just like the top of the hat. Place a marker in the 1st st of each rnd to keep track of the beg of the rnd.
- The placement of the increases is offset from the rnd before to prevent bumps in the edge of your brim.
- Count after each rnd or 2 to ensure your st count remains accurate.
Instructions for size Small
On the opposite edge of the ring of granny squares, attach MC to middle st of any square.
Rnd 1: Ch 1, sc in the same st and in each st and all 4 seam ends around. (56)
Rnd 2: [Sc inc in the next st, sc in the next 4 sts] 10 times, sc in the last 6 sts. (66)
Rnd 3: Sc in the next 2 sts, [sc inc in the next st, sc in the next 5 sts] 10 times, sc inc in the next st, sc in the last 3 sts. (77)
Rnd 4: [Sc inc in the next st, sc in the next 6 sts] 11 times. (88)
Rnd 5: Sc in the next 3 sts, [sc inc in the next st, sc in the next 7 sts] 10 times, sc inc in the next st, sc in the last 4 sts. (99)
Rnd 6: [Sc inc in the next st, sc in the next 8 sts] 11 times. (110)
Rnd 7: Sc in the next 4 sts, [sc inc in the next st, sc in the next 9 sts] 10 times, sc inc in the next st, sc in the last 5 sts, join with a slip st to beg st to finish off. (121)
Instructions for sizes Medium and Large
On the opposite edge of the ring of granny squares, attach MC to middle st of any square.
Rnd 1: Ch 1, sc in same st and in each st, ch-1 sp and all 4 seam ends around. (88)
Rnd 2: [Sc inc in the next st, sc in the next 7 sts] 11 times. (99)
Rnd 3: Sc in the next 4 sts, [sc inc in the next st, sc in the next 8 sts] 10 times, sc inc in the next st, sc in the last 4 sts. (110)
Rnd 4: [Sc inc in the next st, sc in the next 9 sts] 11 times. (121)
Rnd 5: Sc in the next 6 sts, [sc inc in the next st, sc in the next 10 sts] 10 times, sc inc in the next st, sc in the last 4 sts. (132)
Rnd 6: [Sc inc in the next st, sc in the next 11 sts] 11 times. (143)
Rnd 7: Sc in the next 6 sts, [sc inc in the next st, sc in the next 12 sts] 10 times, sc inc in the next st, sc in the last 6 sts, join with a slip st to beg st to finish off. (154)
Fasten off and weave in all ends that remain.
Your granny bucket hat is complete. Enjoy wearing it!


4 Comments